Brand: TOSHIBA
Category: Other
Document Type: Manual
Language: EN
Brand: TOSHIBA
Category: Other
Document Type: Manual
Language: EN
Uploaded: Nov. 21, 2025, 8:38 p.m.
Manual Publish Date: 2016-10-01
Symbols in this manual:
General users and administrators.
Dual Scan Document Feeder is referred to as "DSDF".
| Message | Problem Description | Corrective Action |
|---|---|---|
| Close *** cover. | The cover indicated by "***" is open. | Check the cover on the touch panel and close it. |
| Misfeed in *** | Paper misfeed has occurred inside the equipment. | Remove the misfed paper following the guidance displayed on the touch panel. P.18 "Clearing a Paper Misfeed" |
| Install new *** toner cartridge | No toner is left. (For color models, "***" indicates the applicable color.) (The colors are shown abbreviated when two or more toners are running out: Y: yellow, M: magenta, C: cyan, and K: black) | See the color indication on the touch panel and replace the toner cartridge. (About another 2000 copies can be made after this message appears. The number varies depending on the conditions of copying.) P.55 “Replacing a Toner Cartridge" |
| *** Toner Not Recognized Check the toner cartridge | The toner cartridge indicated by "***" is not installed at all or improperly so. | Install the toner cartridge correctly. P.55 "Replacing a Toner Cartridge" |
| The terminal of the toner cartridge is stained. | Wipe the terminal with a soft cloth. | |
| The recommended toner cartridge is not being used. | Use the recommended toner cartridge. P.55 "Replacing a Toner Cartridge" | |
| Check paper size setting on control panel for drawer N. Check the direction or size of the paper. | Paper misfeed has occurred because of the mismatch between the paper size placed in drawer N and the size registered for the drawer N in the equipment. | Just removing the misfed paper does not prevent another paper from being misfed. Be sure to correctly register the paper size in the equipment. P.46 "Clearing paper misfeeds caused by a wrong paper size setting" |
| Paper for left drawer can be added | No paper remains in the left tray of the Tandem Large Capacity Feeder. | You can add paper while the copy function is in operation. Open the drawer of the Tandem Large Capacity Feeder and add paper in the left drawer. For details, refer to Chapter 1 of the Copying Guide. |
| TRU Box needs to be replaced (Please make a service call) | The TRU box requires replacement by a service technician. | Contact your service representative. |
| Wait (Performing Self-check) | The equipment is undergoing maintenance to keep its imaging quality. | Wait until the adjustment is completed and the message disappears. |
| Adjusting. Wait until printing resumed. | The equipment is performing the adjustment of its inside temperature. | Wait until the adjustment is completed and the message disappears. |
| Check the original and set it again | The original is misfed inside of the ADF. | Remove the misfed original following the guidance on the touch panel. P.22 "DSDF (Upper)" |
| The direction or the size of the original and then replace it on the ADF. Then reattempt the operation. | Check the direction and the size of the original and then replace it on the ADF. Then reattempt the operation. | |
| Change direction of original | The orientation of the original placed on the original glass is incorrect. | Change the orientation of the original by 90 degrees and place it on the original glass. |
| Time for Developer (*) Maintenance. (The colors are shown abbreviated: Y: yellow, M: magenta, C: cyan and K: black.) | Little developer remains. "*" indicates the color of the developer. | Contact your service representative. |
| Cannot print this paper size Select the other drawer. | Printing was attempted but failed. The paper could not be output on the tray selected for the paper output because of a mismatch between the paper size and the tray. | Delete the failed print job, select the appropriate tray for the paper, and perform printing again. For the restrictions of the paper type and the receiving trays, refer to the Quick Start Guide. |
| Cannot print this paper type Set the other paper type | Printing was attempted but failed. The paper could not be output in the tray selected because of a mismatch between the paper type and the tray. (Special paper or thick 4 paper tried to be output on the lower receiving tray of MJ-1111/ MJ-1112.) | Delete the failed print job, select the appropriate tray for the paper, and perform printing again. |
| Change from this mode Count over, cannot store anymore | The number of originals to be scanned has exceeded the limit specified with the department or user code during scanning. | Ask your administrator for details of setting the limit for the number of copies. |
| Ready(*** Toner Not Recognized) Check the toner cartridge | The toner cartridge indicated by "***" is not installed at all or improperly so. | Install the toner cartridge correctly. P.55 "Replacing a Toner Cartridge" |
| The terminal of the toner cartridge is stained. | Wipe the terminal with a soft cloth. | |
| The recommended toner cartridge is not being used. | Use the recommended toner cartridge. P.55 "Replacing a Toner Cartridge" | |
| Ready (Saddle Stitch Tray Full) | The saddle stitch tray of the finisher is full of paper. | Remove the paper from the saddle stitch tray of the finisher. |
| Ready (Check Saddle Stitch Stapler) | A staple jam has occurred in the stapler of the saddle stitch unit or the staple sheet has not been fed sufficiently. | Remove the top staple sheet. P.53 "Saddle Stitch unit" |
| Ready (Check Saddle Stitch Stapler) | Staples in the stapler of the saddle stitch unit have almost run out or have actually done so. | Replace the staple case of the saddle stitch unit if stapling is not performed for an output document even though the stapling function has been selected. P.66 "Saddle Stitch unit" |
| Ready (Check Stapler) | Staple jam has occurred in the stapler of the finisher. | Remove the jammed staples. P.51 "Clearing a Staple Jam" |
| Ready (Check Stapler) | Staples in the stapler of the finisher have almost run out or have actually done so. | Replace the staple case of the finisher if stapling is not performed for an output document even though the stapling function has been selected. P.65 "Refilling With Staples" |
| Ready (Hole Punch Dust Bin is Full) | Hole punch dust bin is full of paper punchings. | Remove the paper punchings. P.69 "Cleaning the Hole Punch Dust Bin” |
| Ready (Finisher Full) | The receiving tray of the finisher is full of paper. | Remove the paper from the receiving tray of the finisher. |
| Ready (Inner Tray Full) | The exit tray of the equipment is full of paper. | Remove the paper from the exit tray of the equipment. |
| Cannot copy Check Department Counter | The number of originals to be scanned has exceeded the limit specified with the department code during scanning. | Ask your administrator for details of setting the limit for the number of copies. |
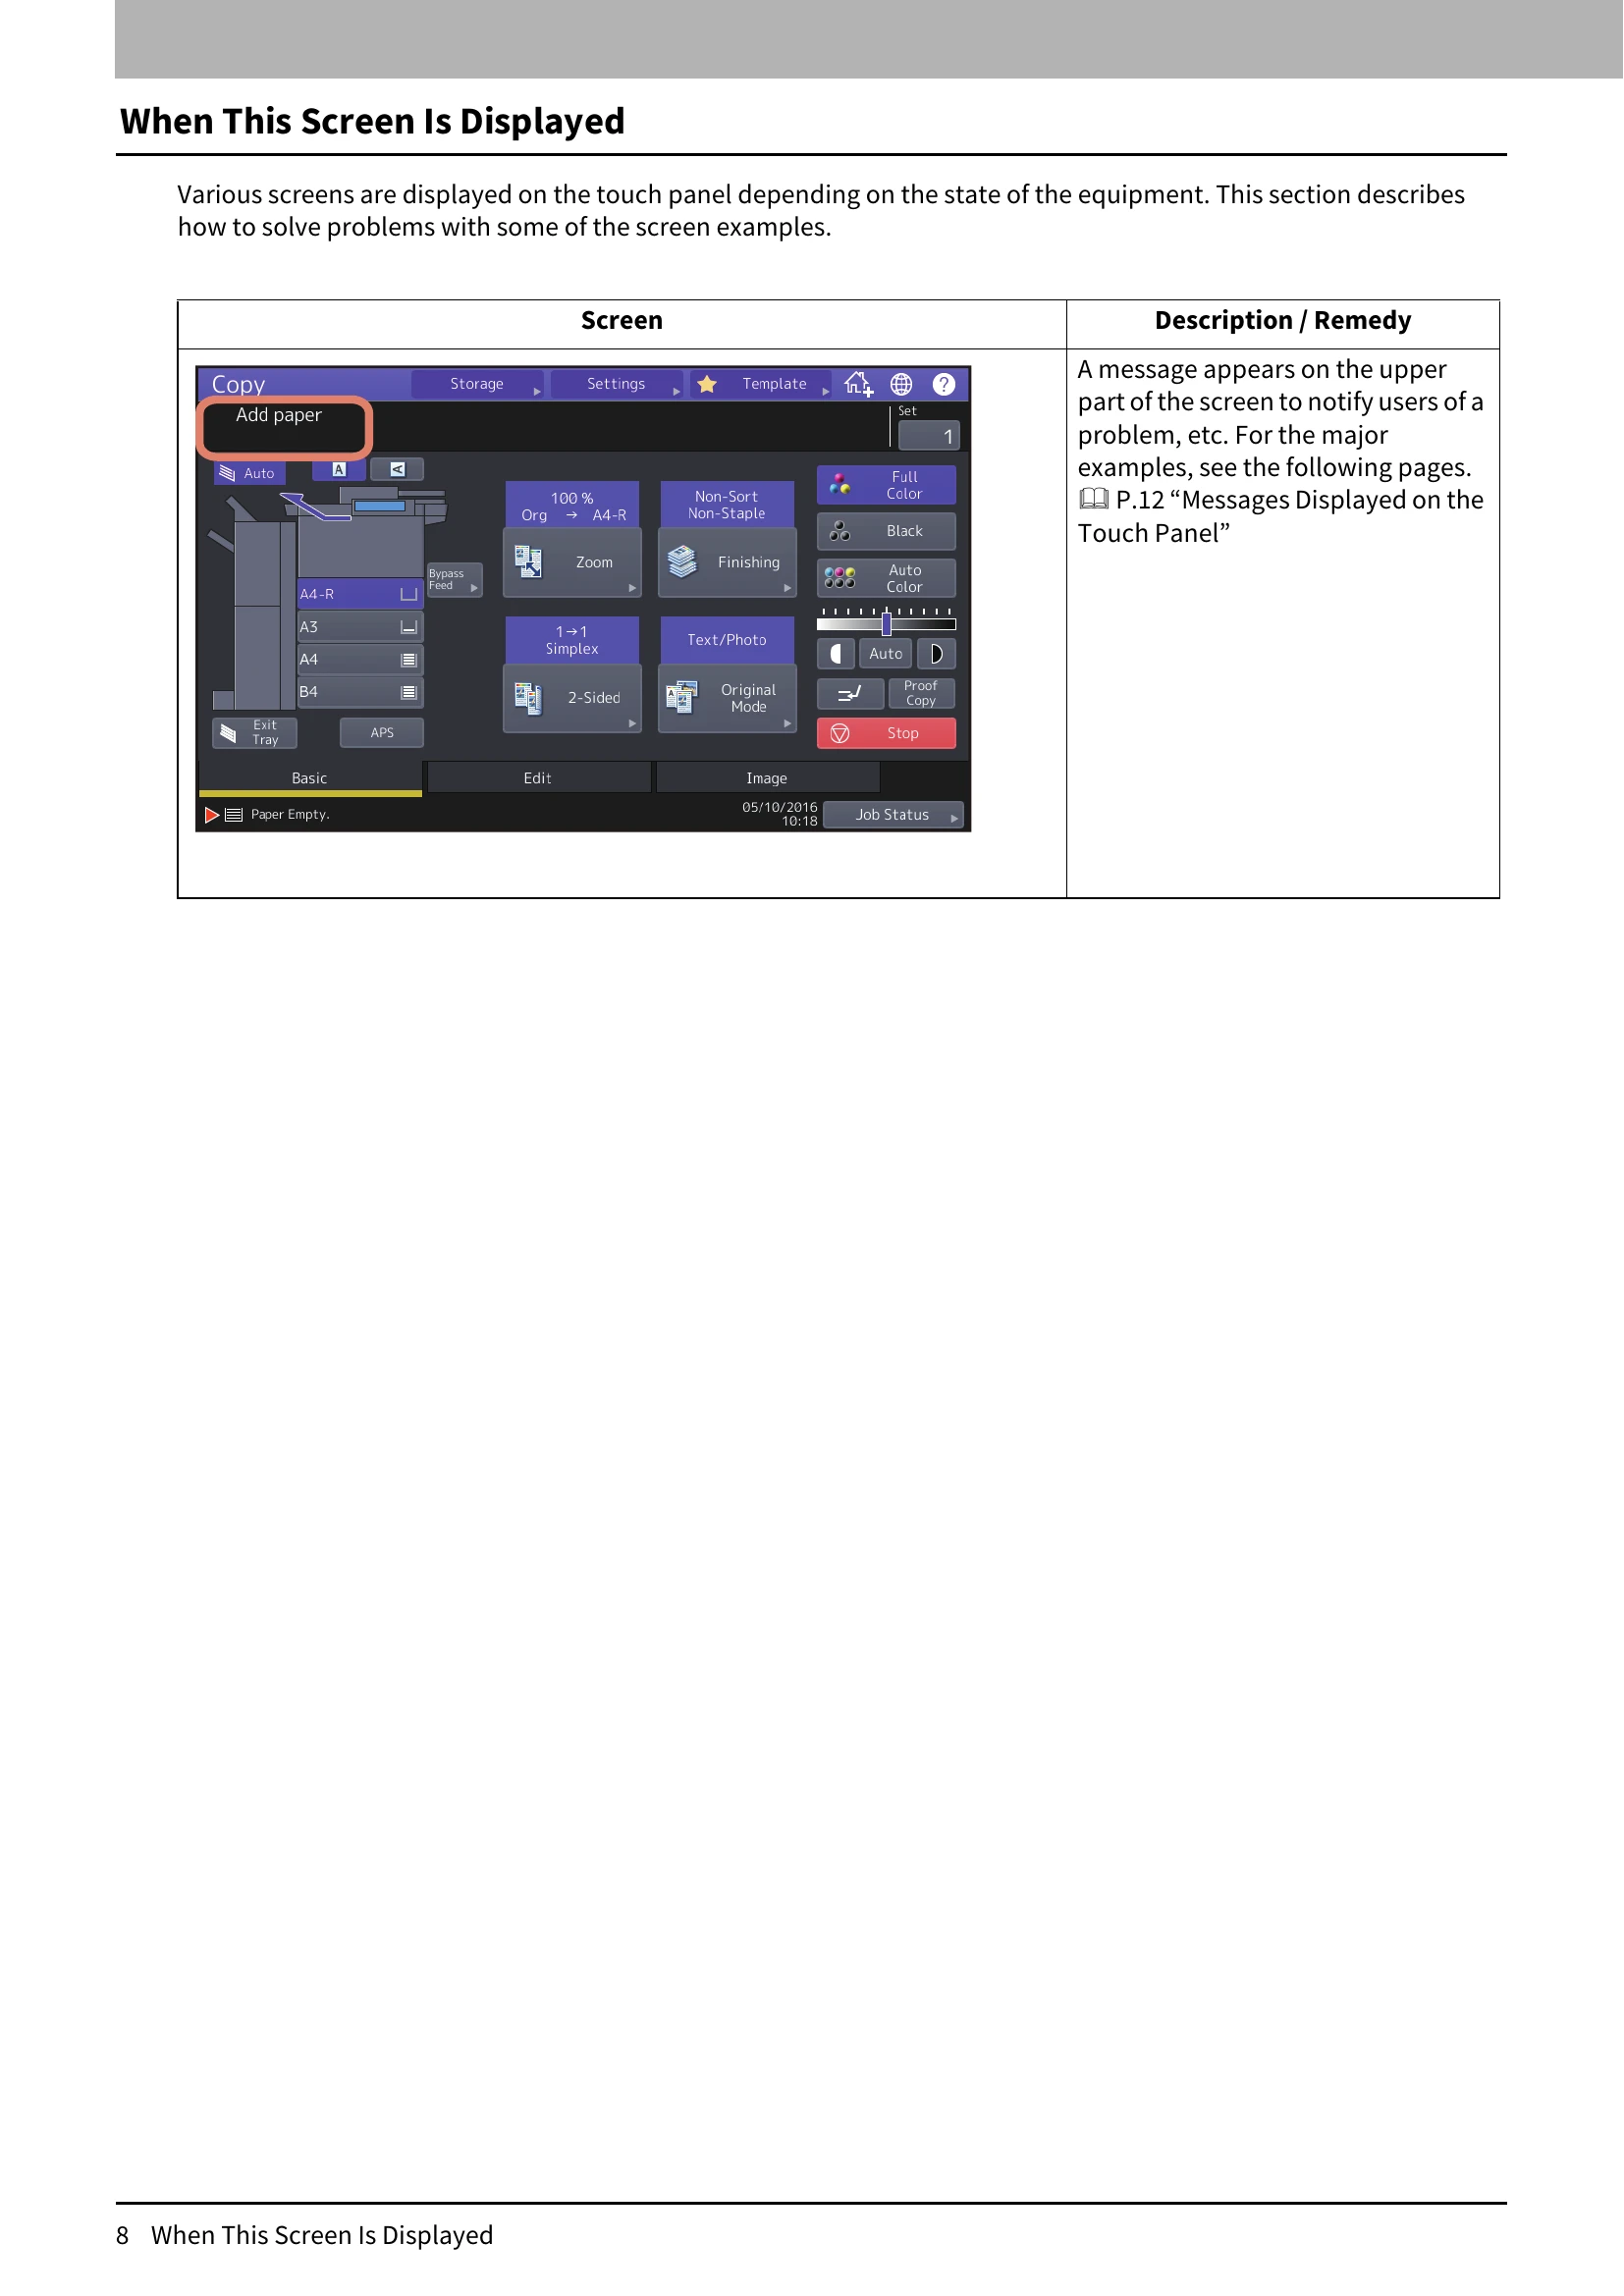
| Add paper | No paper is left in a drawer or on the bypass tray. | Set paper in the drawer or on the bypass tray. The touch panel indicates which drawer (or the bypass tray) has no paper. To set paper, refer to the Copying Guide. |
| Call for Service | The equipment requires adjusting by a service technician. | Contact your service representative with the error code displayed on the right side of the touch panel. ▲ WARNING Never attempt to repair, disassemble or modify the equipment by yourself. You could cause a fire or get an electric shock. Always contact your service representative for maintenance or repair of the internal parts of the equipment. |
| Examine stapler in the saddle Stitch unit | Staple jam has occurred in the stapler of the saddle stitch unit. | Remove the jammed staples. P.53 "Saddle Stitch unit" |
| Check staple cartridge in the saddle stitch unit | Staples in the stapler of the saddle stitch unit have almost run out or have actually done so. | Replace the staple case of the saddle stitch unit if stapling is not performed for an output document even though the stapling function has been selected. P.66 "Saddle Stitch unit" |
| Check staple cartridge | Staples in the stapler of the finisher have almost run out or have actually done so. | Replace the staple case of the finisher if stapling is not performed for an output document even though the stapling function has been selected. P.65 "Refilling With Staples” |
| Examine Stapler | Staple jam has occurred in the stapler of the finisher. | Remove the jammed staples. P.51 "Clearing a Staple Jam" |
| Saving energy - press Energy Saver button. | The equipment has entered into the energy saving mode since it has not been used for a certain time. | Press [ENERGY SAVER] button to clear the energy saving mode. |
| Change Drawer to Correct Paper Size | No paper suitable for the original is set. | Place the suitable size paper for the original in the drawer. |
| The size of the original is not detected correctly because the original is sent from the ADF at a skew. | Replace the original while aligning the side guides of the ADF to its width so that it will be placed straight. | |
| Time for periodic maintenance | The equipment requires inspection and maintenance by a service technician. | Contact your service representative for maintenance. |
| Power Failure | A job was interrupted by a power failure or some other reason. | The print or fax job may be incomplete. Press [Job Status] to check whether any jobs are unfinished. |
| Erasing Data | The Data Overwrite Enabler is clearing the data. | This message is displayed if the Data Overwrite Enabler is installed. You can operate the equipment while the message is displayed. To clear the messages, press the [FUNCTION CLEAR] button twice. |
| Check paper size setting on control panel for Bypass. Check the direction or size of the paper. | Paper misfeed has occurred because of a mismatch between the paper size placed in the bypass tray and the size registered for the bypass tray in the equipment. | Register the paper size correctly. Just removing the misfed paper does not prevent another paper from being misfed. P.46 "Clearing paper misfeeds caused by a wrong paper size setting” |
| Set the paper on the bypass tray again. | The paper placed on the bypass tray misfed. | Remove the misfed paper and set the paper again. |
| Check the direction or size of the paper on the bypass tray and press START | The direction or the size of the paper placed on the bypass tray is incorrect. | Check the direction and the size of the paper and then replace it on the bypass tray. |
| The side guides of the bypass tray do not fit the paper length. | Align the side guides of the bypass tray to the paper length. | |
| Reboot the machine | A system-related trouble has occurred. | Press the [POWER] button, and then [Shutdown] or [Restart] on the touch panel. |
| Toner near Empty (***) | Toner is running out. "***" indicates the color. (The colors are shown in abbreviations when two or more toners are running out: Y: yellow, M: magenta, C: cyan, and K: black) | Some toner is still left in the toner cartridge while this message is displayed. You do not have to replace the toner cartridge yet. Check the color of the toner on the touch panel and prepare the toner cartridge. (About another 2000 copies can be made after this message appears. Depending on the conditions of copying, this message may not appear even when the toner cartridge is near empty.) Note • Replace the toner cartridge after the toner has completely run out. [Install new *** toner cartridge] is displayed at that time. • If you want to replace the toner cartridge though some toner is still left, follow the procedure below: P.58 "Replacing a "Near Empty" toner cartridge" • Black and white print is available while the other colors has run out. Neither color nor black and white print can be done when the black toner has run out. |
| Confirm waste toner box is attached and close waste toner box cover | The waste toner box is not securely attached or the waste toner box cover is open. | Confirm the waste toner box is securely mounted and close the waste toner box cover. |
| Dispose of used toner | The waste toner box is full. | Replace the waste toner box following the guidance displayed on the touch panel. P.62 "Replacing the Waste Toner Box" |
| Please empty hole punch waste | The Hole Punch Unit dust bin is full. | Remove the paper punchings. P.69 "Cleaning the Hole Punch Dust Bin" |
| Fax line1 (or line2) is out of order. | The 1st (or 2nd) line for the fax unit is not working. | Contact your service representative. |
| Fax line1 (or line2) is not installed. | The 1st (or 2nd) line for the fax unit is not installed. | Contact your service representative. |
| This original is copy protected | An attempt is made to copy a prohibited original. | This original cannot be copied. |
| DEPARTMENT Quota exceeded. Contact the Administrator. | The copying, printing or scanning quota to the department has reached "0". | For details of setting the quota, ask your administrator. |
| Not enough Work Space to store originals Will you print out stored originals? | Internal memory available ran out while scanning. | To print out the data for the originals stored (scanned) until the message appeared, press [Yes] on the touch panel. To delete the stored data, press [No]. |
| USER Quota exceeded. Contact the Administrator. | The copying, printing or scanning quota to the user has reached "0". | For details of setting the quota, ask your administrator. |
| USER and DEPARTMENT Quota exceeded. Contact the Administrator. | The copying, printing or scanning quota to the user and department has reached "0". | For details of setting the quota, ask your administrator. |
| Check under the Finisher tray and reboot the machine. | An obstruction is placed under the Finisher tray. | Remove the obstruction under the Finisher tray and reboot the equipment. |
| The number of originals exceeds the limits. The scanned data will be deleted. | The number of originals to be scanned has exceeded the limit of 1000 sheets during scanning. (The magazine sort or page number function is used.) | Reduce the number of originals to be scanned, and try again. |
| The number of originals exceeds the limits. Will you copy stored originals? | The number of originals to be scanned has exceeded the limit of 1000 sheets during scanning. | To print out the data for the originals stored (scanned) until the message appeared, press [Yes] on the touch panel. To delete the stored data, press [No]. |
| LAN cable is not detected | The LAN cable connection is not detected. | Check the following items. • Check that the LAN cable is connected to the equipment. • Check that there is no damage on the connector of the LAN cable. • Check that the LAN cable is open circuited. • Check that the LAN cable is connected to the HUB. Check that there is no damage to the connector. • Check that the power is ON for the HUB to which the LAN cable is connected. • Check that the settings of the communication speed and the Ethernet method for the equipment and the HUB are aligned. |