Brand: SONY
Category: TV
Document Type: Manual
Language: EN
Brand: SONY
Category: TV
Document Type: Manual
Language: EN
Uploaded: Nov. 21, 2025, 8:12 p.m.
Manual Publish Date: 2005-10-01
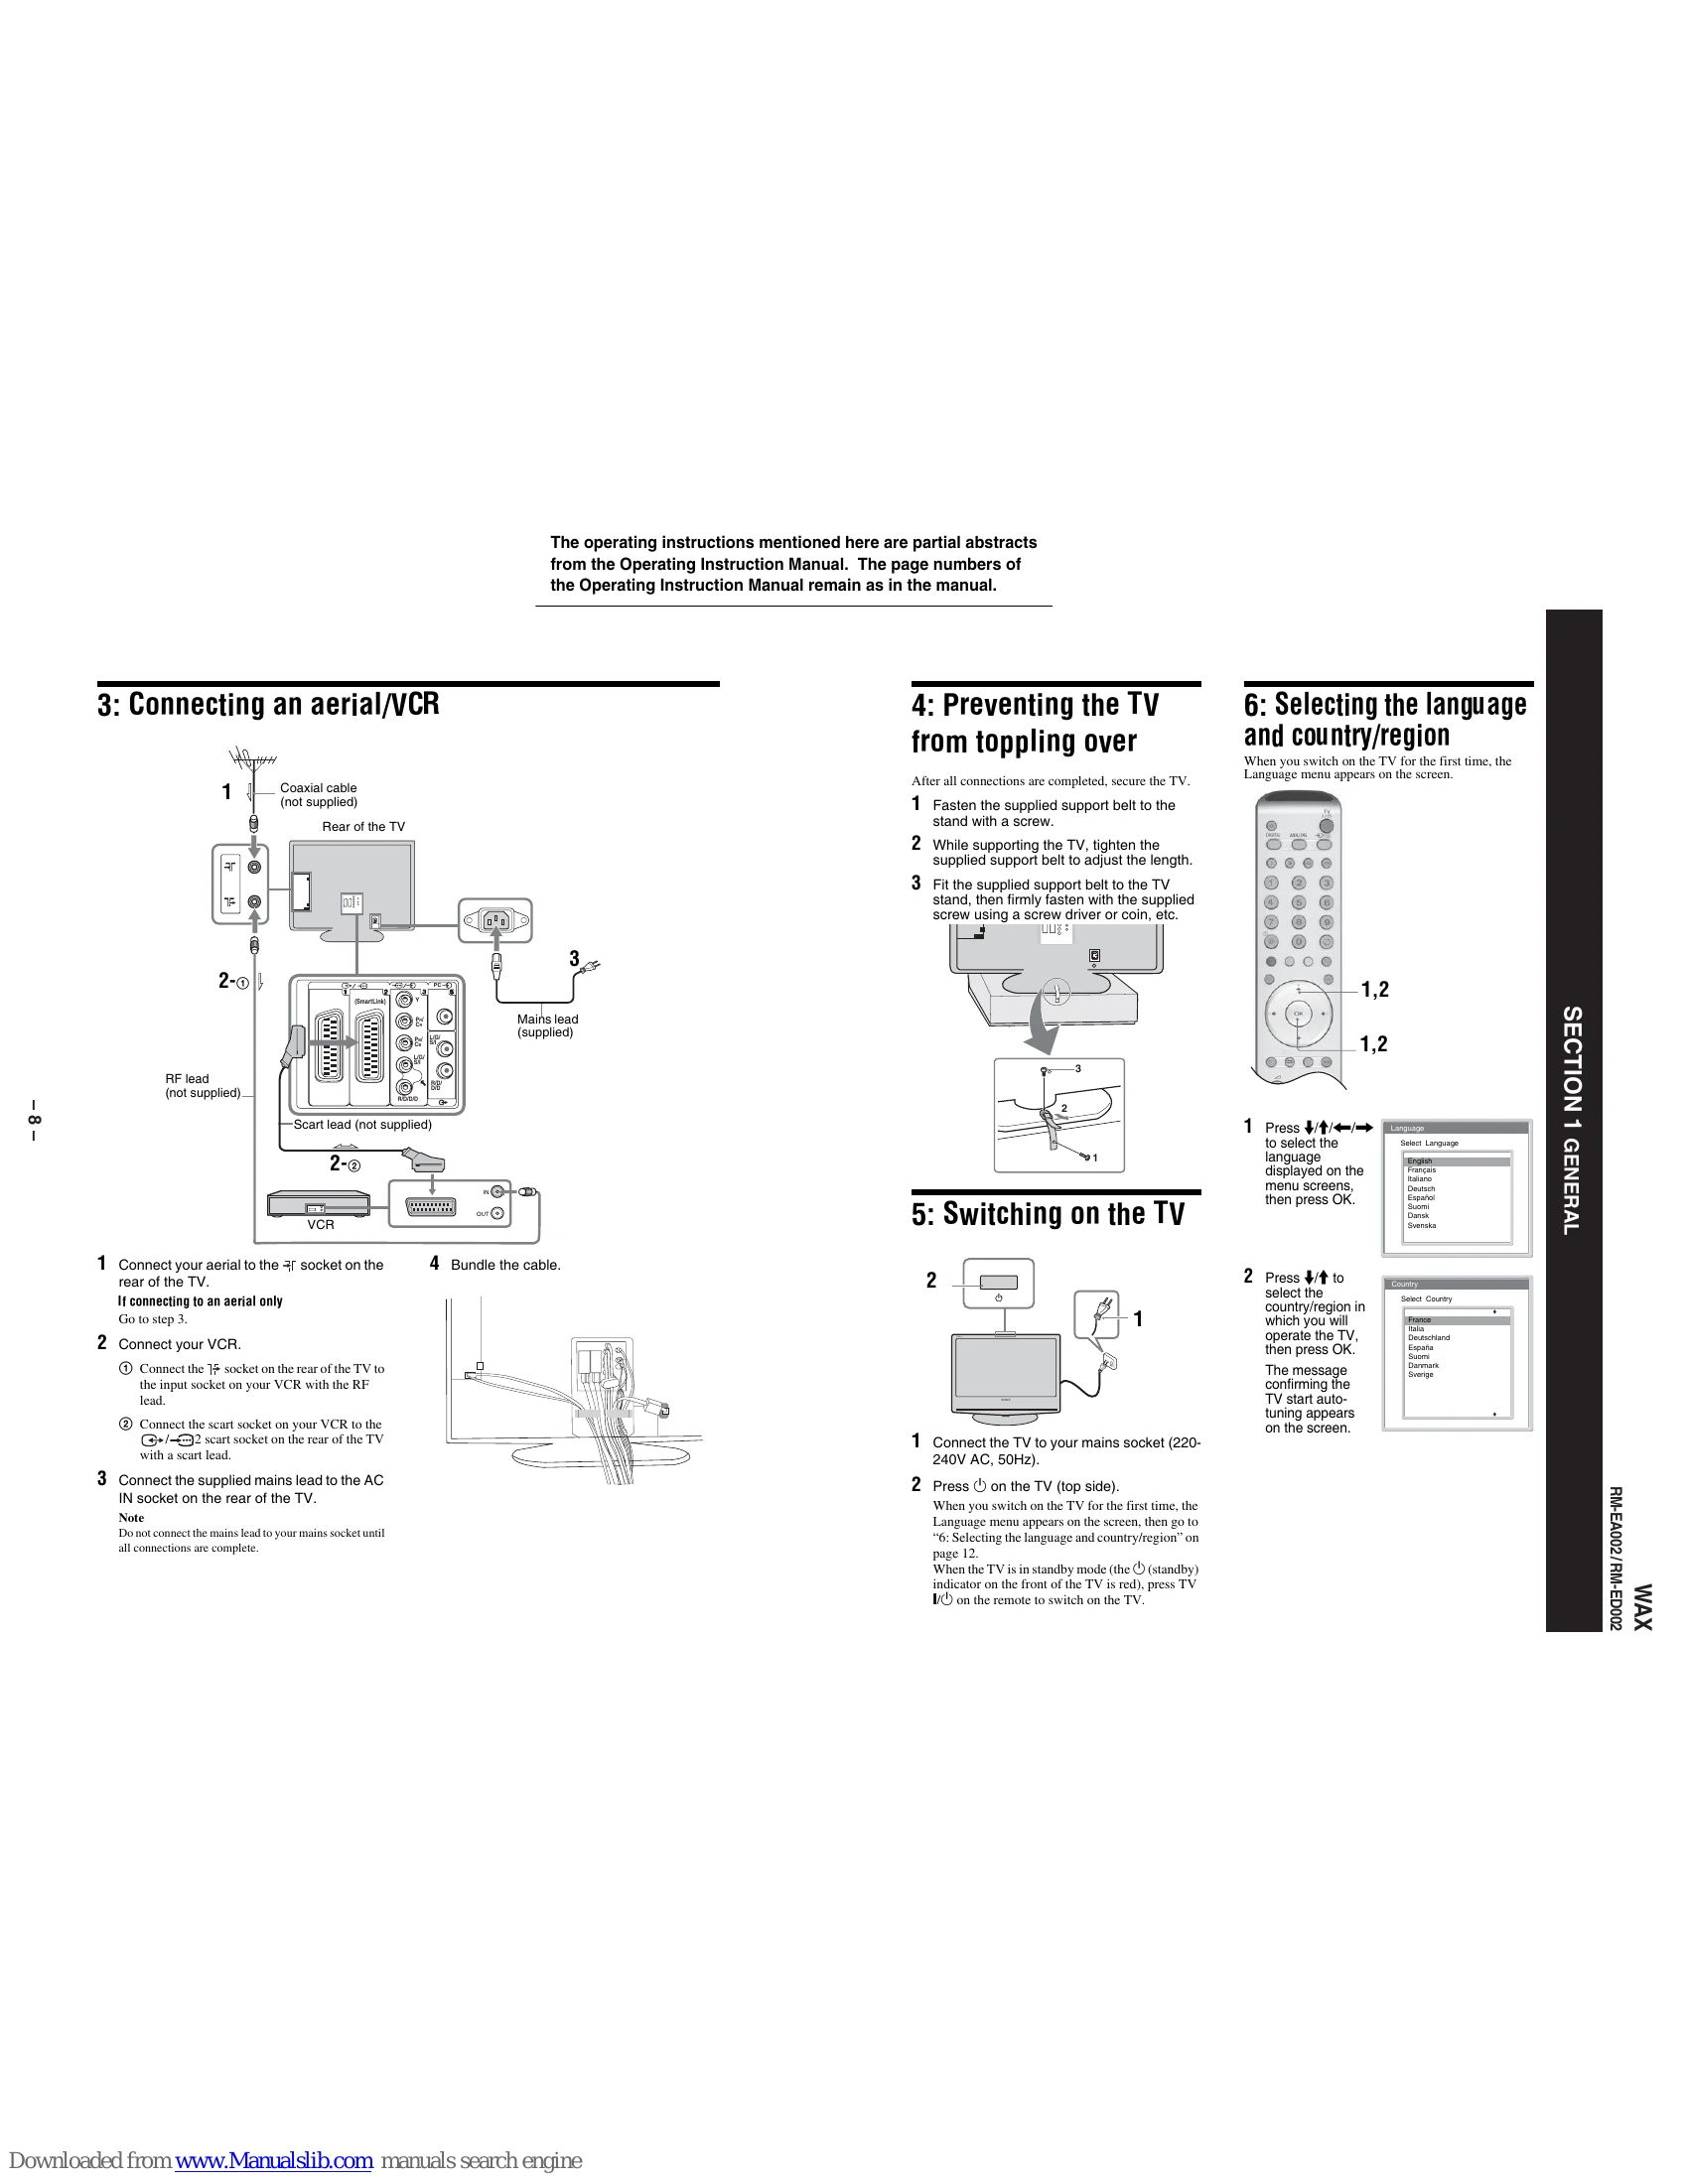
Connecting an aerial/VCR: Connect aerial to TV's socket. Connect VCR to TV's input socket with RF lead. Connect VCR's scart socket to TV's scart socket with scart lead. Connect mains lead to AC IN socket. Bundle cables.
Preventing the TV from toppling over: Secure the TV using the supplied support belt to the stand and then to the TV stand.
Selecting the language and country/region: Upon first startup, a language menu appears. Select language, then country/region. Confirm the TV start auto-tuning.
Auto-tuning the TV: Confirm auto-tuning. The TV searches for all available digital and analogue channels. After tuning, the Programme Sorting menu may appear to change channel order. Press MENU to exit.
Watching TV: Press DIGITAL or ANALOG to select mode. Use number buttons or PROG +/- to select a channel. Use the TV button to switch on/off temporarily.
Checking the Digital Electronic Programme Guide (EPG) DVB: In digital mode, press to display EPG. Use navigation buttons to move. Display previous/next six channels. Watch current programme. Sort by category. Set timer recording.
Viewing pictures from connected equipment: Switch on equipment. Start playback. Select input source using PROG +/- or input symbol buttons. Use MENU to navigate settings.
Picture Adjustment: Access Picture menu. Select Picture Mode (Vivid, Standard, Custom). Adjust Contrast, Brightness, Colour, Hue, Sharpness, Backlight. Select Colour Tone (Cool, Neutral, Warm).
Sound Adjustment: Access Sound menu. Select Sound Effect (Natural, Dynamic, Dolby Virtual, Off). Adjust Treble, Bass, Balance. Reset settings.
Screen menu: Adjust screen format (Auto Format, Screen Format, RGB Center).
Features menu: Adjust Power Saving, Light Sensor, AV2 Output.
Timer menu: Set Sleep Timer, Clock Set, and Timer for automatic on/off.
Set Up menu: Access Auto Start Up, Language, Country, Auto Tuning, Programme Sorting, Programme Labels, AV Preset, Manual Programme Preset, Digital Set Up.
Using Optional Equipment: Connect various optional equipment to the side and rear of the TV using appropriate cables.
Specifications: Details on Display Unit, TV System, Aerial, Colour/Video System, Dimensions, Weight, and PC Specifications.
Troubleshooting: Guide for common problems with picture, sound, channels, and general issues, with suggested causes and remedies.
| Problem | Cause/Remedy |
|---|---|
| Picture No picture (screen is dark) and no sound |
Check the aerial connection. Connect the TV to the mains, and press on the TV (top side). If the (standby) indicator lights up in red, press TV I. |
| No picture or no menu information from equipment connected to the scart connector | Check that the optional equipment is on and press repeatedly until the correct input symbol is displayed on the screen. |
| Distorted picture | Check the connection between the optional equipment and the TV. When installing optional equipment, leave some space between the optional equipment and the TV. When changing programmes or selecting Text, turn off any equipment connected to the scart connector on the rear of the TV. |
| Double images or ghosting | Check aerial/cable connections. Check the aerial location and direction. |
| Only snow and noise appear on the screen | Check if the aerial is broken or bent. Check if the aerial has reached the end of its serviceable life (three to five years in normal use, one to two years at the seaside). Keep the TV away from electrical noise sources such as cars, motorcycles, or hair-dryers. Make sure that the aerial is connected using the supplied coaxial cable. Keep the aerial cable away from other connecting cables. Do not use a 300-ohm twin lead cable as interference may occur. |
| Picture (dotted lines or stripes) noise | Select "Manual Programme Preset" in the "Set Up" menu and adjust "AFT" (Automatic Fine Tuning) to obtain better picture reception (page 31). |
| Picture noise when viewing a TV channel | Select "Noise Reduction" in the "Picture Adjustment" menu to reduce the noise in the picture (page 22). |
| Stripe noise during playback/ recording of a VCR | Video head interference. Keep your VCR away from the TV. Leave a space of 30 cm between your VCR and the TV to avoid noise. Avoid installing your VCR in front of the TV or beside the TV. |
| Some tiny black points and/or bright points on the screen | The picture of a display unit is composed of pixels. Tiny black points and/or bright points (pixels) on the screen do not indicate a malfunction. |
| Sound No sound, but good picture |
Press +/- or (Mute). Check that "TV Speakers" is set to "on" in the "Features" menu (page 27). |
| Noisy sound | See the "Picture noise" causes/remedies on page 42. |
| Channels The desired channel cannot be selected |
Switch between digital and analogue mode and select the desired digital/analogue channel. |
| Some channels are blank | Scrambled/Subscription only channel. Subscribe to the Pay Per View service. Channel is used only for data (no picture or sound). Contact the broadcaster for transmission details. |
| Digital channel is not displayed | Check that the aerial is plugged directly into the TV (not through other equipment). Contact a local installer to find out if digital transmissions are provided in your area. Upgrade to a higher gain aerial. |
| General The TV turns off automatically (the TV enters standby mode) |
Check if the "Timer" is activated (page 28). If no signal is received or no operation is performed in the TV mode for 10 minutes, the TV automatically switches to standby mode. |
| The TV turns on automatically | Check if the "Timer" is activated (page 28). |
| Some input sources cannot be selected | Select "AV Preset" in the "Set Up" menu and cancel "Skip" of the input source (page 31). |
| The remote does not function | Replace the batteries. |