Brand: SANYO
Category: Video
Document Type: Manual
Language: EN
Brand: SANYO
Category: Video
Document Type: Manual
Language: EN
Uploaded: Nov. 21, 2025, 8:17 p.m.
Consult the separate User's Manual (concise) for warranty details.
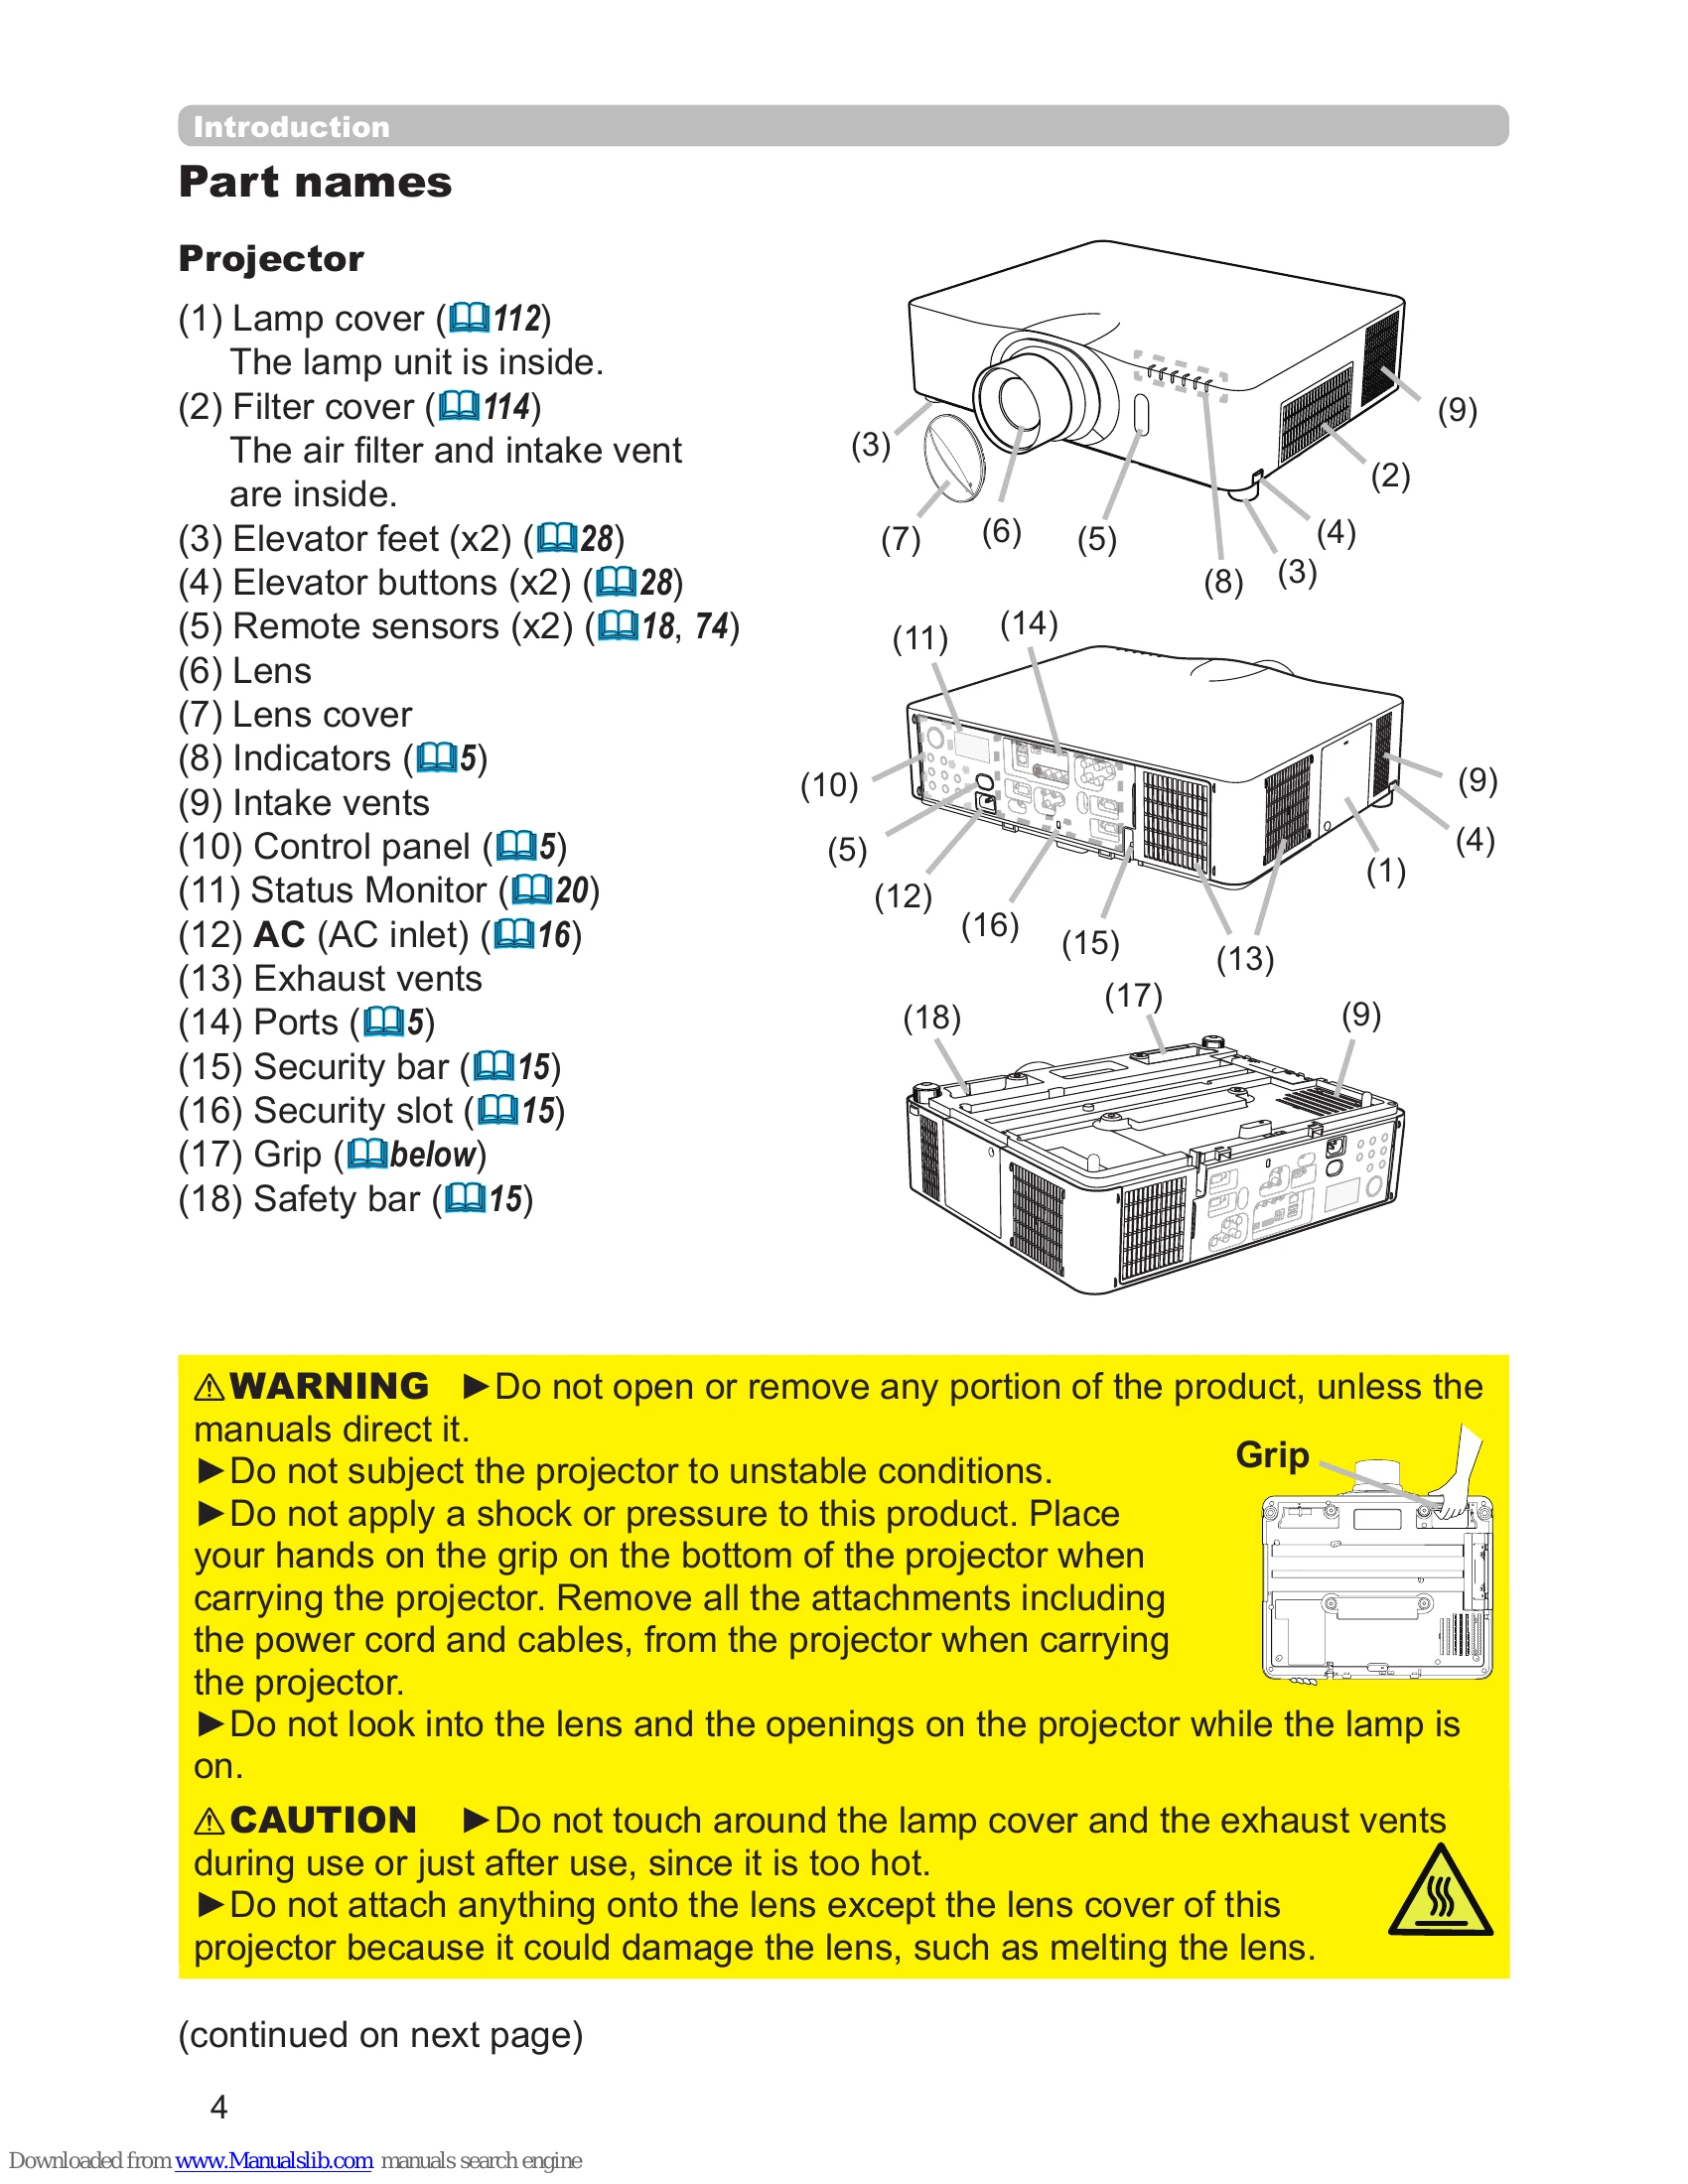
This manual provides comprehensive operating instructions for the SANYO CP-X8170/CP-WX8265/CP-WU8460 projector. It covers initial setup, including arrangement and connecting devices, as well as detailed operating procedures. Users can learn how to power the projector on/off, adjust audio output, select input signals, aspect ratios, and fine-tune image settings like zoom, focus, and keystone correction. The manual also details the use of the menu functions, status monitor, remote control, and basic maintenance tasks such as replacing the lamp and cleaning the air filter. Troubleshooting tips for common issues and error messages are also provided.
| Phenomenon | Cases not involving a machine defect | Reference page |
|---|---|---|
| Power does not come on. | The electrical power cord is not plugged in. Correctly connect the power cord. | 16 |
| The main power source has been interrupted during operation such as a power outage (blackout), etc. Please disconnect the power plug from the power outlet, and allow the projector to cool down at least 10 minutes, then turn the power on again. | 16 | |
| Either there is no lamp and/or lamp cover, or either of these has not been properly fixed. Please turn the power off and disconnect the power plug from the power outlet, and allow the projector to cool down at least 45 minutes. After the projector has sufficiently cooled down, please make confirmation of the attachment state of the lamp and lamp cover, and then turn the power on again. | 112 | |
| Neither sounds nor pictures are outputted. | The signal cables are not correctly connected. Correctly connect the connection cables. | 10~14 |
| Signal source does not correctly work. Correctly set up the signal source device by referring to the manual of the source device. | - | |
| The input changeover settings are mismatched. Select the input signal, and correct the settings. | 26 | |
| AV MUTE function is working. Press AV MUTE button on the remote control. | 25 | |
| The USB TYPE B port is selected as the picture input source even if MOUSE is selected for USB TYPE B. Select USB DISPLAY for USB TYPE B in OPTION menu to project the picture input to the port. Otherwise select other port for picture input. | 70 | |
| The USB TYPE B port is not recognized as an input port because of electrical noise. Temporarily set to MOUSE with the USB TYPE B on the OPTION menu, and then return it to USB DISPLAY to enable the USB TYPE B port to be recognized as an input port. | 70 | |
| Neither sounds nor pictures are outputted. (continued) | The projector does not recognize the USB storage device inserted into USB TYPE A ports. Use the REMOVE USB function first, remove the USB storage device, and then insert it into the port again. Before removing the USB storage device, be sure to use the REMOVE USB function on the Thumbnail screen, which appears when the USB TYPE A is selected as the input source. | 12, 101 |
| The signal cables are not correctly connected. Correctly connect the audio cables. | 10~14 | |
| Sound does not come out. | The volume is adjusted to an extremely low level. Adjust the volume to a higher level using the menu function or the remote control. | 25, 59 |
| The AUDIO SOURCE setting is not correct. Correctly set the AUDIO SOURCE in AUDIO menu. | 59 | |
| The Sound button (♪) or checkbox is disabled. If you have selected USB TYPE A, turn the sound on from the Thumbnail menu. If you have selected USB TYPE B, remove the check mark from the Sound checkbox in the Options window of “LiveViewer Lite for USB”. If you have selected LAN, remove the check mark from the Sound checkbox in the Option menu of “LiveViewer”. | 101, 111 | |
| No pictures are displayed. | The signal cables are not correctly connected. Correctly connect the connection cables. | 10~14 |
| The brightness is adjusted to an extremely low level. Adjust BRIGHTNESS to a higher level using the menu function. | 46 | |
| The computer cannot detect the projector as a plug and play monitor. Make sure that the computer can detect a plug and play monitor using another plug and play monitor. | 10 | |
| The lens shade is closed. Check whether the SHADE indicator is blinking. If it is blinking, press SHADE button on the control panel. | 36 | |
| Pictures appear blurry. (continued) | The lens is dirty or misty. Clean the lens referring to the section Caring for the lens. | 116 |
| Some kind of image degradation such as flickering or stripes appear on screen. | When the projector is operating in Eco mode, flickering may appear on screen. Set ECO MODE to NORMAL, and set AUTO ECO MODE to OFF, in the SETUP menu. | 57 |
| The OVER SCAN ratio is too big. Adjust OVER SCAN in the IMAGE menu smaller. | 50 | |
| Excessive VIDEO NR. Change the setting of VIDEO NR in the INPUT menu. | 52 | |
| The FRAME LOCK function cannot work on the current input signal. Set FRAME LOCK in the INPUT menu to OFF. | 54 | |
| The sound or image is unstable or is output intermittently. | When LAN, USB TYPE A or USB TYPE B port is selected, some parts of the output may be missing due to signal processing delay. Change the signal or use another port. | 26, 59 |
| The computer connected to the USB TYPE B port of the projector does not start up. | The computer cannot start up in the current hardware configuration. Disconnect the USB cable from the computer, then reconnect it after starting up the computer. | 11, 12 |
| RS-232C does not work. | The SAVING function is working. Select NORMAL for STANDBY MODE item in the SETUP menu. | 58 |
| The COMMUNICATION TYPE for the CONTROL port is set to NETWORK BRIDGE. Select OFF for COMMUNICATION TYPE item in the OPTION - SERVICE - COMMUNICATION menu. | 75, 76 | |
| Network does not work | The SAVING function is working. Select NORMAL for STANDBY MODE item in the SETUP menu. | 58 |
| The same network address is set for both wireless and wired LAN. Change the network address setting for wireless or wired LAN. | 81, 85 | |
| NETWORK BRIDGE function does not work | The NETWORK BRIDGE function is turned off. Select NETWORK BRIDGE for COMMUNICATION TYPE item in the OPTION - SERVICE - COMMUNICATION menu. | 75, 76 |
| Schedule function does not work | The SAVING function is working. Select NORMAL for STANDBY MODE item in the SETUP menu. | 58 |
| The internal clock has been reset. Once you turn off the projector in the SAVING mode or the AC power, the current date and time setting is reset. Check the DATE AND TIME setting for WIRELESS SETUP or WIRED SETUP in the NETWORK menu. | 82, 86 | |
| When the projector is connected to the network, it powers off and on as described below. | Disconnect the LAN cable and check that the projector is working properly. If this phenomenon occurs after connecting to the network, there may be a loop between two Ethernet switching hubs within the network, as explained below. - There are two or more Ethernet switching hubs in a network. Two of the hubs are doubly connected by LAN cables. This double connection forms a loop between the two hubs. Such a loop may have an adverse effect on the projector as well as the other network devices. Check the network connection and remove the loop by disconnecting the LAN cables such that there is only one connecting cable between two hubs. | - |