1. Packing List: Verify all items are present, including the DVR, suction mount, car charger, cables, and quick start guide/warranty card. Note the GPS receiver cable is for RR520G models.
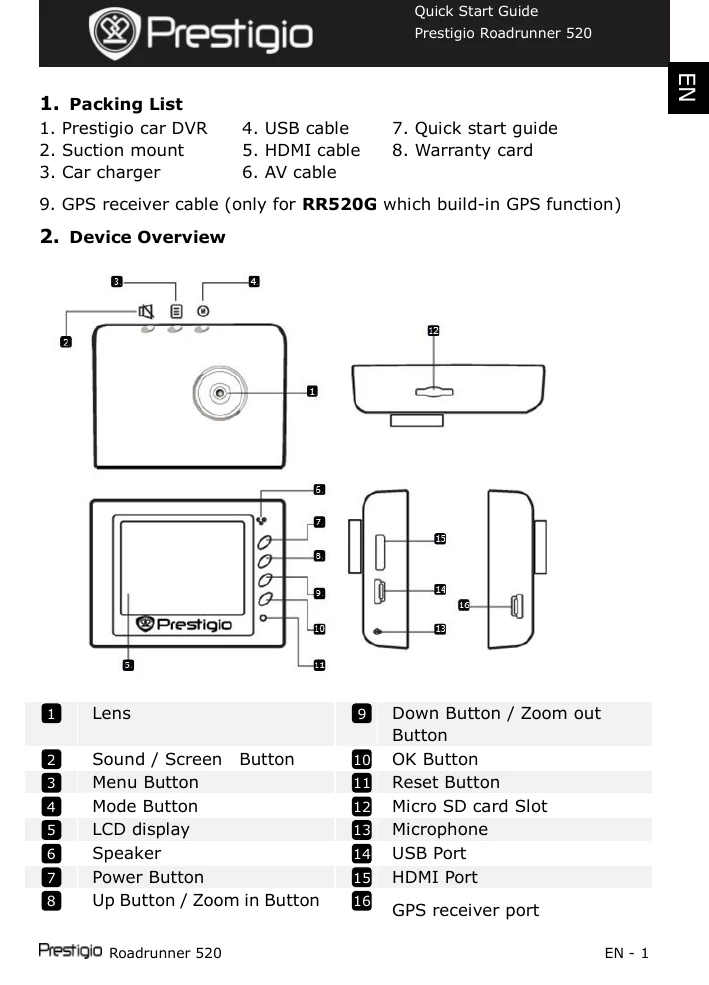
2. Device Overview: Familiarize yourself with the device's components by referring to the numbered diagram and corresponding list of buttons and ports.
3. Power on/Power off: Use the Power button to turn the device on/off. It can also automatically power on/start recording when connected to the car charger and the engine starts, and power off when the engine stops.
4. Charging: Connect to the car charger for charging. A full charge takes approximately 2-3 hours. Operating while charging may extend charging time.
5. Inserting the Micro SD-card: Insert a Micro SD card before recording. Push gently to extract.
6. Recording: Select Video Mode and press the Record button to start. Press again to stop. Recording files are saved on the Micro SD Card.
7. Taking pictures: Select Picture Mode and press the Record button to take a photo. Use Up/Down buttons to zoom.
8. Video Menu Settings: Access settings via the Menu button to adjust Movie Mode, Quality, Clip Time, Power off Delay, Sound Record, Mic. Sensitivity, Scene Selection, Exposure Adjust, White Balance, and ISO Sensitivity.
9. Picture Menu Settings: In Picture Mode, adjust Still Image Size, Quality, Scene Selection, Exposure Adjust, White Balance, ISO Sensitivity, Color, and Effect.
10. Playback settings: Adjust Volume, Delete files, or Protect files.
11. Media Tool: Format the SD card or check SD-Card INFO.
12. General settings: Configure Beep, Power Off, Clock, Date/Time, Language, TV System, HDMI Output, Flicker Frequency, USB Function, LCD Rotate, LCD Power Save, Reset Setup, and Version.
13. USB connection: Connect to PC/notebook to download files.
14. Playback on TV: Connect to TV via AV or HDMI cable for playback.