Brand: Pioneer
Category: DVD Player
Document Type: Manual
Language: EN
Brand: Pioneer
Category: DVD Player
Document Type: Manual
Language: EN
Uploaded: Nov. 21, 2025, 9:24 p.m.
Manual Publish Date: 2004-01-01
Warranty information is not explicitly stated but refers to the enclosed warranty card for DV-575A and DV-578A models.
Switching on the Player: Press STANDBY/ON on the front panel or remote. Ensure the TV is set to the correct video input.
Loading a Disc: Press OPEN/CLOSE to open the tray, then place the disc label-side up. Close the tray.
Starting Playback: Press the Play button (►). For DVD/Video CDs, menus may appear. For MP3/WMA discs, playback may take a few seconds.
Basic Playback Controls: Use the buttons on the remote for Play (►), Pause/Restart (II), Stop (■), Fast Reverse (◄◄), and Fast Forward (►►).
Navigation: Use cursor buttons (↑/↓/←/▶) and ENTER to navigate on-screen displays and menus.
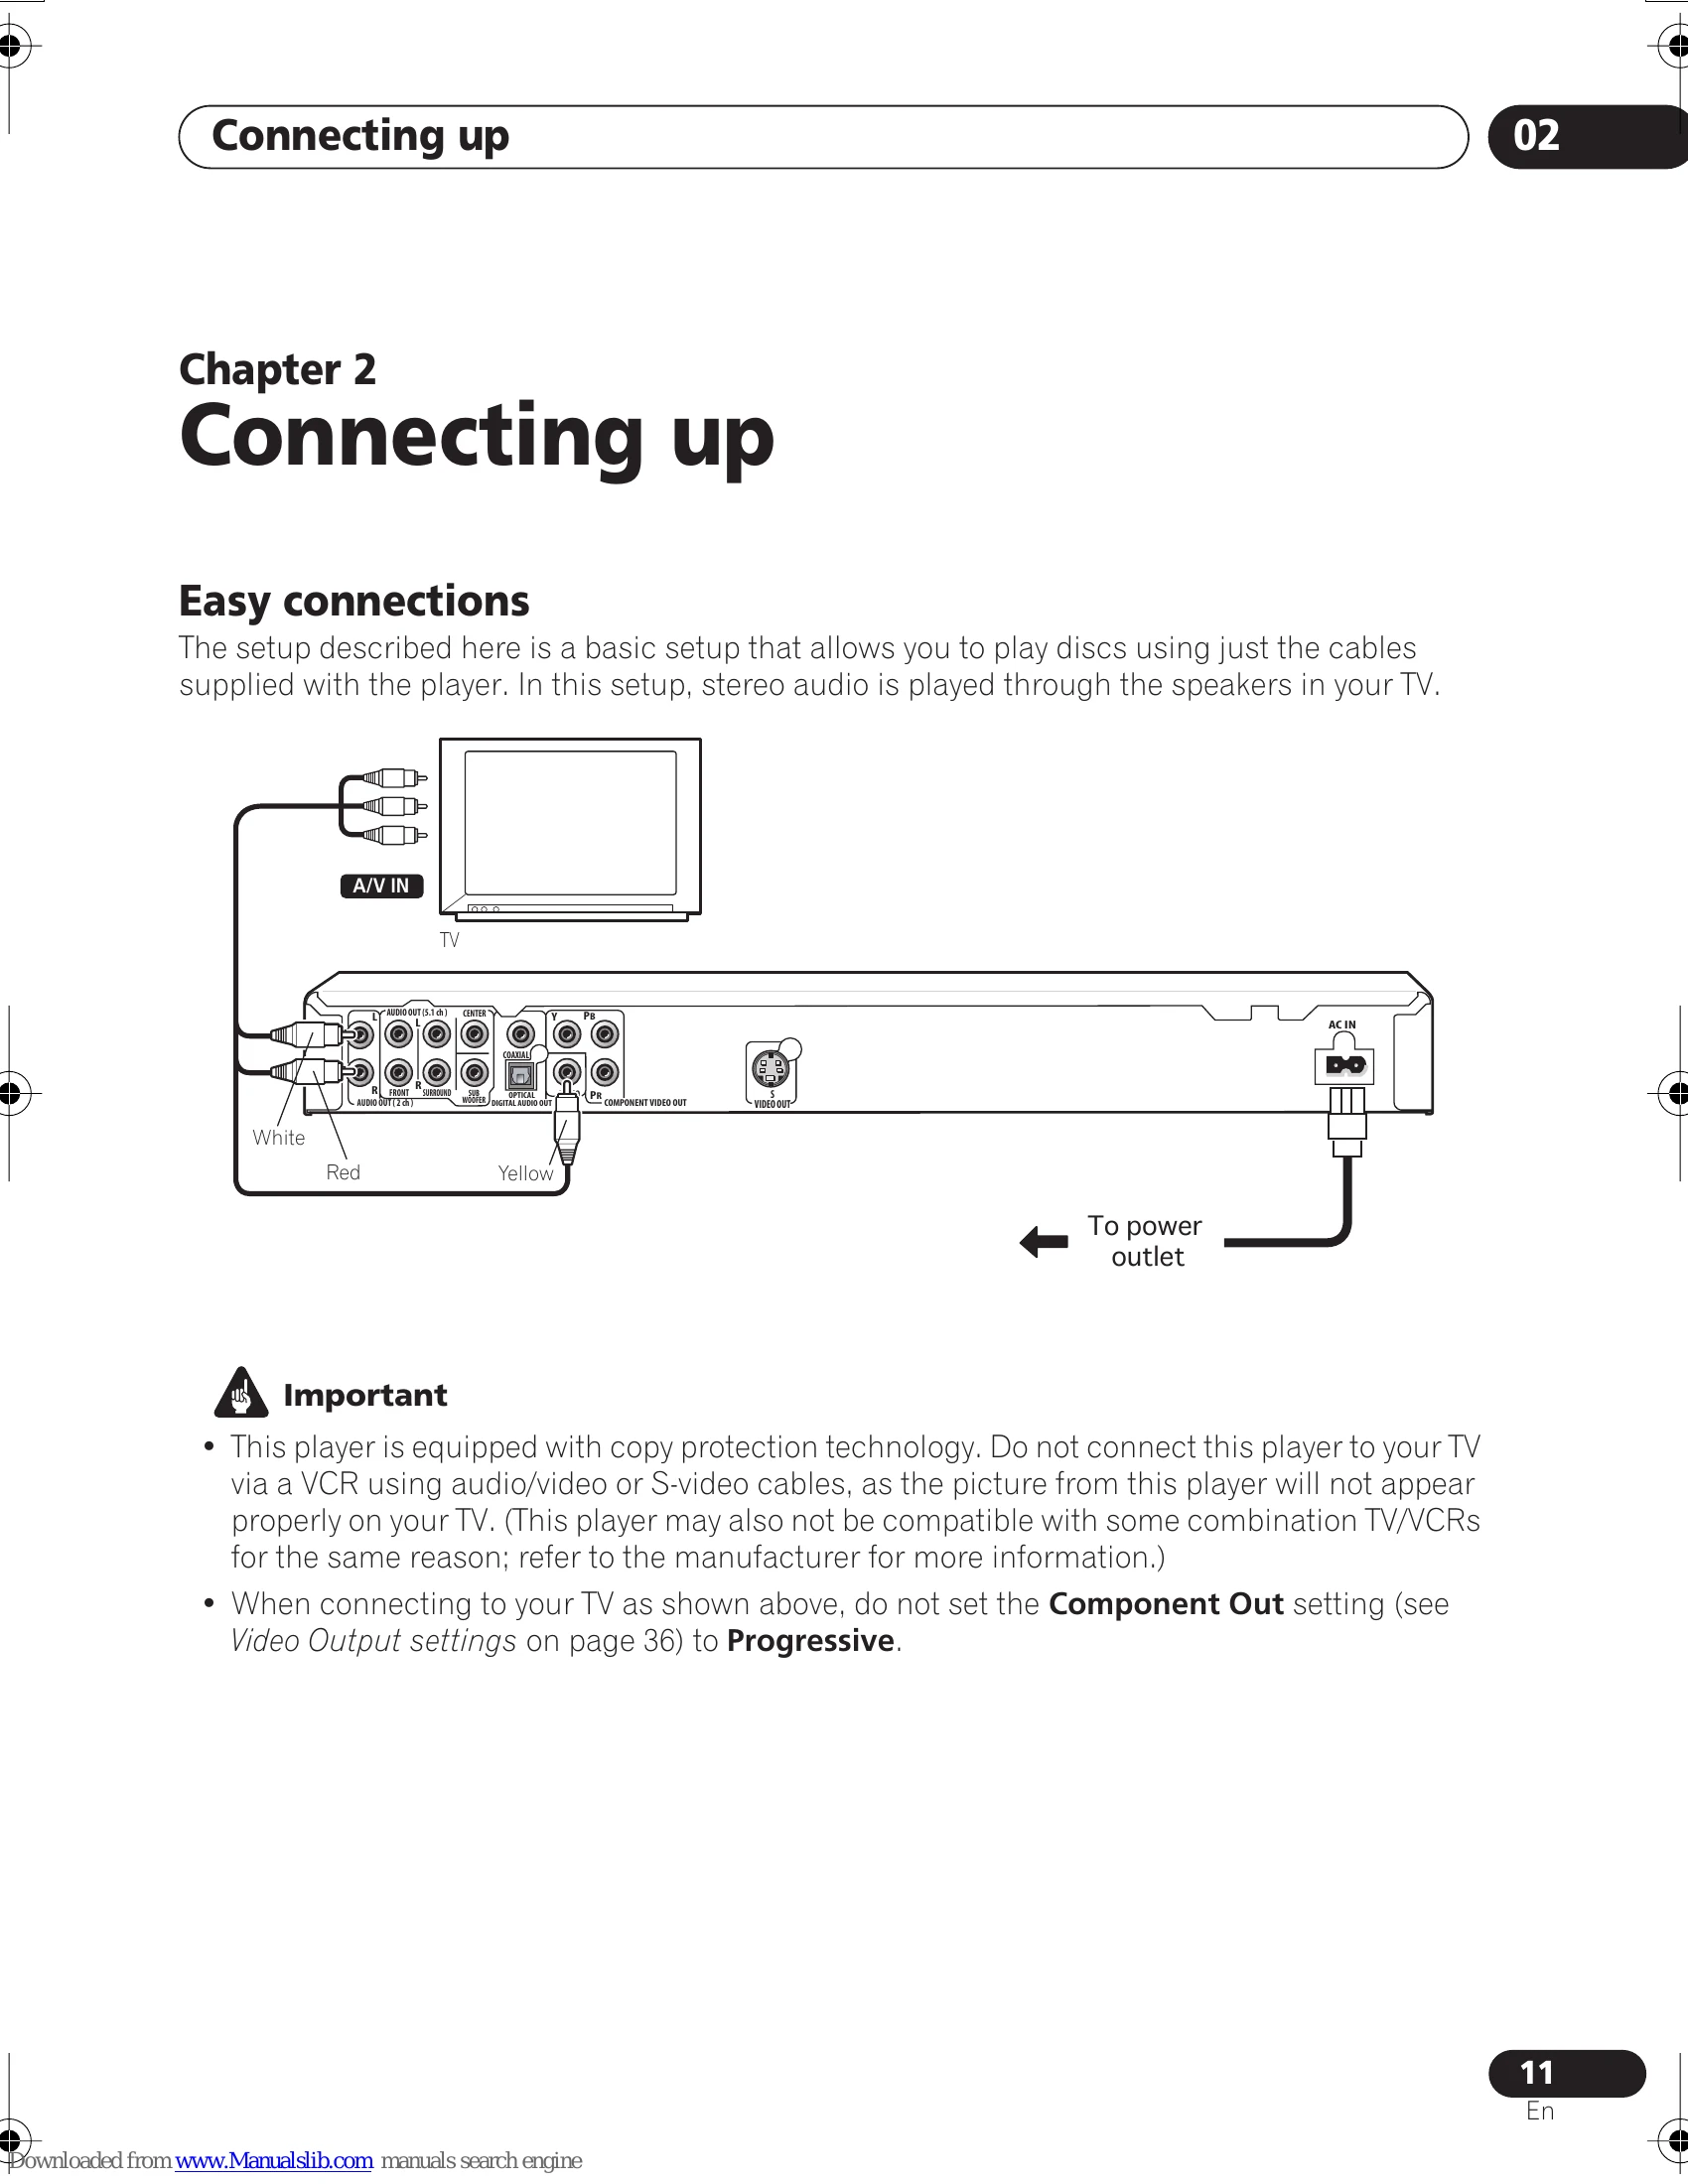
Connecting to a TV: Use the supplied audio/video cables (red, white, yellow) or optional S-video/component video cables. Connect to the TV's A/V inputs.
| Problem | Remedy |
| The disc won't play or is automatically ejected after loading. | • Make sure the disc is free from dirt and dust and is not damaged. • Make sure the disc is loaded with the label side face-up and aligned properly in the disc tray guide. • Incompatible region number: If the region number on a DVD-Video disc does not match the number on the player, the disc cannot be used. • Condensation inside the player: Allow time for condensation to evaporate. Avoid using the player near an air-conditioning unit. • Disc is loaded upside down: Reload the disc with the label side face up. • A Super VCD that does not conform with the IEC standards might not play normally. • The disc may have been illegally copied. |
| DVD-Audio playback stops. | • The disc may have been illegally copied. |
| Picture playback stops and the operation buttons cannot be used. | • Press , then start playback again (►). • Press and hold the front panel STANDBY/ON button for about 10 seconds to switch the unit off, then press again to switch back on. • Switch the power off once, unplug from the wall socket, then plug back in and switch on again using the front panel STANDBY/ON button. |
| New settings made in the Setup screen menus while a disc is playing are ineffective. | • Some settings can be changed while a disc is playing, but are not effective until the disc is stopped then restarted: Press , then start playback again ( ). |
| Settings are canceled. | • When the power is cut due to power failure or by unplugging the power cord, settings will be canceled: Press STANDBY/ON on the front panel to turn the player off. Wait for --OFF-- to disappear from the display, then unplug the power cord. |
| The remote control doesn't seem to work. | • The remote control is too far from the player, or the angle with the remote sensor is too wide: Use the remote within its operating range (page 18). • The batteries are exhausted: Put in new ones (page 8). |
| No picture/No color. | • Incorrect video connections: Check that connections are correct and that plugs are inserted fully. Also check the video cable for damage. • TV/monitor or AV amplifier settings are incorrect: Check the instruction manual of the connected equipment. • The video output is set to progressive but your TV/monitor is not compatible with progressive scan: See page 13 for how to set to interlace. |
| Screen is stretched or aspect does not change. | • The TV Screen setting in the Initial Settings menu is incorrect. See page 45 for how to set it correctly for your TV/monitor. |
| Picture disturbance during playback or the picture is dark. | • This player is compatible with Macro-Vision System copy guard. Some discs include a copy prevention signal, and when this type of disc is played back, stripes etc., may appear on some sections of the picture depending on the TV. This is not a malfunction. • Due to the player's copy protection circuits, connection of this device through a VCR or an AV selector may prevent recording or cause picture problems. This is not a malfunction. |
| No audio, or audio is distorted. | • No audio is output during slow motion playback or when scanning discs other than audio CDs and SACDS. • Some DVD discs do not output digital audio: Switch your amplifier to the player's analog outputs. • Check that the disc is free from dust and dirt, and that it is not damaged (page 44). • Check that all interconnects are firmly inserted. • Check that the plugs and terminals are free of dirt, oxide, etc. and clean if necessary. Also check the cable for damage. • Make sure the player's output is not connected to the amplifier's phono (turntable) inputs. • Check your amplifier/receiver's settings (volume, input function, speaker settings, etc.). |
| The analog audio is OK, but there appears to be no digital audio signal. | • Make sure that the Digital Out setting is set to On (page 35). • Check that the Dolby Digital, DTS and MPEG out settings (pages 35–36) are suitable for your amplifier/receiver—check the instruction manual that came with your amplifier/receiver. • SACDs and some DVD-Audio discs do not output digital audio. Listen through the player's analog audio outputs. |
| Noticeable difference in DVD and CD volume. | • This is due to differences in the audio format and is not a malfunction. |
| Cannot play multichannel audio | • Make sure that Audio Output Mode is set to 5.1 Channel (page 41). • Check that the Dolby Digital, DTS and MPEG Out settings (pages 35–36) are suitable for your amplifier/receiver—check the instruction manual that came with your amplifier/receiver. • DVD-Audio and SACDs do not output multichannel digital audio. Listen through the player's analog outputs. • Check that the settings in the Speaker Installation screen are correct (page 42). • Check the audio options available from the disc menu. |
| Cannot listen to high-sampling rate audio through the digital output. | • Make sure that Linear PCM Out is set to Downsample Off (page 35). • As a copy-protection measure, some DVDs do not output 96kHz audio. In this case, even if set to Downsample Off, the player automatically outputs the audio at 48 kHz. This is not a malfunction. |
| Cannot output 192kHz or 176.4kHz digital audio. | • The player does not output digital audio at these sampling rates. The digital output is automatically downsampled. |
| Cannot output 96kHz or 88.2kHz digital audio. | • Check that Linear PCM Out is set to Downsample Off (page 35). • Some discs are digital copy protected and do not output high sampling rate digital audio. In this case the output is automatically downsampled. |
| No DTS audio output. | • If this unit is connected to a non-DTS compatible amplifier or decoder using a digital audio cable, set DTS Out to DTS > PCM (page 35). If you do not do this, noise will be output when you play a DTS disc. • If this unit is connected to a DTS-compatible amplifier or decoder using a digital audio cable, check the amplifier settings, and that the cable is properly connected. |
| Audio mix does not sound right or sounds incomplete (for example, inaudible dialog). | • Make sure that Audio Output Mode is set to 2 Channel if you've connected to the stereo inputs on your amplifier or TV (page 41). |
| The audio recorded on a Super VCD disc is not output properly. | • If the audio is switched to [2] when playing a Super VCD that contains only one stereo soundtrack, there may be no sound at all. Press AUDIO to change the soundtrack. |
| Can't hear effect of Virtual Surround | • Virtual Surround does not work with SACD or DVD-Audio. • The Virtual Surround effect is only output through the AUDIO OUT (2ch) analog audio outputs. • Make sure that Audio Output Mode is set to 2 Channel (page 41). • The effectiveness of Virtual Surround varies with the disc. |