Brand: Panasonic
Category: Home Theater System
Document Type: Manual
Language: EN
Brand: Panasonic
Category: Home Theater System
Document Type: Manual
Language: EN
Uploaded: Nov. 21, 2025, 8:22 p.m.
Please refer to your dealer for specific warranty information and limitations.
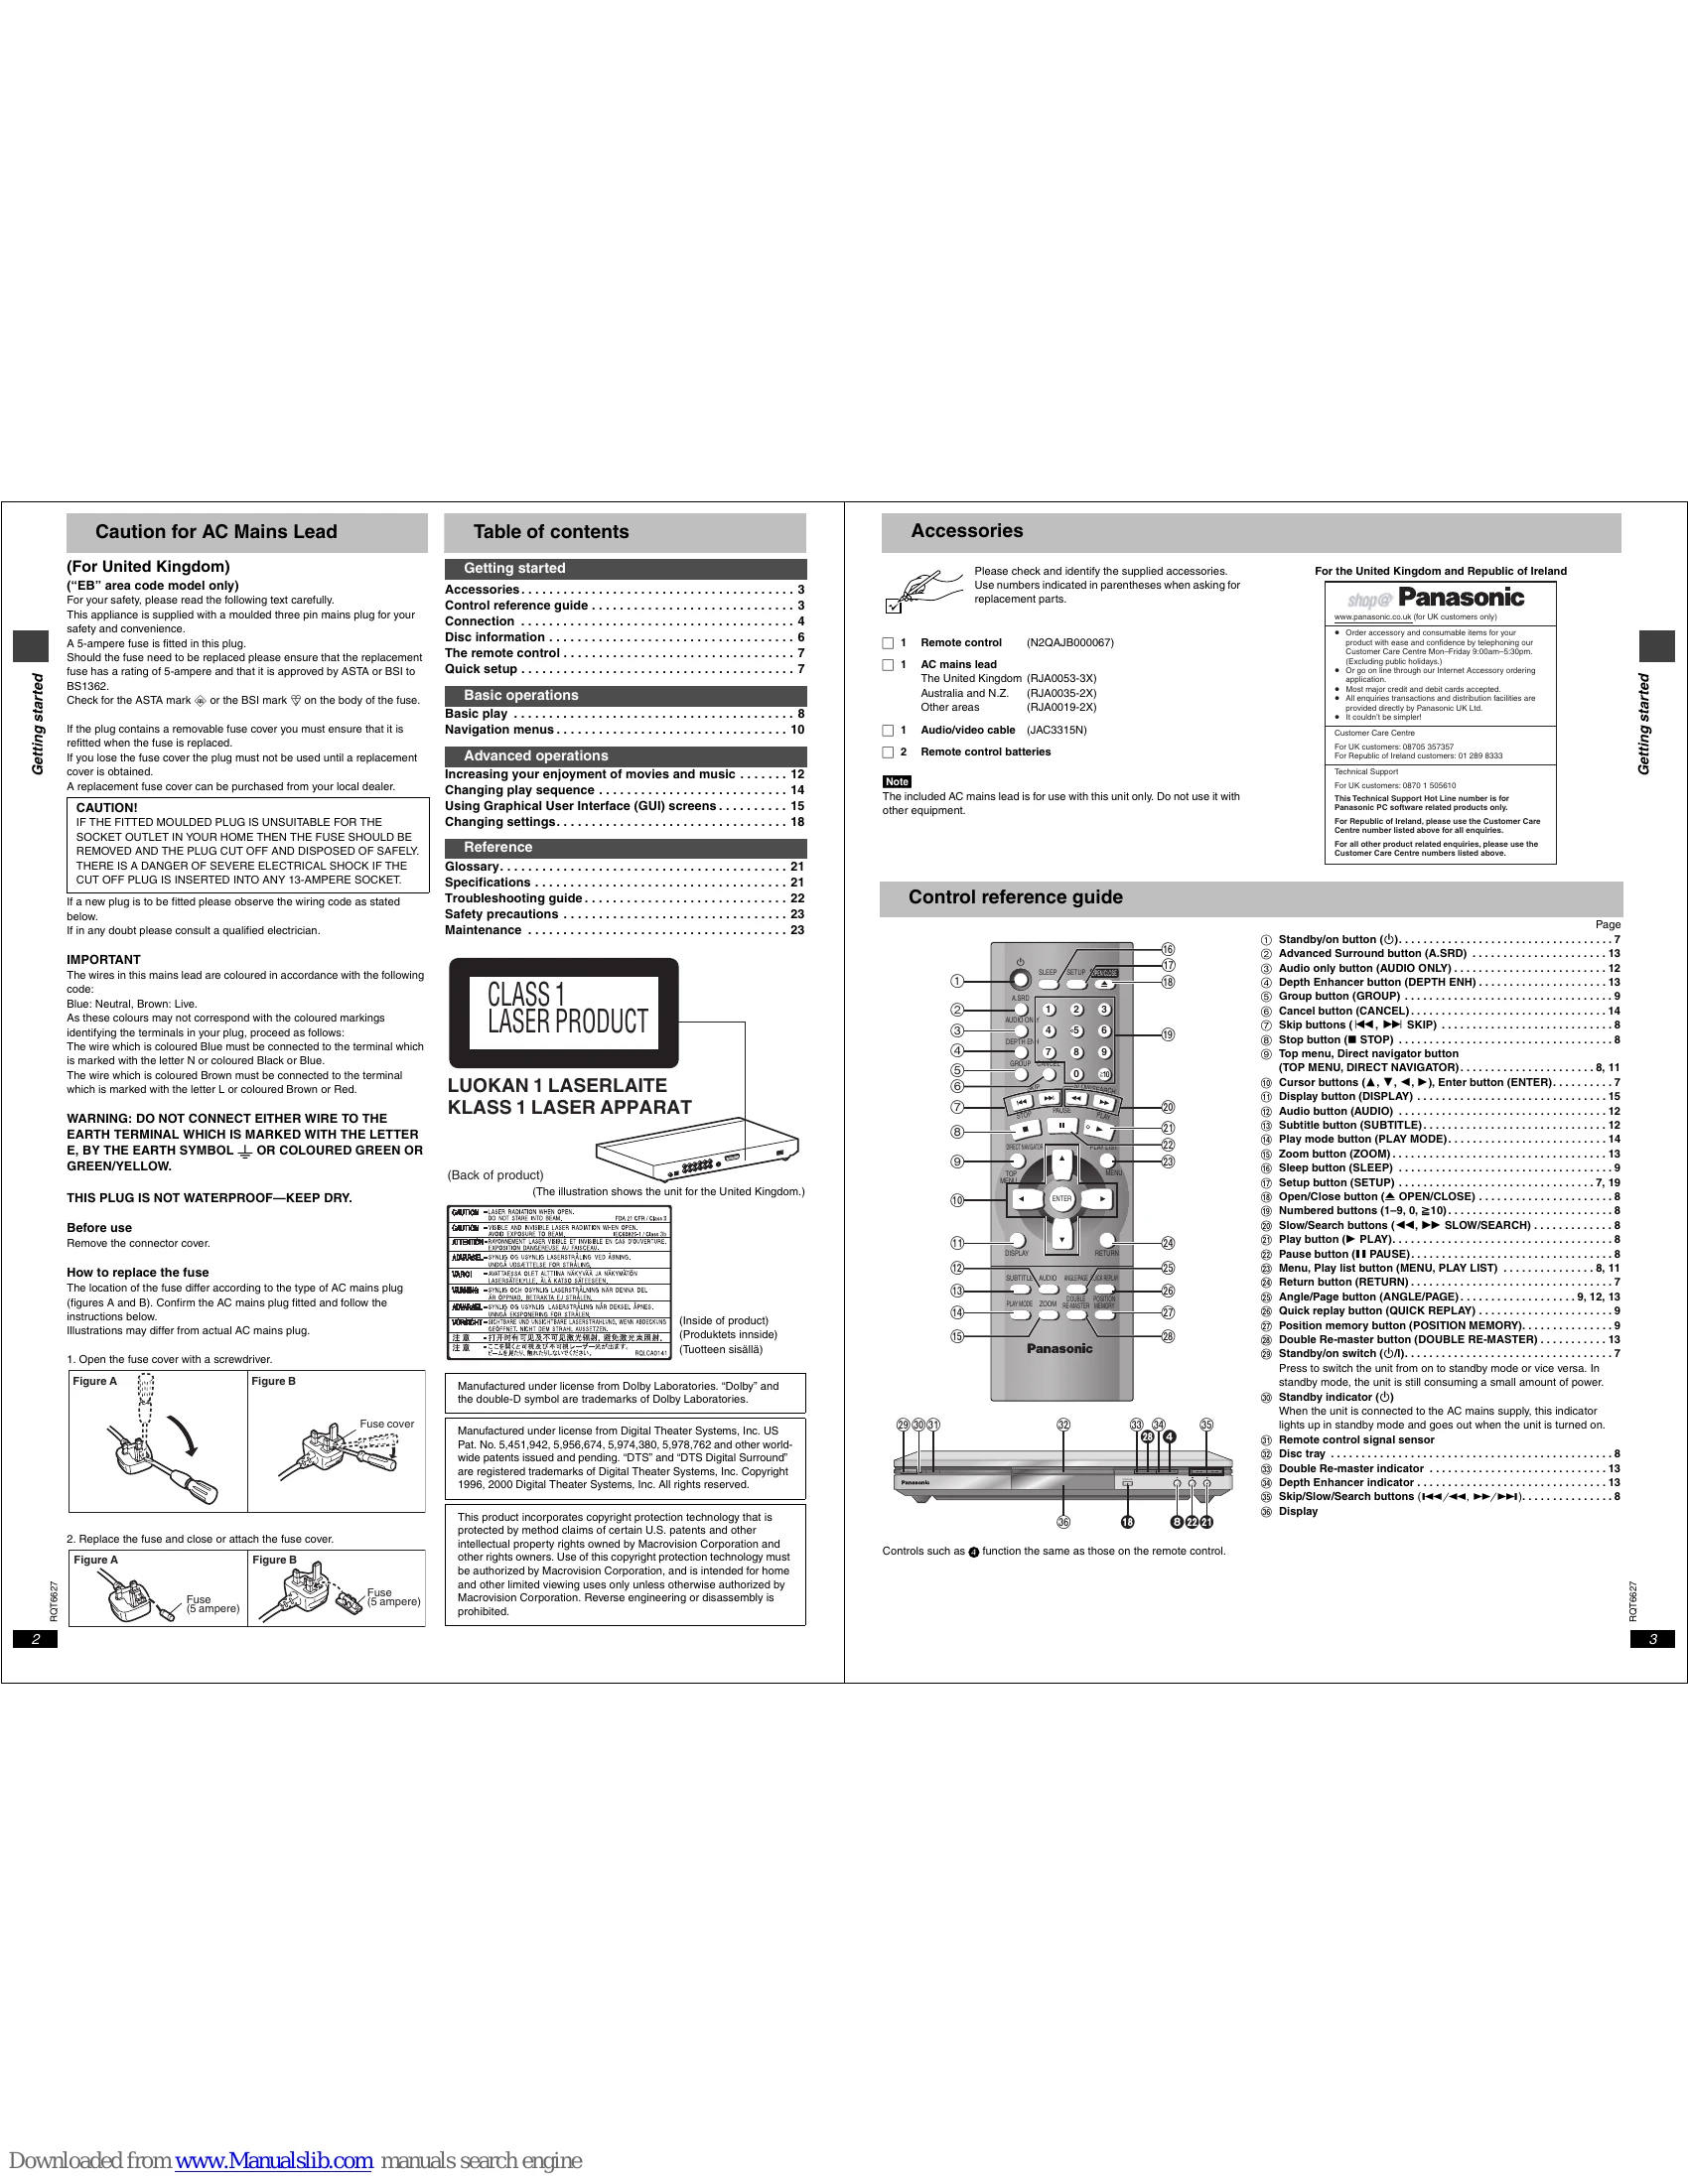
Caution for AC Mains Lead: Specific safety instructions for UK mains leads, including fuse replacement and wiring.
Table of Contents: Provides a detailed overview of the manual's sections, from Getting Started to Reference.
Accessories: Lists included accessories and contact information for ordering replacements.
Connection: Explains how to connect the unit to a television and an amplifier for both basic and home theater setups, including digital and analog connections. Power connection details are also provided.
Disc Information: Details the types of discs that can be played and those that cannot, along with disc structures and handling precautions.
Quick Setup: Guides users through the initial setup process, including setting the menu language, TV aspect, and other essential configurations.
Basic Play: Instructions on how to play discs, including stopping, pausing, skipping, searching, and using slow-motion.
Navigation menus: Explains how to use menus to find and play specific items like tracks, groups, or programs on various disc types (DVD-A, WMA, MP3, JPEG, CD Text).
Changing play sequence: Covers programming the playback order of up to 32 items, all group play, and random play.
Using Graphical User Interface (GUI) screens: Details how to access and use on-screen menus for disc information, playback controls, and unit settings.
Increasing enjoyment of movies and music: Instructions on using features like subtitles, advanced surround sound, variable zoom, and double re-master for enhanced audio and video experiences.
Changing settings: A comprehensive chart and explanation of how to customize various settings, including audio, subtitle, menu languages, video output, speaker settings, and digital output options.
Entering a password (Ratings): Explains how to set and manage parental control ratings.
Troubleshooting guide: A detailed chart to help diagnose and resolve common issues.
Safety precautions: Important safety information regarding placement, power, AC mains lead, and foreign matter.
Maintenance: Instructions for cleaning the unit.
Specifications: Technical specifications of the unit.
Glossary: Definitions of technical terms used in the manual.
| Troubleshooting guide | |||
| Problem | Possible Cause / Solution | Page | |
| No power. | •Insert the AC mains lead securely into the household mains socket. | 5 | |
| The unit automatically switches to standby after approximately 30 minutes in the stop mode. Turn the power back to ON. | 9 | ||
| The unit is automatically switched to the standby mode. | •The SLEEP timer functioned. | 9 | |
| No response when buttons pressed. | •Some operations may be prohibited by the disc. | 8 | |
| •The unit may not be operating properly due to lightning, static electricity or some other external factor. Reset procedure: Press [◆] to switch the unit to the standby mode and then back to ON. Alternatively, press [◆] to switch the unit to the standby mode, disconnect the AC mains lead, and then reconnect it. | - | ||
| •Check that the batteries are installed correctly. | 7 | ||
| No operations can be performed with the remote control. | •The batteries are depleted: Replace them with new ones. •Point the remote control at the remote control sensor and operate. | 7 | |
| Play doesn't start (or stops immediately) when you press [►] (PLAY). | •Condensation has formed: Wait 1 to 2 hours for it to evaporate. | 8 | |
| •This unit cannot play discs other than the ones listed in these operating instructions. | 6 | ||
| •You can only play DVD-Video if their region number is the same or includes the same region number as the unit or if the DVD-Video is marked "ALL". Confirm the region number for the unit on the rear panel. | 6 | ||
| Effects do not work. | •This function depends on software availability. | - | |
| •Try selecting from the disc's menu if one is available. | - | ||
| Cannot select alternative languages. | •This function depends on software availability. | 12 | |
| "NO PLAY" | •The disc may be dirty and may require cleaning. •Ensure that the disc is loaded with the label of the side to be played facing upwards. •Check that the DVD-RAM has something recorded on it. | 6 | |
| No menu play. | •This function depends on software availability. | - | |
| No subtitles. | •This function depends on software availability. Even if a disc has a number of angles recorded, these angles may be recorded for specific scenes only. | 12 | |
| Soundtrack and/or subtitle language is not the one selected with the SETUP menus. | •The disc may be dirty and may require cleaning. •Ensure that the disc is loaded with the label of the side to be played facing upwards. •Check that the DVD-RAM has something recorded on it. | 6 | |
| Cannot change angle. | •This function depends on software availability. | 12 | |
| You have forgotten your ratings password. | • While stopped, press and hold [◄◄◄◄] and [◆] on the unit and then also press and hold [▲] on the unit until "Initialized" disappears from the television. Turn the unit off and on again. All settings will return to the default values. | 18 | |
| Reset all the settings to Factory Preset. | All settings will return to the default values. | 18 | |
| The unit does not play the data format set in "Mixed Disc - Audio & Stills" or "HighMAT" in the SETUP menu. | •Reload the disc for the setting to be effective. Press [▲] to open the tray, then press [►] (PLAY) to start play. | 18 | |
| Picture | Picture distorted. | •Some distortion is normal during SEARCH. •Restore the zoom ratio to x 1.00. •Set the subtitle position to 0. •Set 4:3 Aspect to "Normal". | 17 13 12 7 |
| Menu not displayed correctly. | •Check the connection. •Make sure the television is on. •Ensure the television's video input setting (e.g., VIDEO 1) is correct. | 4, 5 | |
| No picture. | •Go to Video in the SETUP menus, and change "TV Aspect" to suit your television. •Use the television to change the aspect to the correct one. | 7, 18 | |
| The picture shown on the television is not normal. (The sides of the picture are cut off, the picture is stretched horizontally, or black bands appear at the top and bottom of the screen.) | •If your television cannot change the aspect when input is progressive, try changing 4:3 Aspect with the GUI screen. •Turn off the zooming feature of your television if you are using Variable Zoom. •Ensure that the unit is connected directly to the television, and is not connected through a video cassette recorder. | 16 13 4 | |
| There is ghosting when progressive output is on. | •Change video output mode to "480I". This problem is caused by the editing method or material used on DVD-Video, but should be corrected if you use interlace output. | 17 | |
| Picture quality is poor. | •Check the settings in the GUI screen's Picture Menu. •For the United Kingdom and Continental Europe: When you are using the component video out terminals to connect to a television, check to see if the "Video Out (AV/Component)" setting is set to "Y PB PR" in the SETUP menu. | 17 18 | |
| The SETUP menus and other screens shown on the television are displayed incorrectly. | •The unit and television are using different video systems. Units for Asia: Use a multi-system or NTSC television. Units for other areas: Use a multi-system or PAL television. | 6, 18 | |
| Colors appear faded. | - | - | |
| Sound | No sound. | •Check the connections. •Check the volume on the equipment you have connected. | 4, 5 |
| Distorted sound. | •Ensure that the input settings on the other equipment are correct. | - | |
| •Turn Advanced Surround off if it causes distortion. | 13 | ||
| •Turn Attenuator on if it causes distortion with analog connection. | 17 | ||
| •Output from this unit will be in stereo (two channels) when Advanced Surround is on. Turn Advanced Surround off if you are using three or more speakers. •If you have connected this unit to an amplifier through the AUDIO OUT terminals, go to the Audio menu in the SETUP menu, and change "Speaker Setting" to suit to your speakers. Select the large or small icon for all the speakers you have connected. | 13 20 | ||
| •Due to the specifications on some types of televisions, both video and audio may be cut off when you turn the AUDIO ONLY feature on. | 12 | ||
| •If the "D.MIX" indicator on the display goes out while playing a multi-channel DVD-Audio disc, sound will only be output from speakers specified by the disc. Read the disc's instructions for details. | - | ||
| •Press [►] (PLAY) to restore normal play after changing the speed. | 17 | ||
| •Noise may occur when playing WMA files. | - | ||
| Piercing noise comes from the speakers. | •If you have connected this unit to other equipment through the DIGITAL AUDIO OUT terminal, ensure you have selected the correct settings for "Dolby Digital", "DTS Digital Surround" and MPEG" in the SETUP menus' Audio menu. | 19 | |
| •Dialogue Enhancer and Advanced Surround do not work when the unit is outputting bitstream signals. | 17 | ||
| •Advanced Surround does not work if you have changed the play speed. | - | ||
| "CHECK" | • You inserted a disc the unit cannot play; insert one it can. •You inserted a blank DVD-RAM. | 6 | |
| •Disc is dirty: Wipe it clean. | 6 | ||
| "H" | • Trouble may have occurred. The number following "H" depends on the status of the unit. Reset procedure: Press [◆] to switch the unit to the standby mode and then back to ON. Alternatively, press [◆] to switch the unit to the standby mode, disconnect the AC mains lead, and then reconnect it. | - | |
| •If the service numbers fail to clear, note the service number and contact a qualified service person. | - | ||
| "NO DISC" | • You haven't inserted a disc: Insert one. • You haven't inserted the disc correctly: Insert it correctly. | 8 | |
| Television displays | |||
| "Cannot display group xx, picture xx" | You are trying to display incompatible pictures. | 11 | |
| "The progressive out is set to "Disable"" | •Go to Video in the SETUP menus, and select "Enable (NTSC Disc Only)" in "Progressive Out (Component)". | 18 | |
| No on-screen display or only partially displayed. | •Go to Display in the SETUP menus, and select "On" for "On-Screen Messages". •Press [DISPLAY], and press [►] to highlight the Bar Position icon, then press [▲, ▼] to adjust the position. | 18 15 | |
| The disc's menu is displayed in a different language. | Go to Disc in the SETUP menus, and select the preferred language for "Menus". | 18 | |