Brand: Panasonic
Category: Digital Camera
Document Type: Manual
Language: EN
Brand: Panasonic
Category: Digital Camera
Document Type: Manual
Language: EN
Uploaded: Nov. 21, 2025, 7:41 p.m.
Do not subject to strong vibration, shock, or pressure. The lens, LCD monitor, or external case may be damaged. Avoid using the camera in dusty, wet, or sandy locations. Be careful of condensation.
Check that all accessories are supplied. Refer to "Basic Owner's Manual" for details. The card is optional.
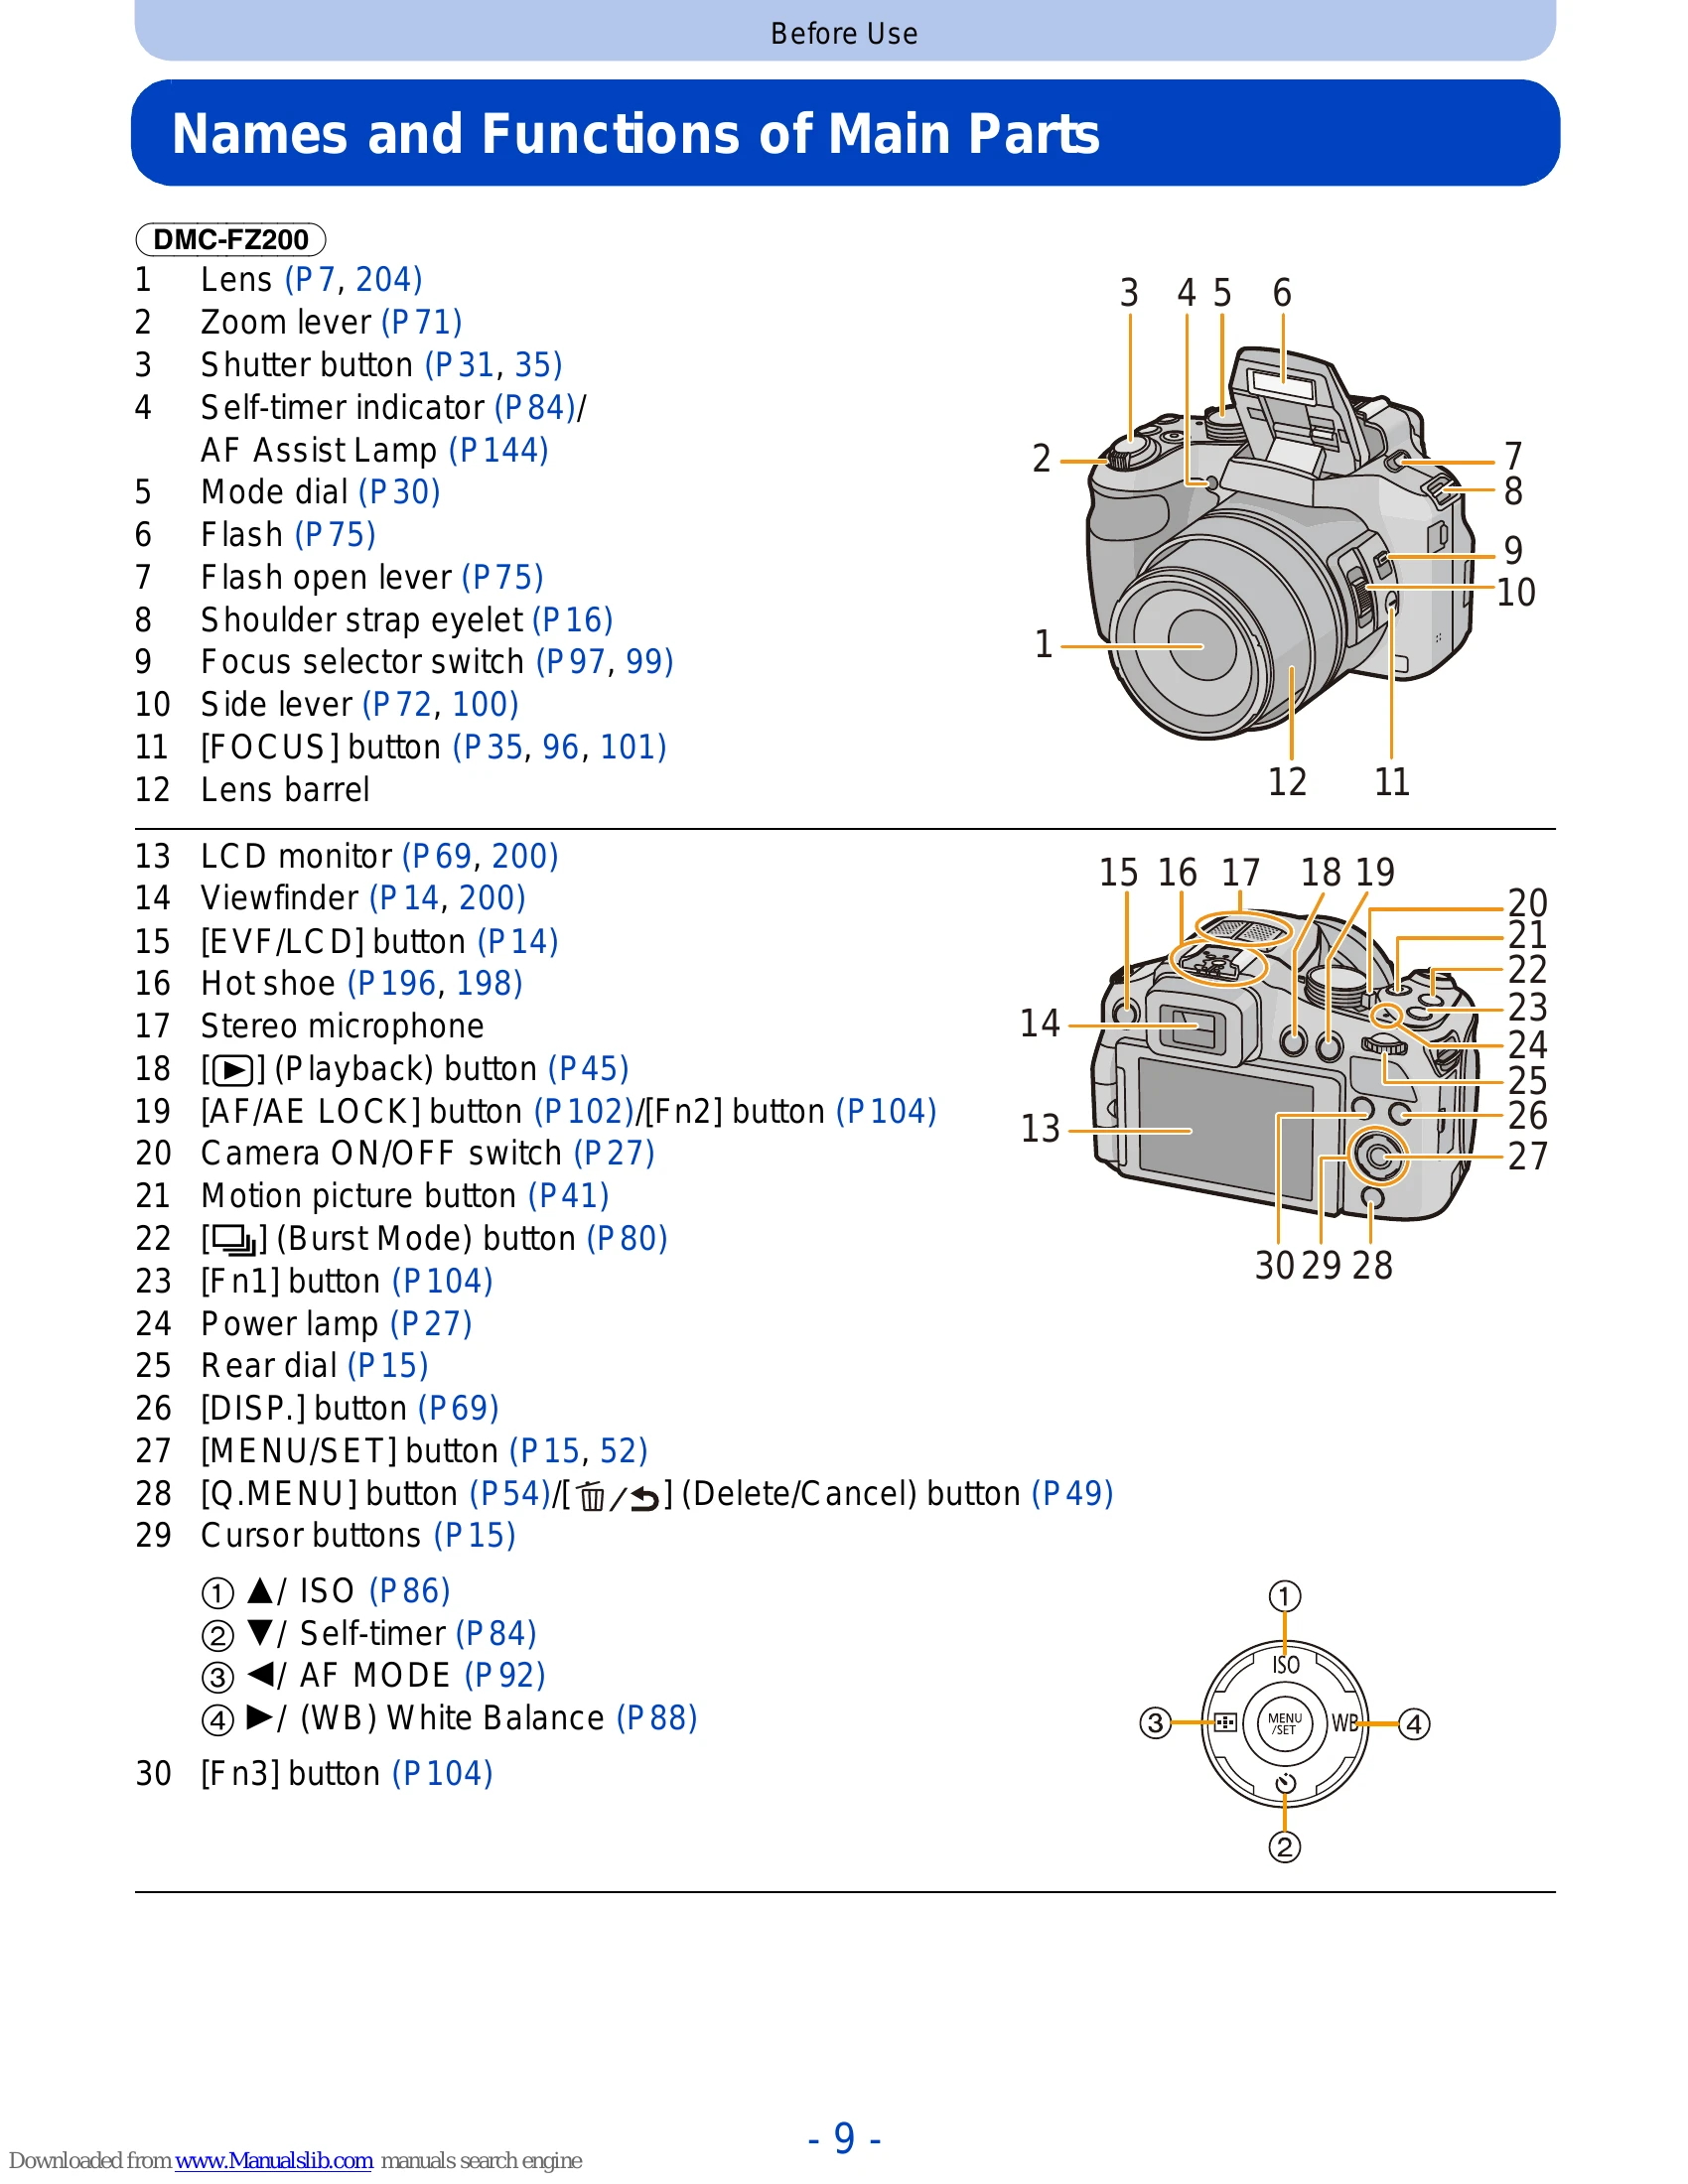
Identifies and describes the various buttons, dials, and components of the DMC-FZ200 and DMC-FZ60 cameras.
Instructions on how to attach the lens cap for protection and how to attach the shoulder strap to prevent dropping.
Instructions for attaching the lens hood to minimize lens flare and ghosting, with a note about flash usage.
Information on compatible batteries, charging procedures, charging time, and battery indication.
Provides estimated recording times and number of pictures for still and motion recording, with CIPA standard conditions.
Step-by-step guide on how to insert and remove memory cards and batteries, with important notes.
Guide to selecting different recording modes.
Instructions on using Program AE Mode, including Program Shift.
Explanation of focusing methods.
Details on using Intelligent Auto Mode, including Defocus Control and Intelligent Auto Plus Mode.
Instructions for recording motion pictures.
How to select, display, and zoom pictures during playback.
Instructions for playing back motion pictures and creating still pictures from them.
Steps for deleting single or multiple pictures.
Guide to setting menu items and using the Quick Menu.
Information about the setup menu options.
| Problem | Possible Cause and Solution |
| Battery and power source The camera cannot be operated even when it is turned on. The camera turns off immediately after it is turned on. |
• The battery is exhausted. Charge the battery. • If you leave the camera on, the battery will be exhausted. → Turn the camera off frequently by using the [Economy] etc. (P63) |
| This unit is turned off automatically. |
• If you connect to a TV compatible with VIERA Link with a HDMI mini cable (optional) and turn the TV off with the remote control for the TV, this unit is also turned off. → If you are not using VIERA Link, set [VIERA Link] to [OFF]. (P66) |
| Card/battery door does not close. | • Insert the battery securely all the way in. |
| Recording The picture cannot be recorded. |
• Is the mode dial correctly set? • Is there any memory remaining on the built-in memory or the card? → Delete unnecessary pictures to increase the available memory. (P49) • You may not be able to record for a short while after turning this unit on when using a large capacity card. |
| The recorded picture is whitish. |
• The picture can become whitish if there is dirt e.g. fingerprints on the lens. If the lens is dirty, turn the camera off, retract the lens barrel and gently wipe the lens surface with a soft dry cloth. |
| The recorded picture is too bright or dark. |
→ Check that the exposure is correctly compensated. (P79) • Setting the [Min. Shtr Speed] to faster speed might make the picture darker. → Set the [Min. Shtr Speed] (P141) to slower speed. |
| Multiple pictures are taken at one time. |
→ Cancel the settings of White Balance Bracket (P91). → Set Auto Bracket (P146) or the Burst Mode (P80) to [OFF]. • Is the Self-Timer (P84) set to [10s / 3pictures]? |
| The subject is not focused properly. |
• The focus range varies depending on the Recording Mode. → Set to the proper mode for the distance to the subject. • The subject is beyond the focus range of the camera. (P34) • There is camera shake (jitter) or the subject is moving slightly. (P29) |
| The recorded picture is blurred. The Optical Image Stabilizer is not effective. |
→ The shutter speed becomes slower when pictures are taken in dark places so hold the camera firmly with both hands to take the pictures. (P29) → When taking pictures at a slow shutter speed, use the Self-timer. (P84) |
| Taking pictures using Auto Bracket is not possible. | • Is there any memory remaining on the built-in memory or the card? |
| The recorded picture looks rough. Noise appears on the picture. |
• Is the ISO sensitivity high or the shutter speed slow? (ISO sensitivity is set to [AUTO] when the camera is shipped. Therefore, when taking pictures indoors etc. noise will appear.) → Decrease the ISO sensitivity. (P86) → Increase the setting for [Noise Reduction] in [Photo Style] or lower the setting for each of the items other than [Noise Reduction]. (P134) → Take pictures in bright places. • Has [High Sens.] in the Scene Mode been set? If so, the resolution of the recorded picture decreases slightly because of high sensitivity processing, but this is not a malfunction. |
| Striping or flicker may appear under lighting such as fluorescent lighting and LED lighting fixture. |
• This is characteristic of MOS sensors which serve as the camera's pickup sensors. This is not a malfunction. |
| The brightness or the hue of the recorded picture is different from the actual scene. |
• When recording under fluorescent or LED lighting fixture etc., increasing the shutter speed may introduce slight changes to brightness and color. These are a result of the characteristics of the light source and do not indicate a malfunction. • When recording subjects in extremely bright locations or recording under fluorescent lighting, LED lighting fixture, mercury lamp, sodium lighting etc., the colors and screen brightness may change or horizontal striping may appear on the screen. |
| Reddish horizontal streaks appear on the LCD monitor during recording. |
• This is characteristic of MOS sensors which serve as the camera's pickup sensors. It appears when the subject has a bright part. Some unevenness may occur in the surrounding areas, but this is not a malfunction. It is recorded in pictures or motion pictures. • It is recommended that you take pictures while taking care not to expose the screen to sunlight or any other source of strong light. |
| Motion picture recording stops in the middle. |
• Use a card with SD Speed Class with “Class 4” or higher when recording motion pictures. • Depending on the type of the card, recording may stop in the middle. → If motion picture recording stops during use of a card of at least "Class 4" or if you use a card that has been formatted on a PC or other equipment, the data-writing speed is lower. In such cases, we recommend that you make a backup of the data and then format (P68) the card in this unit. |
| Object seems to be warped. | • Object seems to be warped slightly when the object moves across the image very fast, but this is because the unit is using MOS for the image sensor. This is not a malfunction. |
| Zoom does not operate properly. | • Is the [Conversion] (P145) set to [] or [0]? |
| DMC-FZ200 The zoom cannot be controlled with the side lever. |
• Has [Side Lever] (P57) been set to [FOCUS]? → Set [Side Lever] to [ZOOM]. |
| Subject cannot be locked. (AF tracking not possible) | • Set the AF area to the distinctive color of the subject if there is a part that is different from the surrounding color. (P95) |
| Recording by [Panorama Shot] is ended before finishing. |
• If the camera is moved too slowly, the camera has assumed that camera motion was stopped and will end the still picture recording. • If there is a great deal of shaking towards the recording direction while moving the camera, recording will end. → When recording with [Panorama Shot], move the camera by trying to trace a small circle parallel to the recording direction at a speed of about 8 seconds per revolution (estimated). |
| Lens Recorded image may be warped, or nonexistent color is surrounding the subject. |
• It is possible that the subject may be warped slightly, or the borders get colored, depending on the zoom magnification, due to the characteristics of the lens. Also, the peripherals of the image might look warped because the perspective is enhanced when the wide angle is used. This is not a malfunction. |
| LCD monitor/Viewfinder The LCD monitor/Viewfinder becomes darker or brighter for a moment. |
• This phenomenon appears when you press the shutter button halfway to set the aperture value and does not affect the recorded pictures. • This phenomenon also appears when the brightness changes when the camera is zoomed or when the camera is moved. This is because of operation of the automatic aperture of the camera, and it is not a malfunction. |
| The LCD monitor flickers indoors. | • The LCD monitor may flicker for a few seconds after this unit is turned on. This is an operation to correct flicker caused by lighting such as fluorescent lights, LED lights etc. and is not a malfunction. |
| The LCD monitor/Viewfinder is too bright or dark. |
• Check [LCD Mode] setting. (P58) • Perform [LCD Display]/[Viewfinder]. (P58) |
| The picture is not displayed on the LCD monitor. |
• Does the picture appear on the Viewfinder? → Press [EVF/LCD] button to switch to LCD monitor display. |
| Black, red, blue and green dots appear on the LCD monitor. |
• This is not a malfunction. These pixels do not affect the recorded pictures. |
| Noise appears on the LCD monitor. | • In dark places, noise may appear to maintain the brightness of the LCD monitor. This does not affect the pictures you are recording. |
| Flash The flash is not activated. |
• Is the flash closed? → Open the flash. (P75) • The flash cannot be used in the following cases: – When using Auto Bracket (P146) – When recording in [Burst] (except for []) (P80) – [Scenery]/[Panorama Shot]/[Night Scenery]/[Handheld Night Shot]/[HDR]/[Sunset]/[Glass Through]/[3D Photo Mode] (Scene Mode) (P107) |
| The flash is activated multiple times. |
• The flash is activated twice when Red-Eye Reduction (P76) has been set. • Is Burst Mode set to []? |
| Playback The picture being played back is rotated and displayed in an unexpected direction. |
• [Rotate Disp.] (P67) is set to [] or []. |
| The picture is not played back. There are no recorded pictures. |
• Is there a picture on the built-in memory or the card? → The pictures on the built-in memory appear when a card is not inserted. The picture data on the card appears when a card is inserted. • Is this a folder or picture which was processed in the PC? If it is, it cannot be played back by this unit. → It is recommended to use the “PHOTOfunSTUDIO” software in the CD-ROM (supplied) to write pictures from PC to card. • Has [Filtering Play] been set for playback? → Change to [Normal Play]. (P156) |
| The folder number and the file number are displayed as [—] and the screen turns black. |
• Is this a non-standard picture, a picture which has been edited using a PC or a picture which was taken by another make of digital camera? • Did you remove the battery immediately after picture-taking or did you take the picture using a battery with a low remaining charge? → Format the data to delete the pictures mentioned above. (P68) (Other pictures will be deleted as well and it will not be possible to restore them. Therefore, check well before formatting.) |
| With a Calendar Search, pictures are displayed on dates differing from the actual dates on which the pictures were taken. |
• Is the clock in the camera set properly? (P27) • When pictures edited using a PC or pictures taken by other equipment are searched, they may be displayed on dates differing from the actual dates on which the pictures were taken. |
| White round spots like soap bubbles appear on the recorded picture. |
• If you take a picture with the flash in a dark place or indoors, white round spots may appear on the picture caused by the flash reflecting of particles of dust in the air. This is not a malfunction. A characteristic of this is that the number of round spots and their position differ in every picture. |
| Red part of the recorded image has changed color to black. |
• When Red-Eye Removal ([A], [S]) is in operation, if you take a picture of subject with red color surrounded by a skin tone color, that red part may be corrected to black by the Red-Eye Removal function. → It is recommend to take picture with Flash Mode set to [A], [←] or [], or [Red-Eye Removal] on the [Rec] menu set to [OFF]. (P145) |
| [Thumbnail is displayed] appears on the screen. | • Is it a picture that has been recorded with other equipment? In such cases, these pictures may be displayed with a deteriorated picture quality. |
| A clicking sound is recorded in the motion pictures. |
• This unit automatically adjusts the aperture during motion picture recording. At such times, a clicking sound is heard, and this sound may be recorded on the motion pictures. This is not a malfunction. • The operational sound of the zoom or button operation may be recorded when it is operated during the recording of a motion picture. |
| Motion pictures recorded with this unit cannot be played back on other equipment. | • Motion pictures recorded in [AVCHD] or [MP4] may be played back with poor picture or sound quality or playback may not be possible even when played back with equipment compatible with these formats. Also, the recording information may not be displayed properly. |
| TV, PC and printer The picture does not appear on the television. |
• Is the camera connected to the TV correctly? → Set the TV input to external input mode. |
| The display areas on the TV screen and the camera's LCD monitor are different. | • Depending on the TV model, the pictures may be extended horizontally or vertically or they may be displayed with their edges cut off. |
| The motion pictures cannot be played back on a TV. |
• Are you trying to play back the motion pictures by directly inserting the card in the card slot of the TV? → Connect the camera to the TV with the AV cable (optional), or with the HDMI mini cable (optional), and then play back the motion pictures on the camera. (P176) |
| The picture is not displayed fully on the TV. | → Check [TV Aspect] setting. (P66) |
| VIERA Link does not work. |
• Is it connected properly with the HDMI mini cable (optional)? (P176) → Confirm that the HDMI mini cable (optional) is firmly fitted. → Press [] on this unit. • Is the [VIERA Link] on this unit set to [ON]? (P66) → Depending on HDMI terminal of the TV, the input channel may not switch automatically. In this case, use the remote control for the TV to switch input. (For details on how to switch input, please read the operating instructions for the TV.) → Check the VIERA Link setting on the connected device. → Turn this unit off and on. → Set [HDAVI Control] to [Off] on the TV and then turn it back to [On]. (Refer to the operating instructions of the TV for details.) |
| Cannot communicate with the PC. |
• Is the camera connected to the PC correctly? • Is the camera recognized by the PC correctly? → Set to [PC] in [USB Mode]. (P65, 183) → Turn this unit off and on. |
| The card is not recognized by the PC. (The built-in memory is recognized.) |
Disconnect the USB connection cable. Connect it again while the card is inserted in the camera. → If there are two or more USB terminal on a single PC, try connecting the USB connection cable to another USB terminal. |
| The card is not recognized by the PC. (SDXC memory card is used) |
Check if your PC is compatible with SDXC memory cards. http://panasonic.net/avc/sdcard/information/SDXC.html A message prompting to format the card may be displayed when connecting, but do not format. → If the [Access] displayed on the LCD monitor does not disappear, disconnect the USB connection cable after turning this unit off. |
| There is a problem trying to upload to YouTube or Facebook. |
Confirm that the login information (login ID/user name/mail address/password) is correct. → Confirm that the PC is connected to the Internet. → Confirm that resident software such as virus protection software or firewall is not blocking access to YouTube or Facebook. → Confirm with YouTube or Facebook as well. |
| The picture cannot be printed when the camera is connected to a printer. |
• Pictures cannot be printed using a printer which does not support PictBridge. → Set to [PictBridge(PTP)] in [USB Mode]. (P65, 188) |
| The ends of the pictures are cut at printing. |
When using a printer with a cropping or borderless printing function, cancel this function before printing. (For details, refer to the operating instructions for the printer.) → When you order photo studios to print pictures, ask the photo studio if the pictures can be printed with both ends. |
| The panorama picture is not printing correctly. |
• Since aspect ratio of a panorama picture differs from normal pictures, it may not always be possible to print it correctly. → Please use a printer that supports panorama pictures. (For details, please see the operating instructions of your printer) → We recommend using the “PHOTOfunSTUDIO” software on the CD-ROM (supplied) to adjust the size of the still picture to the print paper size. |
| When shaking the camera, there is a rattling sound. |
In the following cases, there is no problem with the camera, so do not worry. • There is a rattling sound when the camera is shaken while this unit is turned off or during Playback Mode. (Sound of lens moving) • This unit makes a rattling sound etc., when this unit is turned on or off, or when switching from Recording Mode to Playback Mode. (Sound of the aperture) • Vibration is felt when zooming. (Movement of the lens barrel motor) • When you hear a clicking or snapping sound from the lens while taking pictures. (The sound of the aperture adjusting to changes in light levels) When this occurs, the image on the LCD monitor may appear to change dramatically. However, the picture is not affected. |
| An unreadable language was selected by mistake. | Press [MENU/SET], select the [Setup] menu icon [] and then select the [] icon to set the desired language. (P68) |
| A red lamp sometimes turns on when the shutter button is pressed halfway. | • In dark places, the AF Assist Lamp lights red to make it easier to focus on a subject. |
| Part of the picture is flashing in black and white. |
• This is a highlight function showing the white saturated area. (P61) • Is the [Highlight] set to [ON]? |
| The AF Assist Lamp does not turn on. |
• Is [AF Assist Lamp] on the [Rec] menu set to [ON]? (P144) • The AF Assist Lamp does not turn on in bright places. |
| The camera becomes warm. | • The surface of the camera may become warm during use. This does not affect the performance or quality of the camera. |
| The lens clicks. | • When the brightness changes due to zoom or camera movement etc., the lens may click and the picture on the screen may drastically change. However, the picture is not affected. The sound is caused by the automatic adjustment of the aperture. This is not a malfunction. |
| The clock is reset. |
• If you do not use the camera for a long time, the clock may be reset. → [Please set the clock] message will be displayed; please re-set the clock. (P27) |
| Zooming stops instantaneously. | • When using the Extended Optical Zoom, the zooming action will stop temporarily. This is not a malfunction. |
| DMC-FZ60 Zoom does not go up to maximum magnification. |
• Is the camera set to Macro Zoom Mode? (P97) Maximum zoom during Macro Zoom Mode is 3× Digital Zoom. |
| The file numbers are not recorded consecutively. | • When you perform an operation after taking a certain action, the pictures may be recorded in folders with different numbers from the ones used prior to the operation. |
| The file numbers are recorded with previously used numbers. | • If you insert or remove the battery before turning off this unit, the folder and file numbers for the pictures taken will not be stored in the memory. When this unit is turned on again and pictures are taken, they may be stored under file numbers which should have been assigned to previous pictures. |
| When the camera is left alone, the slide show is suddenly displayed. | • This is the [Auto Demo] to introduce the features of the camera. Press a button to return the camera to the original screen. |