Brand: MITSUBISHI ELECTRIC
Category: Projector
Document Type: Manual
Language: EN
Brand: MITSUBISHI ELECTRIC
Category: Projector
Document Type: Manual
Language: EN
Uploaded: Nov. 21, 2025, 8:22 p.m.
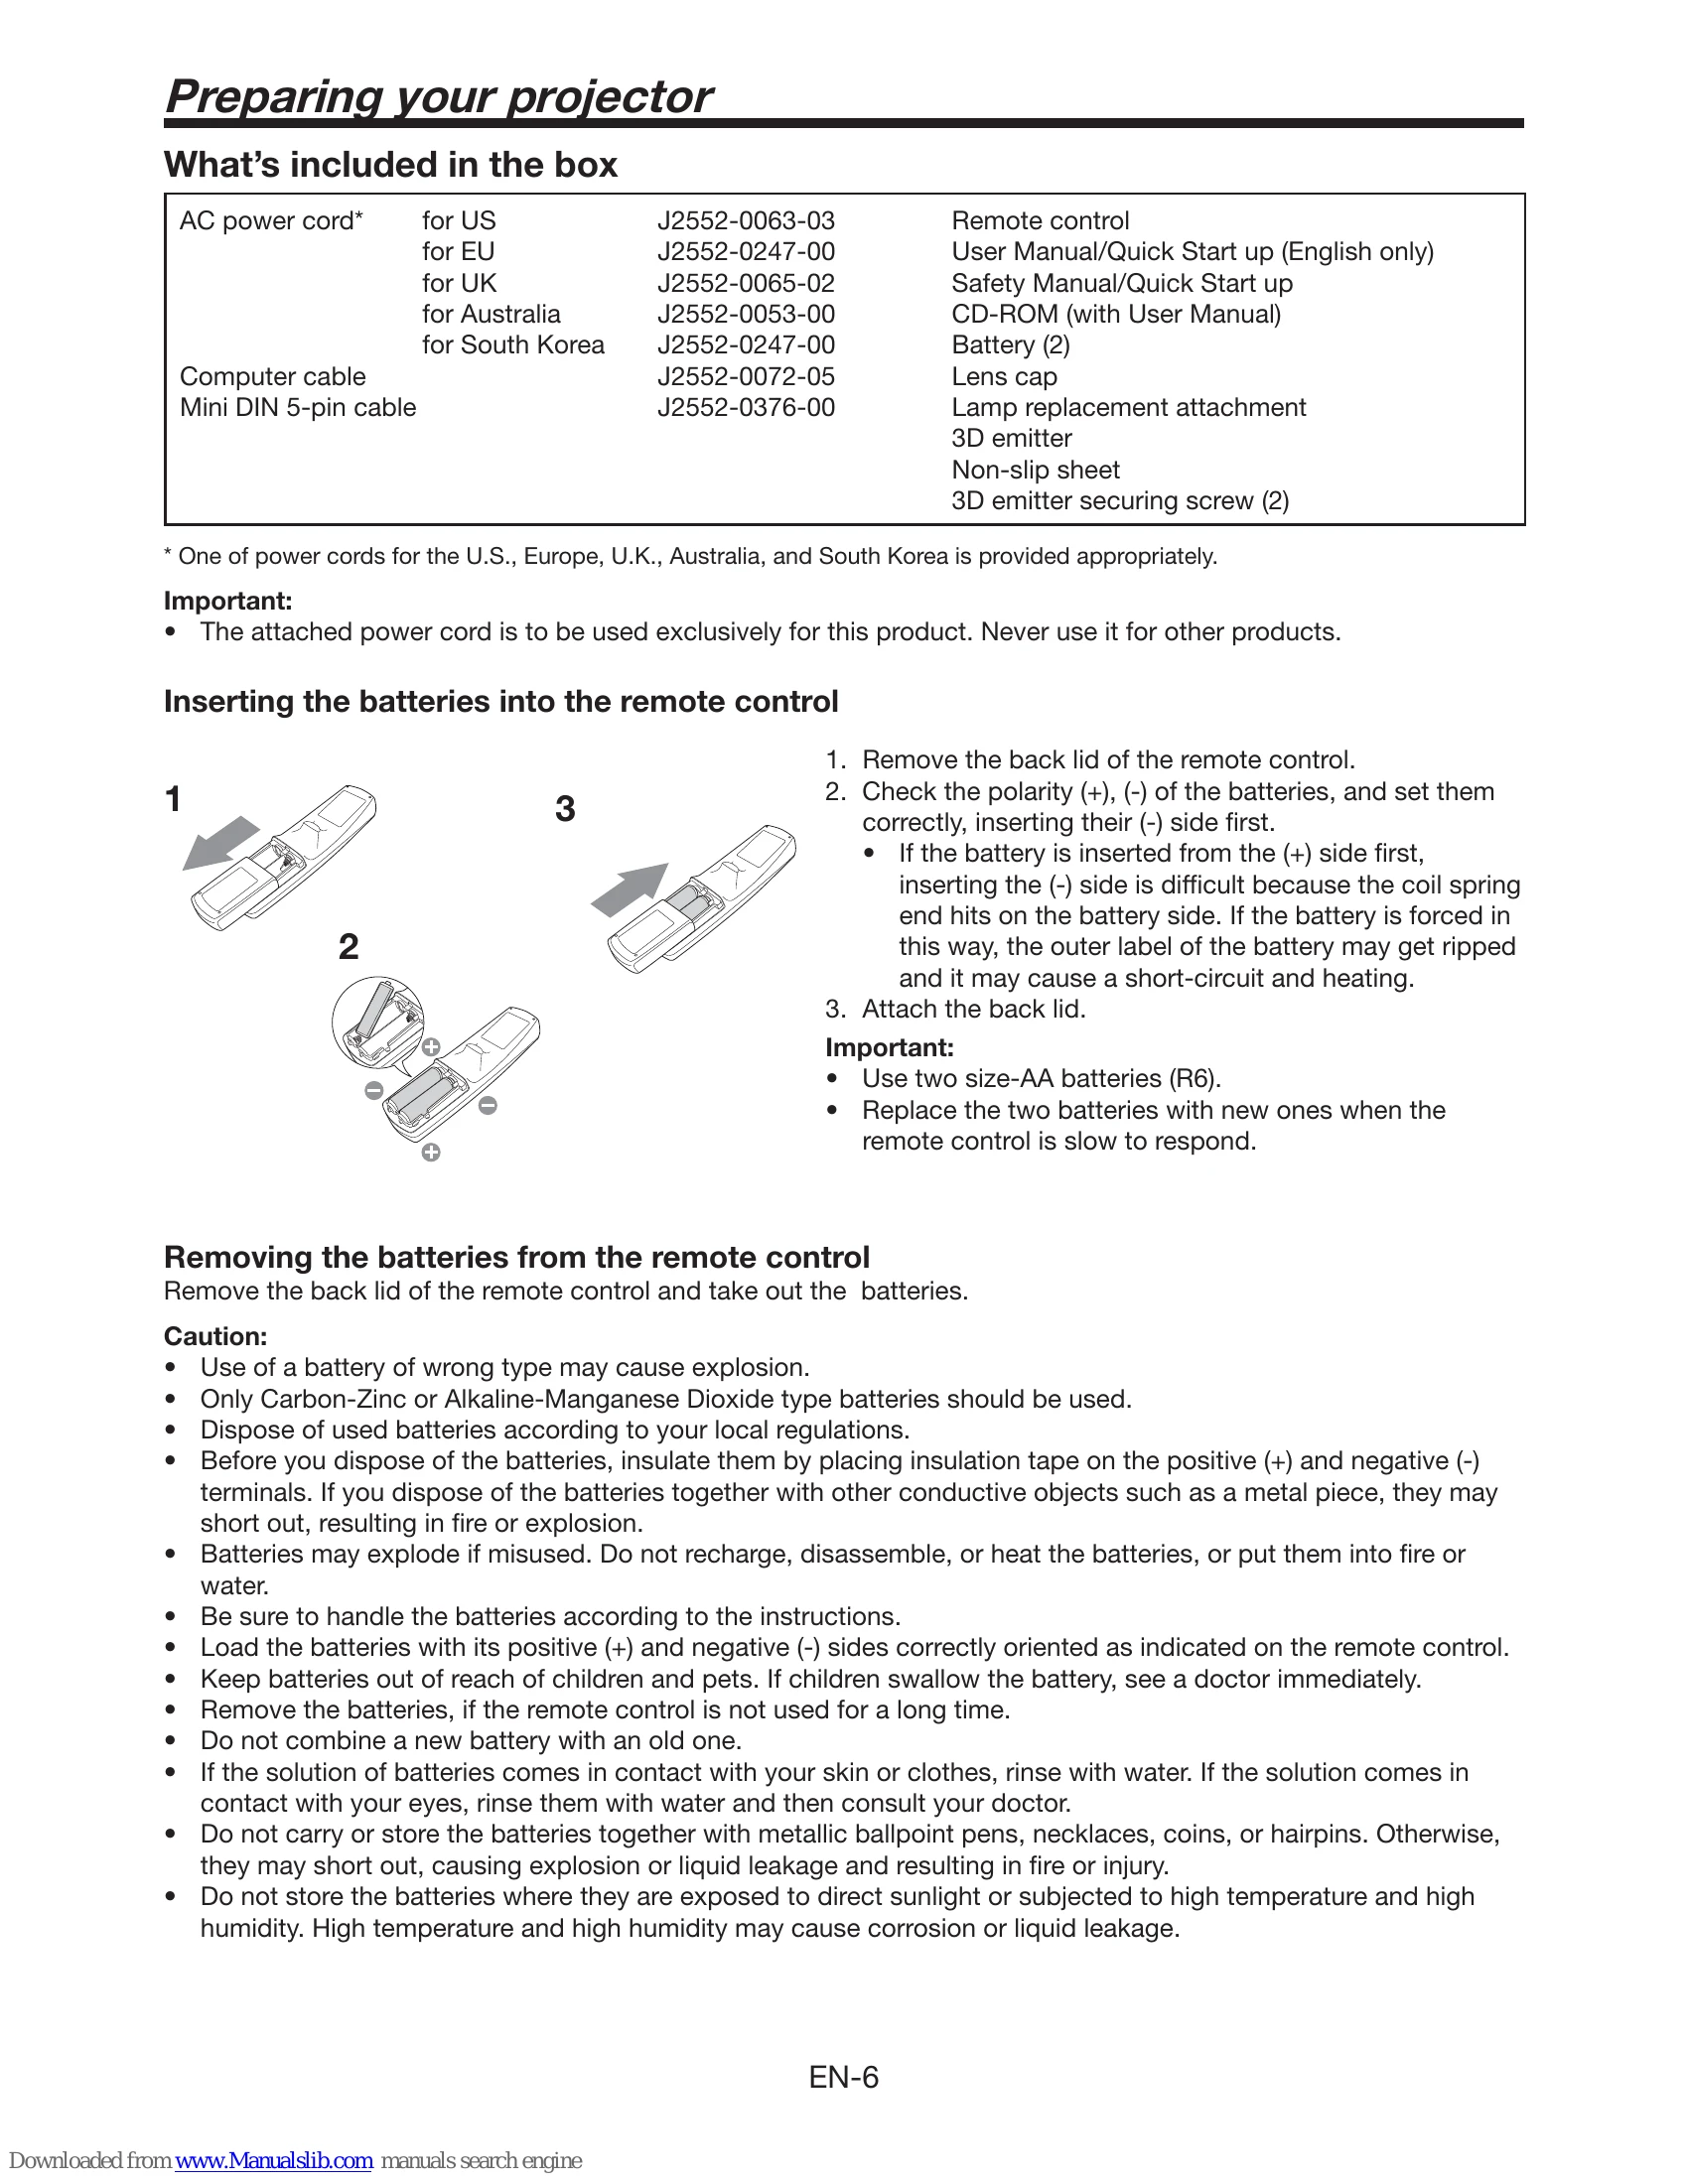
The projector has several components including a lamp cover, lens, focus ring, zoom ring, control panel, LENS SHIFT dial, adjustment feet, remote control sensor (front and rear), air inlet grille, terminal panel, and Kensington Security Lock Standard connector.
Ensure the projector and video equipment are turned off before connecting. Basic home theater system connections involve connecting various video players (Video player, DVD player, Set-top box or digital tuner) to the projector's input terminals.
| Problem | Solution |
|---|---|
| Power can not be turned on. | Check whether the indicators are on or off and how they are lightning. POWER STATUS Solution Off Off Connect the power cord to the projector. Plug the power cord into a wall outlet. If any objects are blocking the air inlet or outlet grill, re move them and carry out the following. 1. Unplug the power cord from the wall outlet. 2. Make sure that the projector has cooled off. 3. Plug the power cord into the wall outlet. 4. Press the POWER button. If any objects are blocking the air inlet or outlet grill, remove them. Blinking Steady red orange Don't expose the air outlet grilles to hot air emitted from a heating appliance. After the STATUS indicator stops blinking, press the POWER button. Blinking green If you unplug the power cord while the fan is rotating, the lamp may not turn on about one minute when you plug the power cord next time. The lamp can't turn on again for one minute after it goes out. Press the POWER button several times. Replace the lamp. (The lamp is at the end of its life.) |
| No image appears on the screen. | Steady red Attach the lamp cover. Off Unplug the power cord from the wall outlet and contact your dealer. Blinking Steady red/green or Blinking Check that the lens cap is removed. It may take about one minute for the lamp to light up. The lamp fails to light up on rare occasions. In such a case, wait for a few minutes and then try again. If the projector was turned off before the lamp was cooled down sufficiently last time, the fan may start rotating and the POWER button may not work after the power cord is plugged. After the fan stops rotating, press the POWER button to turn back on the POWER indicator. Check that the intake vent is clean. Check that the lamp cover is closed. (See page 50.) Check that the cables connected to the external devices are not broken. When an extension cable is being used, replace it with the supplied cable for check. When images are displayed correctly, add an RGB signal amplifier to the extension cable. Check the operation manual of the video device for its connection. This problem may occur when the intake vent and/or exhaust vents are blocked. (In such a case, the STATUS indicator brinks orange.) → Remove the objects blocking the intake vent and/or exhaust vents and then carry out the following procedure. 1. Wait for the intake fan and/or exhaust fan to stop. (Wait until the STATUS indicator goes out.) 2. Unplug the power cord from the wall outlet. 3. Wait at least 10 minutes. 4. Plug the power cord into the wall outlet. 5. Press the POWER button. When the STATUS indicator is steady red, it is indicating that the lamp should be replaced. Replace the lamp in this case. Check that AUTO POWER OFF has been set to OFF. If the lamp has deteriorated, it may go out after a while it illuminates. |
| The screen for entering the password appears. | PASSWORD FUNCTION in the FEATURE menu has been set to DISPLAY INPUT to enable the password lock. → Enter the password or contact the person in charge of management of the projector. (See page 41.) |
| "NO SIGNAL" is displayed. | Turn on the power of the connected device, or check whether there is something wrong with the connected device. Check whether the external device output signals. (Check this especially when the external device is a notebook computer.) Check that the cable connected to the external device isn't defective. Check that the projector is connected to the external device using the correct terminals. Check that the connected device is correctly selected as the input source. When an extension cord is being used, replace it with the supplied cable and check whether images are projected correctly. If images are projected correctly, use an RGB signal amplifier along with the extension cord. |
| Images may be jagged when connecting the projector using the HDMI cable. | Make sure if the cable is firmly plugged into the connecting terminal. To accept and display 1080p signals on the screen, make sure to use a high-speed HDMI cable that can transmit 1080p signals. When a distributor or an AV amplifier is connected using an HDMI cable, check that the distributor or the AV amplifier complies with HDMI1.3 or higher (Deep Color). When displaying 3D images, check that the distributor or the AV amplifier complies with HDMI1.4 or higher (3D display). |
| "NO SIGNAL" is displayed when connecting the projector using the HDMI cable. | |
| Projected images are shaking. | Check that the cable connected to the external device isn't intermittent. Connect the cable's plug with the external device's connector firmly. |
| Projected images are displaced. | Press the AUTO POSITION button. |
| Projected images are distorted. | Some computers output out-of-spec signals on rare occasion. Adjust the SIGNAL menu. (See page 40.) Adjust the projector and the screen so that they are perpendicular to each other. (See page 10.) |
| Projected images are dark. | Adjust BRIGHTNESS and CONTRAST in the IMAGE menu. (See page 37.) Replace the lamp. (See page 48.) |
| Projected images are blurred. | Adjust the focus. (See pages 18 and 23.) Clean the lens. Press the or button on the remote control to eliminate flicker. Adjust TRACKING and FINE SYNC. in the SIGNAL menu. (See page 40.) |
| White dots are seen on projected images. | Adjust BRIGHTNESS and CONTRAST in the IMAGE menu. (See page 37.) Adjust the projector and the screen so that they are perpendicular to each other. (See page 10.) This symptom is normal for a DLP™™ projector and is not a malfunction. (A very small number of pixels may stay lit or out, but such symptom is not a malfunction. Pixels of 99.99% or more are effective.) |
| Black dots are seen on projected images. | This is due to color breaking noise that occurs in a DLP™™ system and is not a malfunction. |
| Rainbow effect is seen on projected images. | This is due to interference with the screen surface and is not a malfunction. Replace the screen or displace the focus a little. |
| Fine streaks are seen on projected images. | Vertical or horizontal streak noise may appear on the projected image, depending on the type of the DVD player or game console you use. In such a case, you can reduce such streak noise by enabling the LPF. (See page 40.) |
| Projected images become wavy. | Connect the plugs of the cables to external devices securely. Keep the projector away from devices that emit interfering radio waves. |
| Hue is not appropriate. | Check that the cables connected to the external devices are not broken. |
| Tint in projected images is incorrect. | Check that COMPUTER INPUT in the SIGNAL menu is correctly set. (See page 34.) Check that the cable connected to the external device isn't broken. |
| Different color tint. | When comparing images projected by two projectors, tints in the displayed images may be different because of variation between their optical components. This is not a malfunction. When comparing the image projected by this projector with those displayed on the television or PC monitor, tints in the displayed images may be different because of difference in the range of color reproducibility. This is not a malfunction. |
| Color unevenness appears in images. | Since the projector utilizes a high-definition DLP™™ chip, color variations (at the center of the screen and along the rims of the active area) that are caused by diffraction of light may occur. This is not a malfunction. |
| Only the motion areas in the images supplied from the computer aren't displayed. | This is caused by the computer being used. Contact the manufacturer of your computer. |
| Projected images are obscured. | Match the output resolution of your computer with the resolution of the projector. For the method to change the output resolution of the computer, contact the manufacturer of your computer. (See page 59.) |
| Image remains freezing. | When image from VCR is projected, it may remain freezing during speed search. This is not a malfunction. |
| Noise appears around the image. | In some images such as DVD, noise may appear around the recorded image. In this case, decrease the setting value of OVER SCAN of the SIGNAL menu. (See page 34.) |
| Projected images are flickering. | After the POWER button or ON button on the remote has been pressed, or the Lamp mode setting has changed, images may be flickering until the lamp lights stably. This is an expected behavior. When selecting the input signal and Auto Position, the projected image may be flickering temporarily. This is not a product malfunction. |
| No sound comes from the speakers connected to the AV amplifier. (No sound comes from the home theater system speakers.) | The projector is not equipped with the speakers. The AV amplifier reads the information that projector is not equipped with the speakers and then passes this information along to the DVD player. Because of this, either the DVD player may be temporarily stopping audio output, or the AV amplifier may be temporarily stopping audio output from the DVD player. → Change the setting on the AV amplifier or the DVD player. |
| The exhaust vents emit warm air. | This air comes out after cooling the inside of the projector. You may feel hot, but this is not a malfunction. |
| The menu can't be used. | The microcomputers inside the projector may be wrongly operating because of noise. → Press the POWER button to turn off the lamp and wait about 2 minutes. Then unplug the power cord from the outlet, wait at least 10 minutes, and plug the power cord back into the outlet. When the POWER button doesn't function, unplug the power cord from the outlet, wait at least 10 minutes, and then plug the power cord back into the outlet. |
| "TEMPERATURE!!" is displayed. | This indication appears when the ambient temperature rises high. When the ambient temperature stays high, the lamp goes out. → Eliminate any causes of the rise in the ambient temperature. |
| The mark appears. | This indication appears when the air inlet or outlet grille is blocked. When they are kept blocked, the lamp goes out. → Remove the objects blocking the air inlet or outlet grille. This mark appears when ineffective operation is carried out. This isn't a product malfunction. |
| The remote control doesn't function easily or at all. | Check that the batteries are loaded in the remote control or the batteries are not weak. (See page 6.) Check that the remote control sensor isn't exposed to direct sunlight or fluorescent light. (See page 9.) Use the remote control within its operation range. (See page 9.) Use the remote control at least 10 cm away from the projector. |
| The buttons on the control panel (except for the POWER button) don't function. | PASSWORD FUNCTION in the FEATURE menu has been set to MENU ACCESS to enable the password lock. → Cancel the password lock or contact the person in charge of management of the projector. (See page 41.) |
| Mechanical operating noise (clicking sound) is heard. | The iris produces sound while operating. This is not a malfunction. |
| Abnormal sound is heard. | Because the color wheel spins at a high speed, metallic sounds may be heard in rare occasions. Such symptom is not a malfunction. |
| Images are not 3D. *The 3D glasses are sold separately. They are not supplied with this product. | Is the 3D in the IMAGE menu set to ON? → Set the 3D to ON Is there any block in the communication area between the 3D emitter and the 3D glasses? Or, is there a sticker or other such item on the infra-red reception section on the 3D glasses? → The 3D glasses operate by receiving signals from the 3D emitter. Check that there is not any block in the communication area between the 3D emitter and the 3D glasses. Is the distance between the 3D emitter and 3D glasses too far, or too close? → Adjust the location of the 3D emitter. Are the direction of the 3D emitter and that of the infra-red reception section on the 3D glasses misaligned? → Adjust the direction and location of the 3D emitter. Is the 3D glasses turned off? → Turn on the power of the 3D glasses. It may need to switch the 3D mode (such as 3D setting system) of the recorder/player when projecting 3D images with the 3D image supporting recorder/player. (For detail, see the User Manual of the recorder/player.) Is the 3D mode of the projector set properly for the image? → Set the 3D MODE of the projector (FRAME PACKING, SIDE BY SIDE, TOP AND BOTTOM) properly for the image. Is the 3D emitter connected to the projector? The 3D glasses may become out of sync due to fluorescent light. Turn off the fluorescent light. Is there any other 3D emitter or 3D image supporting television close to the 3D glasses? → The 3D glasses work by receiving signals from the 3D emitter. Check that there is no interference of the signals from other infra-red emission section. Is there any block in the communication area between the 3D emitter and the 3D glasses? Or, is there a sticker or other such item on the infra-red reception section on the 3D glasses? → When the signal from the 3D emitter is interrupted, the power of the 3D glasses automatically turns off 5 minutes after the interruption. Check that there is not any block in the communication area between the 3D emitter and the 3D glasses. |
| The power of the 3D glasses turns off automatically. *The 3D glasses are sold separately. They are not supplied with this product. | |
| There is something wrong with the 3D images. *The 3D glasses are sold separately. They are not supplied with this product. | Depending on the 3D image status, you may feel something wrong with the 3D images. → Switch the 3D SYNC. setting of the projector to check whether or not the uncomfortable feeling is disappeared. → When the signal from the 3D emitter is interrupted, the power of the 3D glasses automatically turns off 5 minutes after the interruption. Check that there is not any block in the communication area between the 3D emitter and the 3D glasses. The 3D glasses may become out of sync due to fluorescent light. Turn off the fluorescent light. Is there any other 3D emitter or 3D image supporting television close to the 3D glasses? → The 3D glasses work by receiving signals from the 3D emitter. Check that there is no interference of the signals from other infra-red emission section. Does the battery of the 3D glasses die? → Replace the battery with a new one if the indicator does not light up even when the power is turned on. |
| The indicator on the 3D glasses does not light up even if the power is turned on. *The 3D glasses are sold separately. They are not supplied with this product. | |
| If the following problem occurs after the lamp is replaced, check the following first. | |
| The projector does not turn on. | Fit the lamp cover securely. (See pages 48 - 50.) Reset the lamp operating time. (See page 50.) |
| The STATUS indicator blinks. | Reset the lamp operating time. (See page 50.) |