Brand: JVC
Category: Camcorder
Document Type: Manual
Language: EN
Brand: JVC
Category: Camcorder
Document Type: Manual
Language: EN
Uploaded: Aug. 10, 2025, 12:36 a.m.
Manual Publish Date: null
null
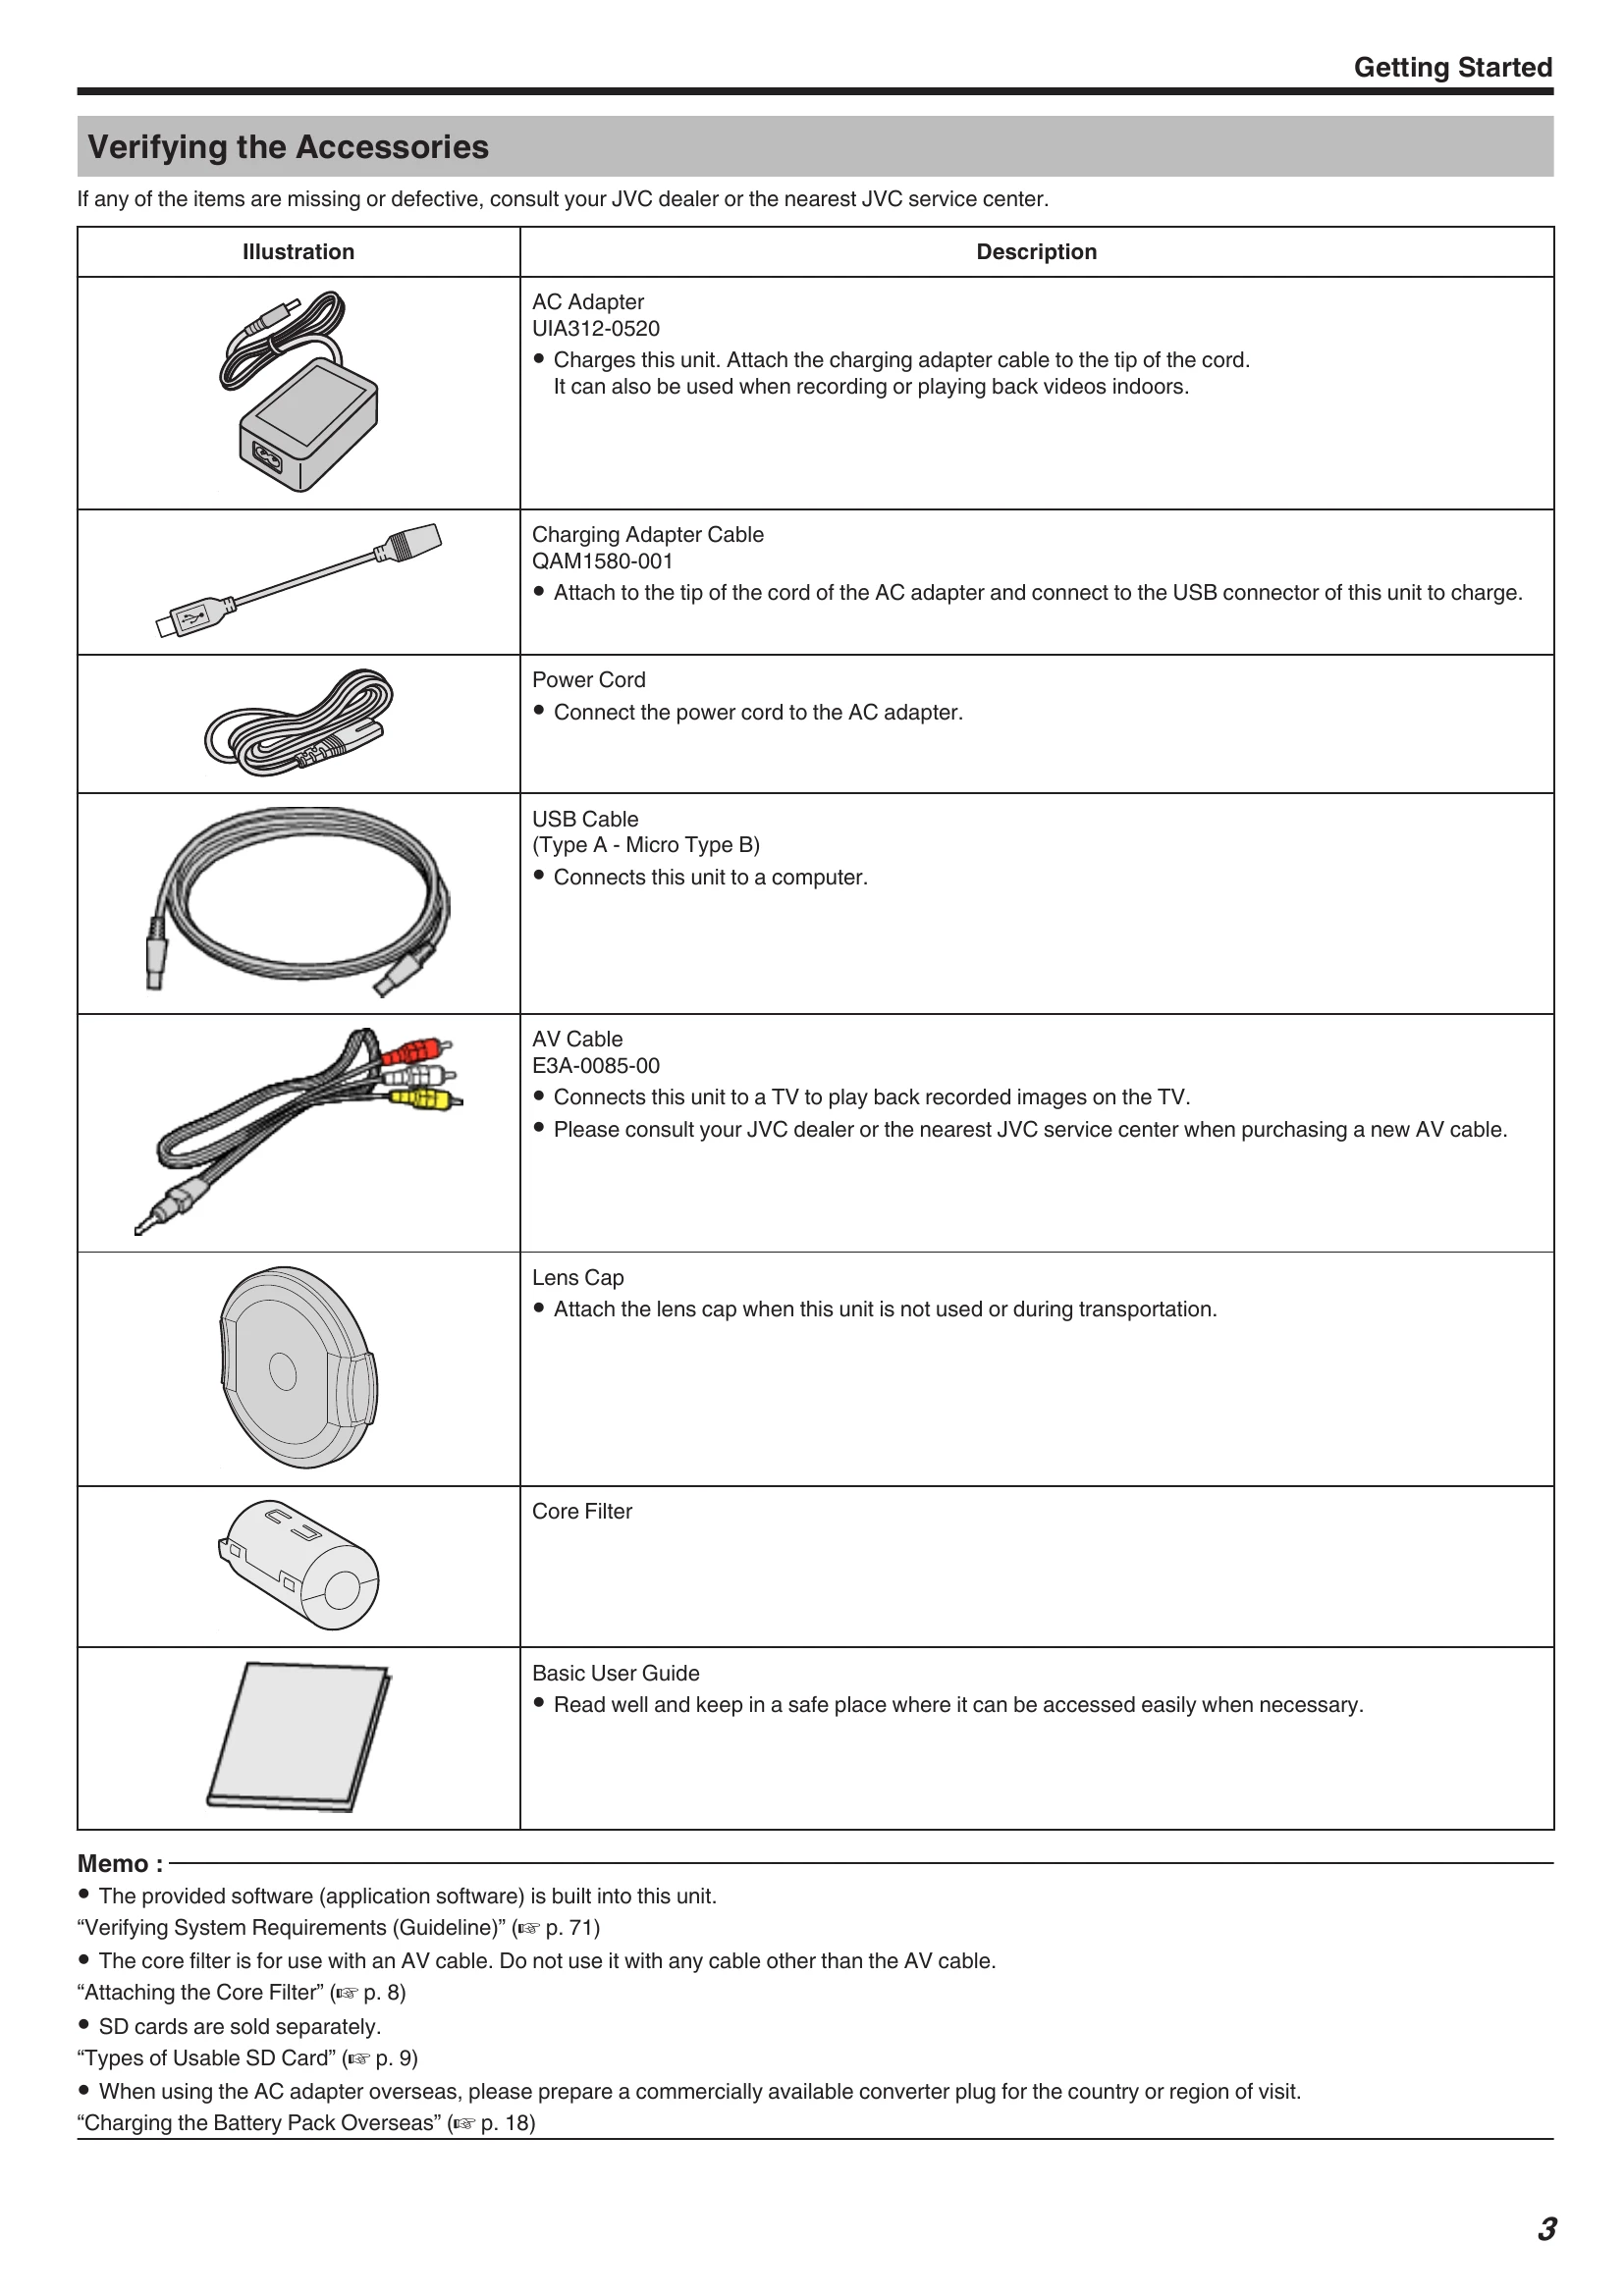
Getting Started
\nMaintenance
\n| When the unit is not working properly | Charging |
| Resetting this Unit | Unable to charge the battery. |
| This unit is a microcomputer-controlled device. Electrostatic discharge, external noise and interference (from a TV, a radio, etc.) might prevent it from functioning properly. In that case, perform the steps below to reset this unit. (The recorded data will not be erased.) 1 Open the terminal cover. • Remove the power cord and all connecting cables. 2 Close the LCD monitor to turn off this unit. 3 Press the Reset button gently using an object with pointed tip. |
When the battery pack is fully charged, the lamp does not light up. Be sure to charge using the supplied AC adapter. Malfunction in the unit that occurred due to the use of an AC adapter other than the one provided is not included in the warranty. Check the connection, then disconnect and reconnect the charging adapter cable. Charging cannot be performed under low or high temperature environments. Charge under the room temperature range of 10°C to 35°C. (Under environments beyond the temperature range, charging may stop to protect the battery pack.) Using a non-original AC adapter may result in damage to this unit. Be sure to use an original AC adapter. |
| The remaining battery display is not correct. | |
| If this unit is used for long periods of time in high or low temperatures, or if the battery pack is repeatedly charged, the amount of remaining battery may not be displayed correctly. | |
| The battery runs out quickly even after charging. | |
| Be sure to charge using the supplied AC adapter. Malfunction in the unit that occurred due to the use of an AC adapter other than the one provided is not included in the warranty. The performance of the battery will drop temporarily when the temperature is -10°C to 0°C, this will cause the remaining recording time to shorten. When the recording time becomes extremely short even when the battery is fully charged, the battery needs to be replaced. For details on replacing the built-in battery (subject to a fee), consult the nearest JVC service center. |
| Power supply | Recording |
| Unable to turn on the power. | Recording cannot be performed. |
| • The camera does not turn on if the remaining battery power is low. In this case, charge the battery for more than 40 minutes before turning on the power. • When the unit does not turn on even after charging, reset the unit. |
Check the button. Set to the recording mode by tapping the REC button on the screen. Recording stops automatically. Recording stops automatically as it cannot be performed for 12 or more consecutive hours according to specifications. (It may take some time to resume recording.) Turn off this unit, wait for a while, and turn it on again. (This unit stops automatically to protect the circuit when the temperature rises.) |
| The continuous shooting speed of still images is slow. | |
| The continuous shooting speed will drop if this function is used repeatedly. Continuous shooting speed may drop depending on the SD card or under certain recording conditions. | |
| The focus is not adjusted automatically. | |
| If you are recording in a dark place or a subject that has no contrast between dark and light, adjust the focus manually. Wipe the lens with a lens cleaning cloth. Cancel manual focus on the manual recording menu. |
|
| Zoom does not work. | |
| Digital zoom is not available in the still image recording mode. Zoom operation is not available in time-lapse recording. (Simultaneous still image recording and image stabilizer are also not available.) To use digital zoom, set "ZOOM" in the menu accordingly. |
|
| Mosaic-type noise occurs when recording scenes with fast movements or extreme changes in brightness. | |
| Set the "VIDEO QUALITY" to "UXP" or "XP" for recording. | |
| The inside of the lens is foggy. | |
| Open the terminal cover; close the LCD monitor and leave as is for a while to reduce the temperature. | |
| Preventing fogging inside the lens | |
| • Models with waterproof function are airtight. When the temperature rises during recording, condensation can occur inside the lens due to the internal humidity. | |
| During recording | |
| To prevent the temperature of this unit from rising, we recommend that you use the unit in the following ways. 1 Avoid frequent exposure to direct sunlight. Record under the shade or use an umbrella. Best if you could keep a wet towel cover the unit. 2 The use of a tripod is recommended. Long hours of recording while holding the unit in your hands will cause the temperature of the unit to rise. 3 It is better to leave the terminal cover open while recording. However, the waterproof, dust-proof and shockproof features do not function in this condition. Do take note of the environment when using the camera. (Do not use a wet towel.) 4 Make sure to turn off the power when you are not recording. When the LCD monitor is closed, the unit turns off. |
|
| During charging | |
| It is recommended to charge the unit in a low humidity environment. The moist air inside the unit can cause condensation. We recommend that you charge the unit in a room where humidifier is not in use, and in an air-conditioned room during summer. |
| Troubleshooting | |
| SD Card | Playback |
| Cannot insert the SD card. | Sound or video is interrupted. |
| Make sure not to insert the SD card in the wrong direction. "Inserting an SD Card" (p. 9) Do not use a miniSD card or microSD card on this unit (even if the card is inserted in an adapter). It may cause malfunction. "Types of Usable SD Card" (p. 9) |
Sometimes playback is interrupted at the connecting section between two scenes. This is not a malfunction. |
| Unable to copy to SD card. | There is no sound. |
| Set "REC MEDIA FOR VIDEO"/"REC MEDIA FOR IMAGE" to SD card. "REC MEDIA FOR VIDEO" (p. 98) "REC MEDIA FOR IMAGE" (p. 99) To use a new SD card, or SD card used on other devices, it is necessary to format (initialize) the SD card using "FORMAT SD CARD" from the "SETUP" menu. "FORMAT SD CARD" (p. 99) When "CHECK CARD'S WRITE PROTECTION SWITCH" appears, release the lock on the SD card. |
When the Silent mode is used, operation sounds will not be output. Turn off the Silent mode. "Using the Silent Mode" (p. 22) Set "OPERATION SOUND" in the "SETUP" menu to "ON". "OPERATION SOUND" (p. 98) Audio sound is not recorded for videos taken in TIME-LAPSE RECORDING. "Recording at Intervals (TIME-LAPSE RECORDING)" (p. 41) |
| The motion is choppy. | The same image is displayed for a long time. |
| Use a high speed SD card (Class 4 or higher). "Types of Usable SD Card" (p. 9) Clean the terminals of the SD card with a dry cotton swab or something similar. Execute "FORMAT SD CARD" in the "SETUP" menu. (All data will be deleted.) "FORMAT SD CARD" (p. 99) Verify the system requirements of your PC when using Everio MediaBrowser 4 to play back. "Verifying System Requirements (Guideline)” (p. 71) |
Use a high speed SD card (Class 4 or higher). "Types of Usable SD Card" (p. 9) Clean the terminals of the SD card with a dry cotton swab or something similar. Execute "FORMAT SD CARD" in the "SETUP" menu. (All data will be deleted.) "FORMAT SD CARD" (p. 99) |
| Cannot find a recorded file. | |
| Change the playback media by tapping SD on the touch screen. "Operation Buttons for Video Playback" (p. 51) "Operation Buttons for Still Image Playback" (p. 58) Select "PLAYBACK OTHER FILE" in the menu. (Video files that have damaged management information can be played back.) "PLAYBACK OTHER FILE" (p. 56) |
|
| Images do not appear on the TV properly. | |
| Disconnect the cable and connect again. "Connecting via the HDMI Mini Connector" (p. 60) Reset this unit. "Resetting this Unit" (p. 108) |
|
| Images are projected vertically on the TV. | |
| Set "VIDEO OUTPUT" in the "CONNECTION SETTINGS" menu to "4:3". "VIDEO OUTPUT" (p. 100) Adjust the TV's screen accordingly. |
|
| The image displayed on TV is too small. | |
| Set "VIDEO OUTPUT" in the "CONNECTION SETTINGS" menu to "16:9". "VIDEO OUTPUT" (p. 100) |
|
| When connected to the TV via the HDMI mini cable, proper images and sounds are not output. | |
| Images and sounds may not be output properly depending on the TV connected. In such cases, perform the following operations. 1 Disconnect the HDMI mini cable and connect it again. "Connecting via the HDMI Mini Connector" (p. 60) |
|
| HDMI-CEC functions do not work properly, and the TV does not work in conjunction with this unit. | Editing/Copying |
| TVs may operate differently depending on the specifications, even if they are HDMI-CEC compliant. Therefore, the HDMI-CEC functions of this unit cannot be guaranteed to operate in combination with all the TVs. In such cases, set "HDMI CONTROL" to "OFF". "HDMI CONTROL" (p. 100) |
Unable to delete file. |
| The unit operates slowly when switching between video mode and still image mode, or when switching the power on or off. | Files (videos/still images) that are protected cannot be deleted. Release protection before deleting the file. "Protecting Files" (p. 64) |
| It is recommended that you copy all videos and still images onto your computer, and erase the files from this unit. (If there are many recorded files on this unit, it takes time for the unit to respond.) |
| Troubleshooting | Screen/Image |
| Computer | The LCD monitor is difficult to see. |
| Unable to copy files to the computer's HDD. | The LCD monitor may be difficult to see if used in bright areas such as under direct sunlight. |
| If the provided software Everio MediaBrowser 4 is not installed, some functions may not work properly. "Installing the Provided Software (Built-in)” (p. 75) Before making backup, make sure that enough free space is left in the computer's hard disk (HDD). |
Color and brightness of the screen changes and horizontal stripes and flickers appear on screen |
| Unable to copy files to DVD or Blu-ray disc with a PC. | For images recorded under lighting from fluorescent or mercury lamps, the color and brightness of the screen may change and horizontal stripes and flickers may appear on the screen, but this is not a malfunction. If the image stabilizer has been set to "ON (AIS)", switch to "ON" to improve the condition. "Reducing Camera Shake" ( p. 40) |
| Cannot upload the file to YouTube. | A band or a ball of bright light appears on the LCD monitor. |
| Check if you have created an account with YouTube. (You need a YouTube account to upload files to YouTube.) Changing videos to the file format for uploading cannot be performed on this unit. Refer to the help file of the provided software Everio MediaBrowser 4 |
Change the direction of this unit to prevent the light source from coming into view. (A band or a ball of bright light may appear when there is a bright light source near this unit, but this is not a malfunction.) |
| I am using a Mac computer. | The recorded subject is too dark. |
| Load the files to a Mac computer using the following method. "Copying to Mac Computer” (p. 84) |
Use backlight compensation when the background is bright and the subject is dark. "Setting Backlight Compensation" (p. 30) Use "GAIN UP" in the menu. "GAIN UP" (p. 86) Set "BRIGHTNESS ADJUST" in the recording menu to the "+" side. "Adjusting Brightness" (p. 29) |
| The computer cannot recognize the SDXC card. | The recorded subject is too bright. |
| Confirm and update the OS of your computer. "When your computer cannot recognize the SDXC card" (p. 10) |
Set the backlight compensation to "OFF" if it is being used. "Setting Backlight Compensation" (p. 30) Set "BRIGHTNESS ADJUST" in the recording menu to the "-" side. "Adjusting Brightness" (p. 29) |
| The color looks strange. (Too bluish, too reddish, etc.) | |
| Wait for a while until natural colors are achieved. (It may take some time for white balance to be adjusted.) Set "WHITE BALANCE" in the recording menu to "MANUAL". Select from "FINE"/"CLOUD"/"HALOGEN" according to the light source. Select "MWB" and adjust accordingly. "Setting White Balance" (p. 31) |
|
| The color looks different. | |
| Set "WHITE BALANCE" in the recording menu accordingly. "Setting White Balance" (p. 31) |
|
| There are bright or dark spots on the screen. | |
| While the LCD monitor screen has more than 99.99% effective pixels, 0.01% of the pixels may be bright spots (red, blue, green) or dark spots. This is not a malfunction. The spots will not be recorded. |
| Other Problems | This unit does not function properly and error messages appear. |
| The buttons on the touch screen do not work. | This unit is a microcomputer-controlled device. Electrostatic discharge, external noise and interference (from a TV, a radio, etc.) might prevent it from functioning properly. In such a case, close the monitor screen to turn off the power and remove the AC adapter, then press the Reset button to reset this unit. "Resetting this Unit" (p. 5) |
| Tap the buttons on the touch screen with your fingers. The buttons may not respond if you touch them with your fingernails or with gloves on. Disable "SCREEN LOCK". You cannot operate the touch panel when "SCREEN LOCK" is enabled. "Locking the Screen" (p. 33) Save the recorded data before requesting service. 1 Connect to computer using a USB cable. The "SELECT DEVICE" menu appears. 2 Press and hold the START/STOP button for more than 2 seconds. The "PLAYBACK ON PC" appears. 3 Operations are to be performed on the computer after the screen switches. |
CHARGE lamp and POWER/ACCESS lamp are blinking and operation is disabled |
| The image is grainy. | Close the monitor screen to turn off the power and remove the AC adapter, then press the Reset button to reset this unit. "Resetting this Unit" (p. 5) If these operations won't solve the problem, contact your JVC dealer or the JVC service center. |
| When digital zoom is used, the image becomes grainy as it is digitally enlarged. | Disclaimer • We shall not be held responsible for loss of recorded contents when recording videos/audio or playback cannot be operated due to malfunctions in this unit, provided parts, or SD card. Once deleted, recorded contents (data), including data loss due to malfunctions in this unit, cannot be restored. Please be forewarned. JVC will not be responsible for any lost data. Please be forewarned. • In order for quality improvement, defective recording medium is subject to be analyzed. Therefore, it may not be returned. |
| This unit heats up. | |
| This is not a malfunction. (This unit may become warm when used for a long time.) Stop using the unit if it gets too warm. | |
| The language on the display changed. | |
| It may occur when you connect this unit to a TV with different language setting using an HDMI mini cable. "Operating in Conjunction with TV via HDMI" (p. 61) |
|
| When connected to the TV via the HDMI mini cable, proper images and sounds are not output. | |
| Images and sounds may not be output properly depending on the TV connected. In such cases, perform the following operations. 1 Disconnect the HDMI mini cable and connect it again. 2 Turn off and on this unit again. "Connecting via the HDMI Mini Connector" (p. 60) |
|
| HDMI-CEC functions do not work properly, and the TV does not work in conjunction with this unit. | |
| TVs may operate differently depending on the specifications, even if they are HDMI-CEC compliant. Therefore, the HDMI-CEC functions of this unit cannot be guaranteed to operate in combination with all the TVs. In such cases, set "HDMI CONTROL" to "OFF". "HDMI CONTROL" (p. 100) |
|
| The unit operates slowly when switching between video mode and still image mode, or when switching the power on or off. | |
| It is recommended that you copy all videos and still images onto your computer, and erase the files from this unit. (If there are many recorded files on this unit, it takes time for the unit to respond.) |
| Troubleshooting | Error Message? |
| SET DATE/TIME! | The clock is reset about one month after the battery is depleted. Therefore, "SET DATE/TIME!" will appear the next time the power is turned on. Set the clock again after charging the battery. "Clock Setting" (p. 15) |
| COMMUNICATION ERROR | Reconnect the USB cable. Turn off and on the devices connected to this unit, and reset this unit. "Resetting this Unit" (p. 108) |
| FORMAT ERROR! | Check the operating procedure, and perform once again. Reset this unit. "Resetting this Unit" (p. 108) |
| ERROR IN BUILT-IN MEMORY! | Reset this unit. "Resetting this Unit" (p. 108) If the above does not solve the problem, back up your files and execute "FORMAT BUILT-IN MEM." in the "SETUP" menu. (All data will be deleted.) "FORMAT BUILT-IN MEM." (p. 99) |
| MEMORY CARD ERROR! | Check that the card is supported by this unit. "Types of Usable SD Card" (p. 9) Reset this unit. "Resetting this Unit" (p. 108) Turn off this unit, then remove and re-insert the SD card. Remove any dirt from the SD card terminals. If the above does not solve the problem, back up your files and execute "FORMAT SD CARD" in the "SETUP" menu. (All data will be deleted.) "FORMAT SD CARD" (p. 99) |
| NOT FORMATTED | Select "OK", then select "YES" on the "DO YOU WANT TO FORMAT?" screen. |
| RECORDING FAILURE | Reset this unit. "Resetting this Unit" (p. 108) |
| CANNOT TAKE MORE STILL IMAGES AT THIS TIME | Stop video recording before taking still images. (If the SD card is removed and inserted during video recording, still images cannot be recorded.) |
| PLAYBACK FAILED | Remove and re-insert the SD card. "Inserting an SD Card" (p. 9) Remove any dirt from the SD card terminals. Insert the SD card before turning on the power. Do not subject this unit to any strong impact or vibration. |
| UNSUPPORTED SCENE! | THIS FILE IS PROTECTED |
| Use files recorded with this unit. (Files recorded with other devices may not be playable.) | Switch off the "PROTECT/CANCEL" function in the "EDIT" menu. "Protecting Files" (p. 64) |
| UNSUPPORTED FILE! | CHECK CARD'S WRITE PROTECTION SWITCH |
| Use files recorded with this unit. (Files recorded with other devices may not be playable.) | Set the write protect switch of the SD card to off. |
| INSUFFICIENT AVAILABLE SPACE | |
| Delete files, or move files to a computer or other devices. Replace the SD card with a new one. Seamless videos cannot be combined if there is not enough free space in the built-in memory or SD card. Check the amount of remaining free space before combining. |
|
| RECORDABLE MANAGEMENT CAPACITY LEVEL HAS BEEN REACHED | |
| 1 Move the files or folders to a computer or other device. (Back up your files.) 2 Select "FILE + MANAGEMENT NO" in "FORMAT BUILT-IN MEM." or "FORMAT SD CARD" of the "SETUP" menu. (All data on the built-in memory or SD card will be deleted.) "FORMAT BUILT-IN MEM.” (p. 99) "FORMAT SD CARD" (p. 99) |
|
| SCENE QUANTITY EXCEEDED LIMIT | |
| 1 Move the files or folders to a computer or other device. (Back up your files.) 2 Select "FILE +MANAGEMENT NO" in "FORMAT BUILT-IN MEM." or "FORMAT SD CARD" of the "SETUP" menu. (All data on the built-in memory or SD card will be deleted.) "FORMAT BUILT-IN MEM." (p. 99) "FORMAT SD CARD" (p. 99) |
|
| NUMBER OF FOLDERS OVERFLOW | |
| 1 Move the files or folders to a computer or other device. (Back up your files.) 2 Select "FILE +MANAGEMENT NO" in "FORMAT BUILT-IN MEM." or "FORMAT SD CARD" of the "SETUP" menu. (All data on the built-in memory or SD card will be deleted.) "FORMAT BUILT-IN MEM.” (p. 99) "FORMAT SD CARD" (p. 99) |
|
| FILE QUANTITY LIMIT EXCEEDED | |
| 1 Move the files or folders to a computer or other device. (Back up your files.) 2 Select "FILE +MANAGEMENT NO" in "FORMAT BUILT-IN MEM." or "FORMAT SD CARD" of the "SETUP" menu. (All data on the built-in memory or SD card will be deleted.) "FORMAT BUILT-IN MEM." (p. 99) "FORMAT SD CARD" (p. 99) |
|
| NO FILES | |
| Change the setting of "REC MEDIA FOR IMAGE" or "REC MEDIA FOR VIDEO" in the "SETUP" menu, and check that files are not recorded to the other media. "REC MEDIA FOR VIDEO" (p. 98) "REC MEDIA FOR IMAGE” (p. 99) |
|
| RECORDING CANCELLED | |
| Set "REC MEDIA FOR VIDEO" to "SD CARD", then record to an SD card. "REC MEDIA FOR VIDEO" (p. 98) Reset this unit. "Resetting this Unit" (p. 108) Protect the unit from vibration and shock. |
|
| DATA RECORDED FILE IS TOO SMALL TO BE SAVED (CONTINUE RECORDING?) | |
| If time-lapse recording is stopped when the actual recorded time displayed is "0:00:00:17" or less, the video cannot be saved. |