Brand: JVC
Category: Camcorder
Document Type: Manual
Language: EN
Brand: JVC
Category: Camcorder
Document Type: Manual
Language: EN
Uploaded: Nov. 21, 2025, 8:17 p.m.
Verifying Accessories: Check for all included items.
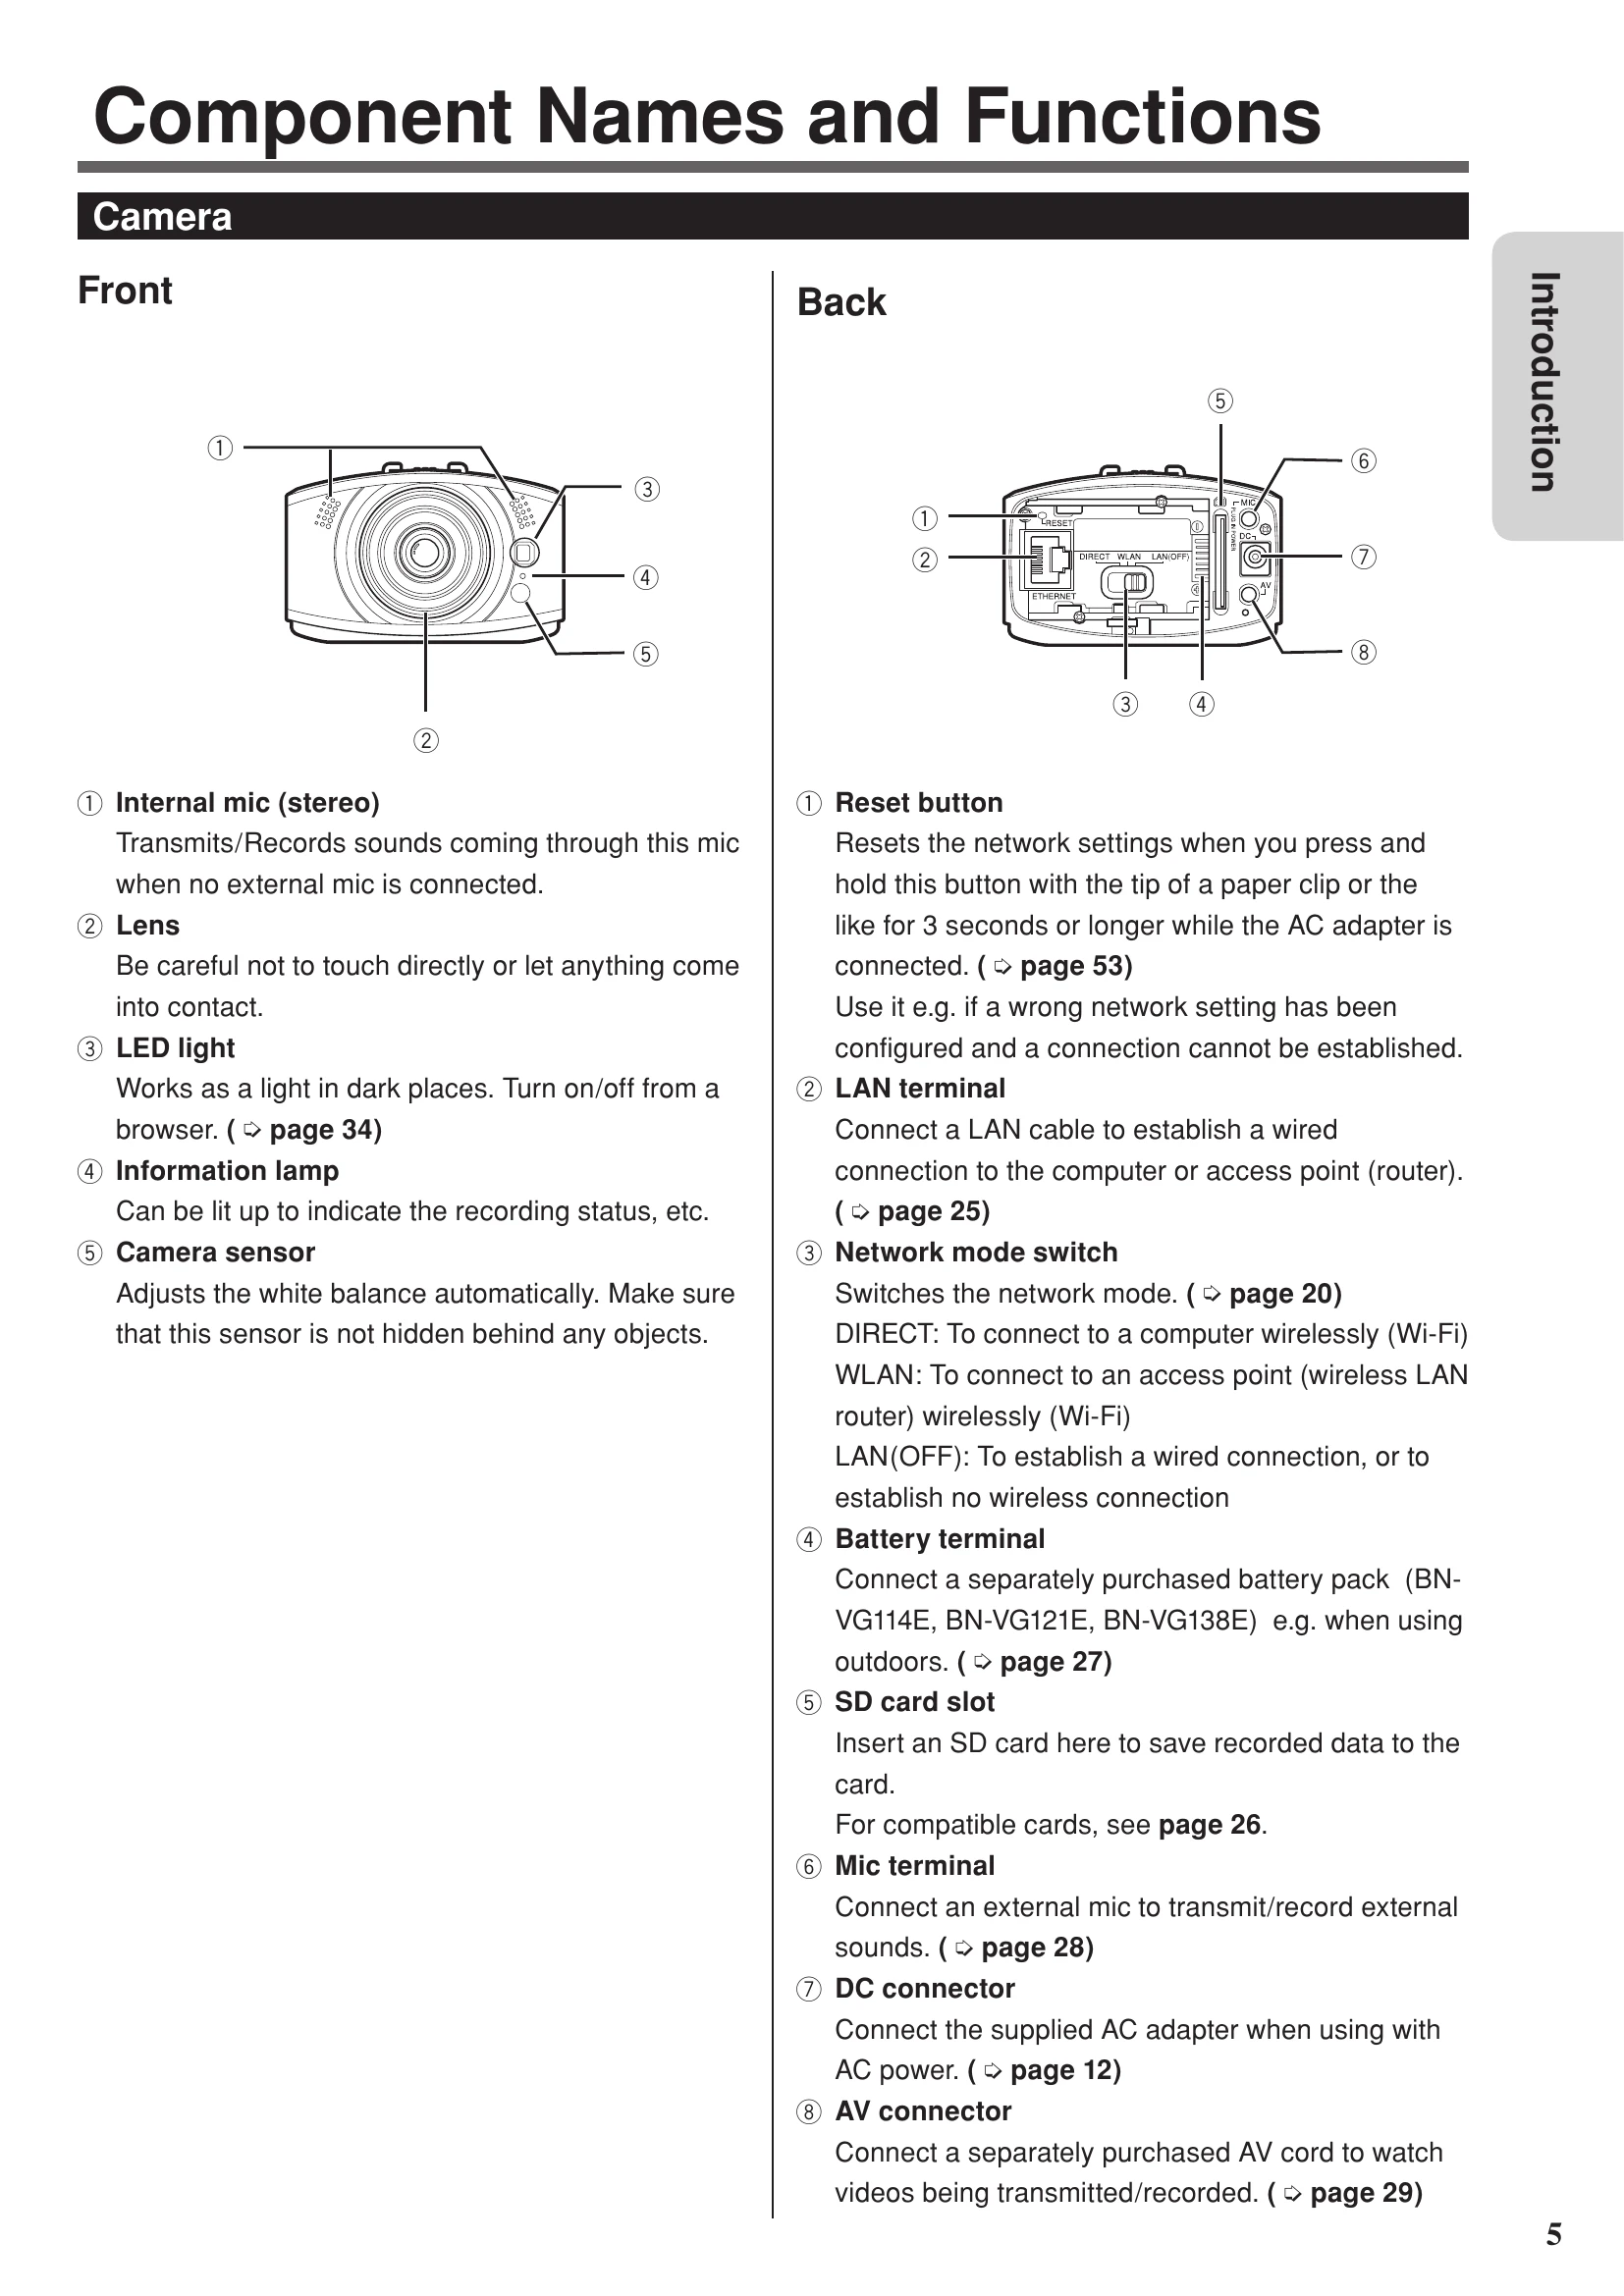
Component Names and Functions: Identify parts of the camera.
Drip-Proof Performance: Understand its capabilities and limitations.
Flow of Connection/Setup: Connect camera to computer via LAN, connect AC adapter, and configure settings via browser.
Connecting Camera to Computer: Use LAN cable, set network mode.
Connecting AC Adapter: Connect supplied adapter.
Configuring Settings: Initial setup, clock adjustment, user name/password, image format, external connection.
Connection Destination: Wired or wireless connection to access points or directly to a computer.
Using Unit Alone: Power on/off, start/stop recording.
Controlling from Web Browser: Log in, monitor, configure settings, manage files.
Using JVC CAM Control: Install and use the software.
Using Mobile Terminal: Install and use mobile apps.
Setting Item List: Detailed explanation of network, camera, and management settings.
Troubleshooting: Solutions for connection, setup, use, and error messages.
Lamp Status List: Understand LED indicator meanings.
Specifications: Technical details of the camera and adapter.
| Problem | Check | Refer to |
| The battery cannot be charged. | • Check the remaining battery. The battery is no longer charged if already full. | page 33 |
| The power does not turn on when the battery is used. | • Charge the battery. • Check if the connector is dirty. If it is dirty, clean it with a cotton swab or the like. |
page 27 |
| The SD card cannot be inserted. | • Check the orientation of the card. | page 26 |
| Shooting stopped automatically. | • Shooting stops automatically as it cannot be performed for 12 or more consecutive hours. • The unit stops automatically to protect the circuit when the temperature rises. Turn off the unit, wait for a while, and turn it on again. |
- |
| A recorded file cannot be found. | • No file is saved if the playback time is less than one second. | - |
| Brightness changes irregularly. | • "AUTO" of "BRIGHTNESS ADJUST" may not work properly depending on the situation, e.g. if there are multiple light sources. Set it up manually. | page 34 |
| The focus is not adjusted automatically. | • If you are recording in a dark place or a subject that has no contrast between dark and light, set "FOCUS" to "FIXED". | page 34 |
| The motion is choppy. | • Use a high speed SD card (Class 4 or higher). • Check if the terminals of the SD card are dirty or there are too many files. If the card is formatted, the write speed may be improved. • Check if the line speed and computer performance are high enough. |
page 26 page 44 |
| Images are dark. | • Turn on the internal light. • Check the "BRIGHTNESS ADJUST" and "GAIN UP" settings. |
page 34 |
| The color looks different. | • Set "WHITE BALANCE" accordingly. | page 34 |
| Sound or video is interrupted or slow. | • Check if the line speed and computer performance are high enough. | - |
| The computer cannot recognize the SDXC card. | • Confirm and update the Operating System of your computer. • Windows Vista and Windows 7 may need to be updated. • Mac OS X must be updated to 10.6.5 or later. |
- |
| Data cannot be saved to the SD card. | • Set "STREAM 1 / STREAM 2" to "MotionJPEG (640x360)/NONE". • When using a new SD card or one that was used with other devices, format the card. |
page 42 page 44 |
| Camera images do not appear./ Camera images are gone. | • Camera images disappear if no operation is performed for 120 hours. Perform one of the following so that images reappear: Press the shooting button. (Shooting starts.) Operate the electrical pantilter. Press the reload button. Disconnect and then connect the AV cable. • Camera images disappear automatically as it cannot transmit images 12 or more consecutive hours. Press the reload button to display images. |
- |
| PLEASE INSERT MEMORY CARD! | • To record, insert an SD card into the camera. | page 26 |
| NEED TO FORMAT MEMORY CARD. | • If a card is used for the first time after purchase or has been used with other devices, it may need to be formatted with this unit. | page 44 |
| THIS CARD CANNOT BE USED FOR RECORDING OR EDITING ON THIS CAMERA | • Format the card. | page 44 |
| INSUFFICIENT AVAILABLE SPACE | • Available space is insufficient. Delete unnecessary files. | page 35 |
| SCENE QUANTITY EXCEEDED LIMIT | • There are too many recorded files. Delete unnecessary files. | page 35 |
| CHECK CARD'S WRITE PROTECTION SWITCH | • The write-protection switch of the SD card is set to the "LOCK" position. Unprotect it. | - |
| VIDEO MANAGEMENT FILE IS DAMAGED, RECOVERY IN PROGRESS | • The management file must be recovered e.g. after the SD card read/write operation is performed on a computer, etc. Wait until it completes. | - |
| MANAGEMENT FILE IS DAMAGED | • The management file could not be recovered. Format the SD card. | page 44 |
| RECORDING FAILURE | • The recorded file could not be saved. Check the SD card. | page 26 |
| RECORDING CANCELLED | • The file could not be saved, and recording was cancelled. Check the transmission speed of the card. | page 26 |
| MEMORY CARD ERROR! | • The SD card cannot be recognized. Check the card. | page 26 |
| COMPATIBLE DEVICE NOT FOUND | • No WPS-compatible device can be found. Check if there is a distance or interference between the devices. | - |
| COMMUNICATION ERROR OCCURRED | • Check the connection and destination device. | - |
| UNABLE TO LOG IN CHECK THE USERNAME AND PASSWORD | • Enter the correct user name and password of the administrator. For the administrator's account, the initial setting of the user name is "root", and that of the password is "password". | - |
| UNABLE TO SWITCH DURING RECORDING | • You cannot open the "FILE MANAGEMENT" tab during recording. Stop recording. | page 32 |
| UNABLE TO UPDATE DURING RECORDING | • You cannot change the "DIS"/"GAIN UP" setting during streaming/recording. Stop streaming/recording. | - |
| INVALID DATA INPUT | • Check the type of the entered text (character, number, single-byte/double-byte, etc.). | - |
| THE USERNAME IS ALREADY IN USE | • You cannot register a user name already in use. Enter another user name. | - |
| INCORRECT PASSWORD | • The two passwords entered on the change password screen are different. Enter the same password in the two fields. | - |
| USE AC ADAPTER | • When updating the firmware, connect the AC adapter. | page 12 |
| NO UPDATES AVAILABLE | • Check if the update file is written in the correct folder on the SD card. | - |
| UPDATE CORRUPTED | • Retrieve the firmware update file, and copy it to the SD card. | - |
| INSTALLED UPDATE ON THIS CAMERA CAN NOT BE USED | • Obtain the updater for the unit. | - |
| UPDATE IS SAME OR OLDER VERSION. NO INSTALLATION REQUIRED | • The firmware has already been updated. There is no need to update it. | - |
| POWER TURNED OFF TO CONSERVE BATTERY POWER (12 HOURS LIMITATION) | • The power is automatically turned off if "AUTO POWER OFF" is set to "ON", the unit runs with the battery, and no operation is performed for 5 minutes. | page 44 |
| RECORDING CANCELLED | • Recording stops automatically as it cannot be performed for 12 or more consecutive hours. | - |
| POWER TURNED OFF AS CAMERA TEMPERATURE IS TOO HOT | • Wait for a while, and turn on the power again. | page 6 |
| PROCESS FAILED | • Setup, file deletion, etc. failed for some reason. Check the connection, and retry. | - |