Brand: JVC
Category: Camcorder
Document Type: Manual
Language: EN
Brand: JVC
Category: Camcorder
Document Type: Manual
Language: EN
Uploaded: Aug. 10, 2025, 12:33 a.m.
To power the camcorder, attach the battery pack securely or connect the AC adapter. To charge the battery, connect the AC adapter to the camcorder and an AC outlet. The CHARGE lamp will blink during charging.
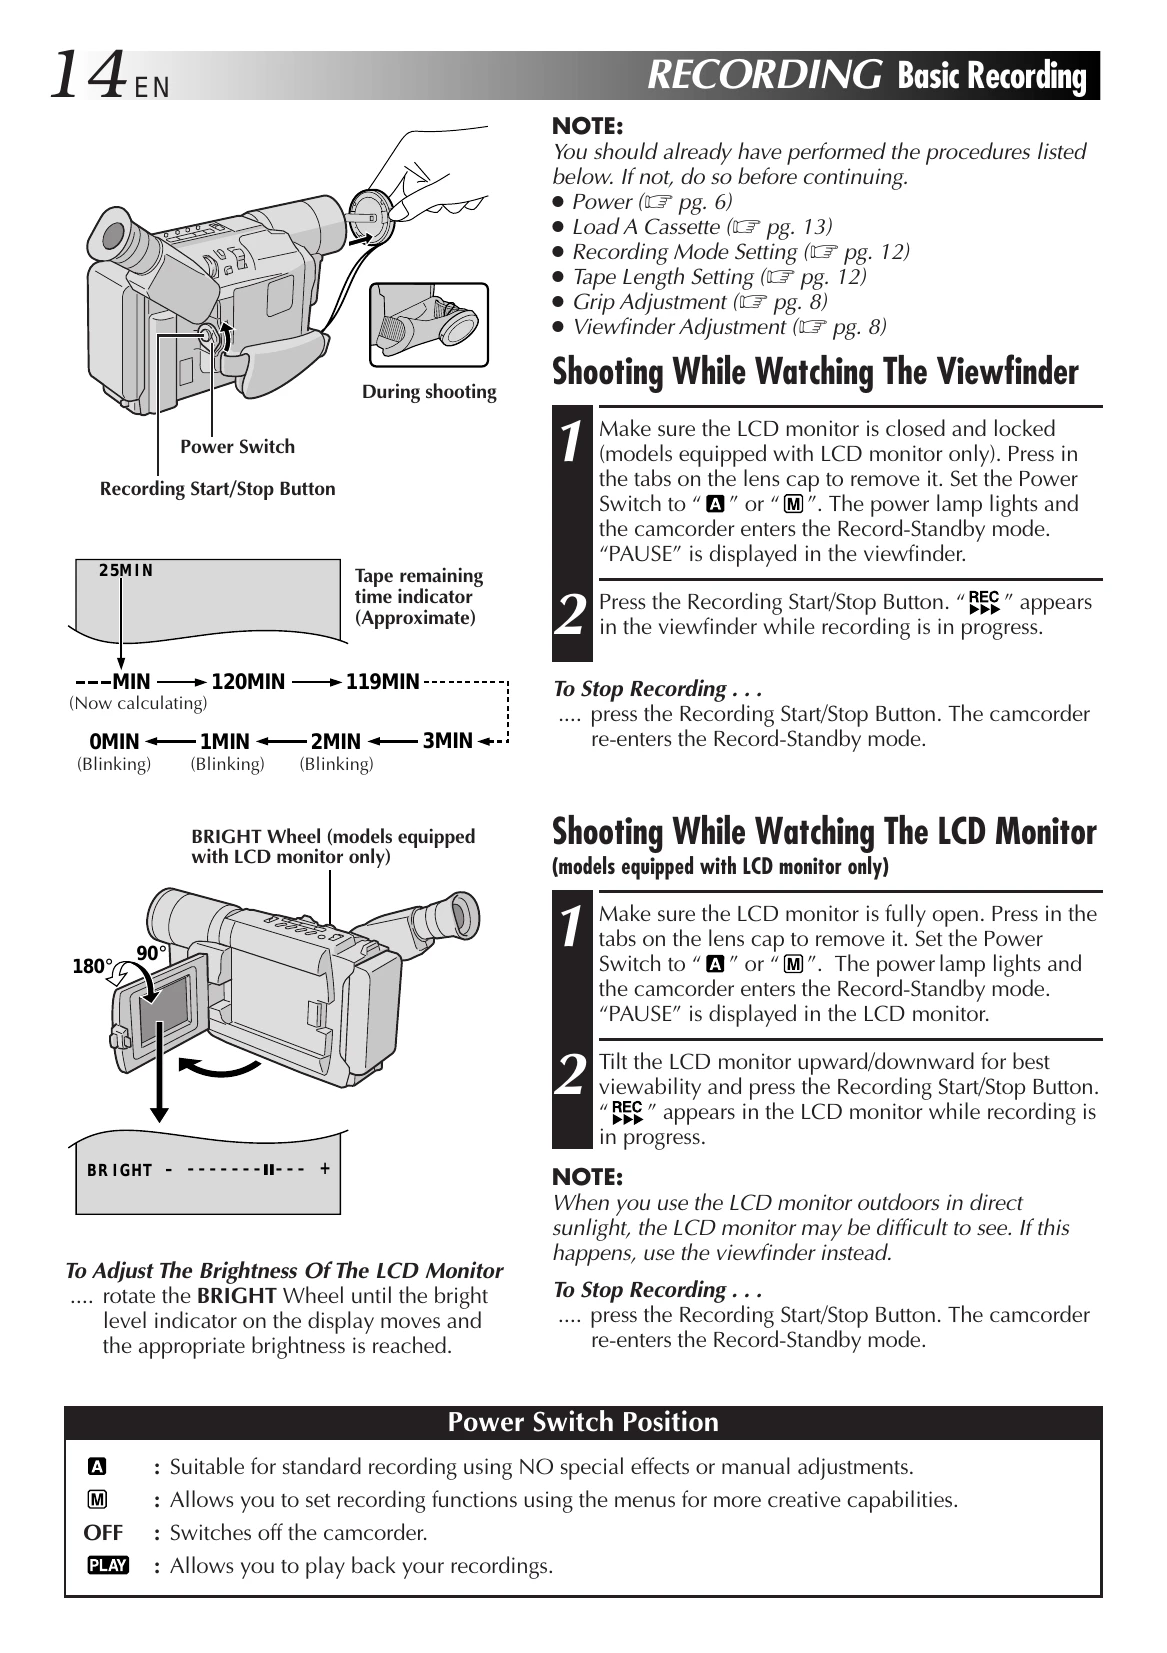
Ensure the LCD monitor is closed or open as needed. Set the power switch to 'A' or 'M'. Press the Recording Start/Stop button to begin recording. The 'REC' indicator will appear. Press the button again to stop recording.
Use the Power Zoom Lever to zoom in ('T') or out ('W'). The Picture Stabilizer compensates for camera shake. Use the '5 SEC. REC' button for quick scene transitions. The 'RETAKE' button allows re-recording segments.
Access the menu using the MENU Wheel to set the date and time. Navigate through the options, select the desired item, and adjust the values.
| SYMPTOM | POSSIBLE CAUSE(S) |
|---|---|
| No power is supplied. | The battery pack has not been attached correctly (☞ pg. 6). The battery pack is not charged (☞ pg. 6). The power supply has not been correctly connected (☞ pg. 6, 7). |
| The power suddenly goes off and does not come back on by itself. | The battery pack has completely discharged. Remove the cassette and disconnect the power source, then after a few minutes, try turning the power back on. If it still does not come on, consult your nearest JVC dealer. |
| Recording cannot be performed. | Make sure the Erase Protection tab is in the position that allows recording. If not, slide the tab. Some cassettes have removable tabs. If the tab has been removed, cover the hole with adhesive tape (☞ pg. 13). The camcorder Power Switch has not been set to "A" or "M" (☞ pg. 14). |
| Recording does not start. | Before recording in the Animation mode at the very beginning of a tape, set the camcorder to the Recording mode for about 5 seconds, so that the tape runs smoothly. Using the Fade-in function at this point is a good way to begin an animated program (☞ pg. 26, 37). |
| Animation or Time-Lapse is not available. | Before recording in the Animation mode at the very beginning of a tape, set the camcorder to the Recording mode for about 5 seconds, so that the tape runs smoothly. Using the Fade-in function at this point is a good way to begin an animated program (☞ pg. 26, 37). |
| The tape is running, but there is no playback picture. | The TV has not been set to its VIDEO mode or channel. If A/V connection is used, the TV's VIDEO/TV Switch has not been set to VIDEO. |
| Playback picture is blurred or interrupted. | The video heads are dirty or worn out. Consult your nearest JVC dealer for head cleaning or replacement. |
| The counter indication is blurred during Still playback. | This is normal. |
| The tape stops during fast-forward or rewind. | The Counter Memory Function has been activated (☞ pg. 31). |
| Rewinding or fast-forwarding cannot be performed. | The tape is already fully wound on one reel or the other. |
| During recording, the indications do not appear. | Set "DISPLAY" to "FULL" in SYSTEM MENU (☞ pg. 24). |
| The tape will not eject. | The battery pack is running low. If the LCD monitor is not open over 60 degrees, the EJECT Switch does not function. |
| Some functions are not available. | The Power Switch is set to "A". Certain combinations of modes or effects are not possible to use. |
| Vertical white lines appear when shooting a very bright object. | This sometimes occurs when the contrast between the background and the object is great. It is not a defect of the camcorder. |
| Bright, crystal-shaped spots appear in the LCD monitor and the viewfinder. | Sunlight is directly entering the lens. This is not a defect of the camcorder. |
| The rear of the LCD monitor is hot. | The light used to illuminate the LCD monitor causes it to be hot. Close the LCD monitor to turn it off or set the Power Switch to "OFF", and let the unit cool down. |
| Colored bright spots appear all over the LCD monitor or the viewfinder. | The LCD monitor and the viewfinder are made with high-precision technology. However, black spots or bright spots of light (red, green or blue) may appear constantly on the LCD monitor or in the viewfinder. These spots are not recorded on the tape. This is not due to any defect of the unit. (Effective dots: more than 99.99%.) |
| The indicators and the picture color on the LCD monitor are not clear. | This may occur when the surface or the edge of the LCD monitor is pressed. |
| The LCD monitor, the viewfinder and the lens have become dirty (ex. fingerprints). | Wipe them gently with a soft cloth. Gently wipe in a semicircular motion, as wiping strongly spreads the stain and it won't come out easily. |
| An error number (i.e. E03) appears. | Turn the camcorder's power off, then disconnect the power source. After a few minutes, try turning the power on again. If the error number still appears in the viewfinder, consult your nearest JVC dealer. |
| The image is out of focus. | The diopter needs to be adjusted (☞ pg. 8). The scene being shot is adversely affecting the operation of Auto Focus (☞ pg. 28). |
| The picture is blurred in the Quick Review or Retake mode. | This is normal while recording in the EP mode. Some noise may be present while recording in the SP mode (☞ pg. 12). |
| The date and time displays disappear. | If you remove the power source from the camcorder while the power is on, all settings and selections are erased. Make sure to turn the camcorder's power off before disconnecting the power source. |
| The wrong date and time are displayed/recorded. | If you have not performed Date/Time Setting (☞ pg. 9), the date and time are not displayed/recorded correctly. Be sure that Date/Time setting is carried out. |
| Even though the lens cap is detached, the “LENS CAP” warning indicator (☞ pg. 47) blinks. | The "LENS CAP" warning indicator may blink when the camcorder is used in dark areas, regardless of whether the lens cap is attached or detached. |