Brand: CASIO
Category: Digital Camera
Document Type:
Language: EN
Brand: CASIO
Category: Digital Camera
Document Type:
Language: EN
Uploaded: Aug. 9, 2025, 11:39 p.m.
Unpacking: Check that all items are included: digital camera, rechargeable battery (NP-120), USB-AC adapter (AD-C53U), power cord, strap, USB cable, AV cable, CD-ROM, and Quick Start Guide. Contact your retailer if anything is missing.
Charging the Battery: Charge the battery using either the USB-AC adapter or a USB connection to a computer. Ensure the camera is turned off before charging. The back lamp indicates charging status.
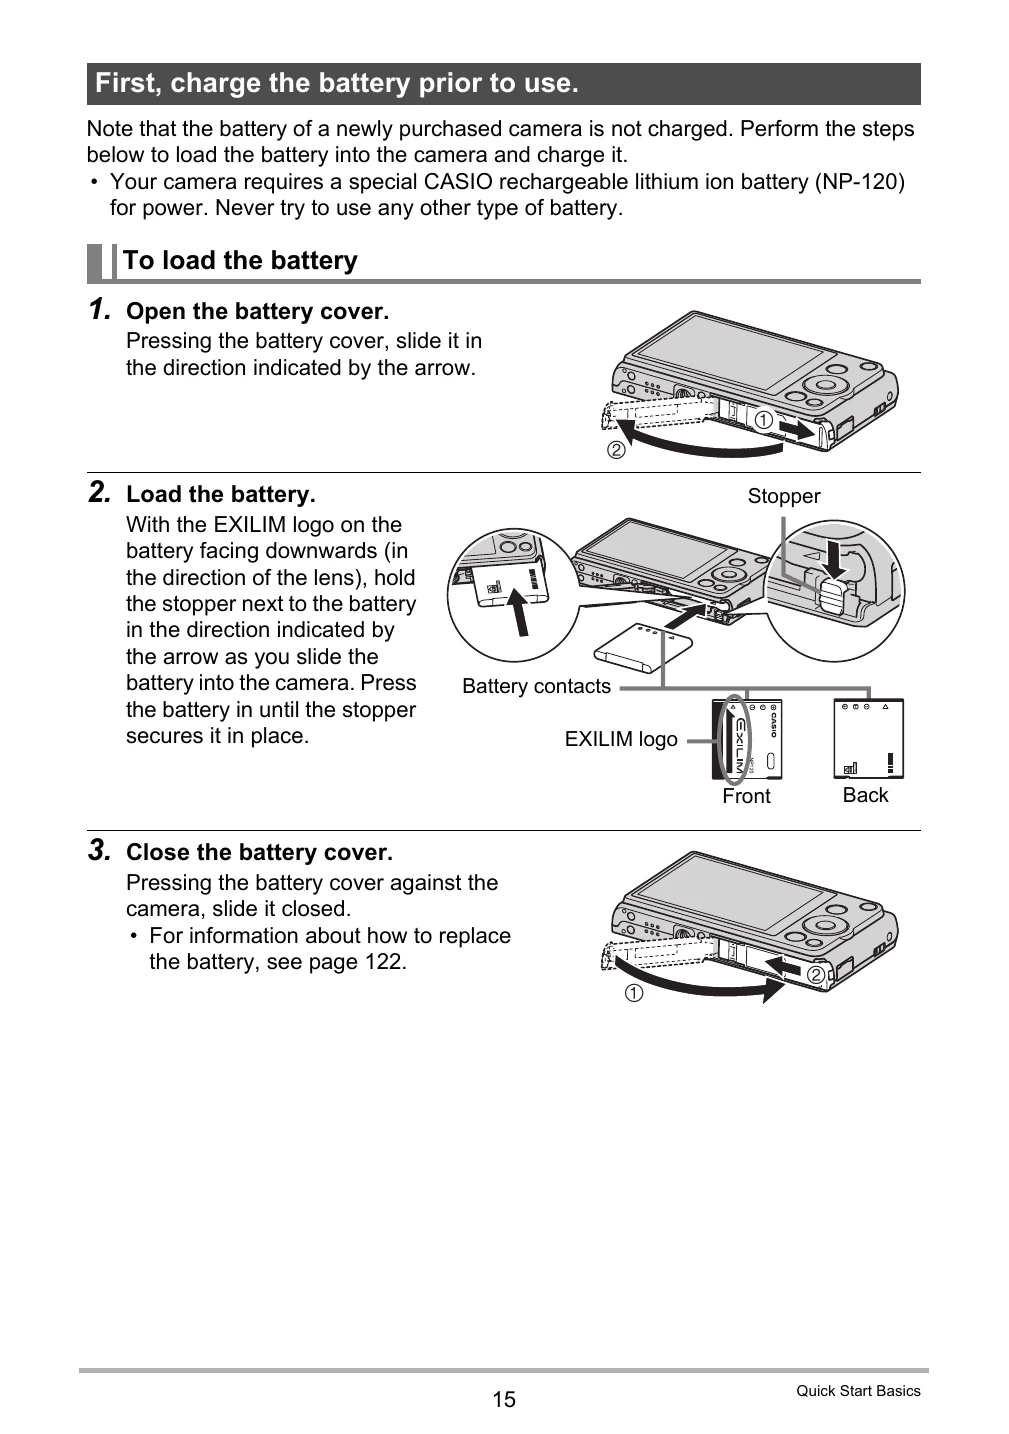
First Use: After loading the battery, configure basic settings like display language, date, and time. Ensure correct date/time settings for accurate image data.
Shooting Snapshots: Press the shutter button halfway to focus and then fully to take a picture. Various modes like Face Detection and Anti Shake are available.
Viewing Images: Use the PLAY button to view snapshots and movies. Images can be deleted or edited (resizing, trimming, rotation).
| Problem | Possible Cause and Recommended Action |
|---|---|
| The subject is out of focus in the recorded image. | Image may not be focused properly. Adjust composition or focus frame. If flash is off, try changing flash mode or BEST SHOT scene. |
| The flash does not fire. | Check flash mode settings. If in a BEST SHOT scene, try changing it. Ensure flash is not set to OFF. |
| The (Flash Off) icon flashes red on the monitor screen and the flash does not fire. | The flash unit may be malfunctioning. Contact CASIO authorized service center. |
| Camera powers down during Self-timer. | The battery may be dead. Charge the battery. |
| The monitor screen image is out of focus. | May be using Manual Focus incorrectly. Ensure focus is set properly or try Macro mode for close-ups. |
| There is a vertical band in the monitor screen image. | This is "vertical smear" due to bright subjects and does not indicate malfunction. |
| There is digital noise in images. | Low light or high ISO sensitivity can cause noise. Use adequate lighting or lower ISO. Flash or specific lighting modes may help. |
| A recorded image was not saved. | Camera power might have been turned off before saving, or the memory card removed prematurely. Ensure battery is charged and do not remove card during saving. |
| Though available lighting is bright, the faces of people in the image are dark. | Insufficient light on subjects. Use flash (daylight synchro flash) or adjust EV shift. |
| Night shots come out bad. | Use specific BEST SHOT scenes for night shooting (Night Scene, Night Scene Portrait). |
| Subjects are too dark when shooting images in a seashore or ski area. | Sunlight reflection can cause underexposure. Use flash (daylight synchro flash) or adjust EV shift. Time stamping can disable digital zoom; turn it off if needed. |
| Digital zoom (including HD zoom) does not work. The zoom bar indicates zoom only up to a zoom factor of 5.0. | Time stamping may be enabled, disabling digital zoom. Turn off time stamping. |
| The image is out of focus during movie recording. | Subject may be outside focus range. Ensure subject is within range. Clean the lens if dirty. |
| Playback: The color of the playback image is different from what appears on the monitor screen when shooting. | Sunlight or light source shining directly into the lens. Reposition camera to avoid direct light. |
| Playback: Images are not displayed. | Camera cannot display non-DCF images from other cameras. |
| Playback: Images cannot be edited (with resizing, trimming, rotation). | Movies and snapshots recorded with another camera cannot be edited. |
| File Deletion: A file cannot be deleted. | File may be protected. Unprotect it. Alternatively, the "Disabled" setting might be "On"; change it to "Off". |
| Other: The wrong date and time are displayed, or the wrong date and time are being stored along with image data. | Date and time settings are incorrect. Set the correct date and time. |
| Other: The messages on the display are in the wrong language. | Incorrect display language selected. Change the display language. |
| Other: Images cannot be transferred over a USB connection. | Check USB cable connection. Ensure correct USB protocol is selected. Turn camera on. Connect directly to computer's USB port, avoid USB hubs. |
| Language selection screen appears when the camera is turned on. | Initial settings may not have been configured, or the battery was depleted. Check camera setup. There may be a memory data problem; perform a reset operation and reconfigure settings. If the issue persists, contact support. |
| The time and date settings configured the first time after purchasing the camera are reset to their factory defaults when remove the camera's battery. | Reload battery and reconfigure settings. Do not remove battery for at least 24 hours after configuring. If reset occurs after this period, the camera's setting memory might be defective; contact support. |
| Buttons are not responsive right after the power has been turned on. | With large capacity memory cards, there may be a delay after power-on before buttons become responsive. |