Brand: CASIO
Category: Digital Camera
Document Type:
Language: EN
Brand: CASIO
Category: Digital Camera
Document Type:
Language: EN
Uploaded: Aug. 9, 2025, 11:39 p.m.
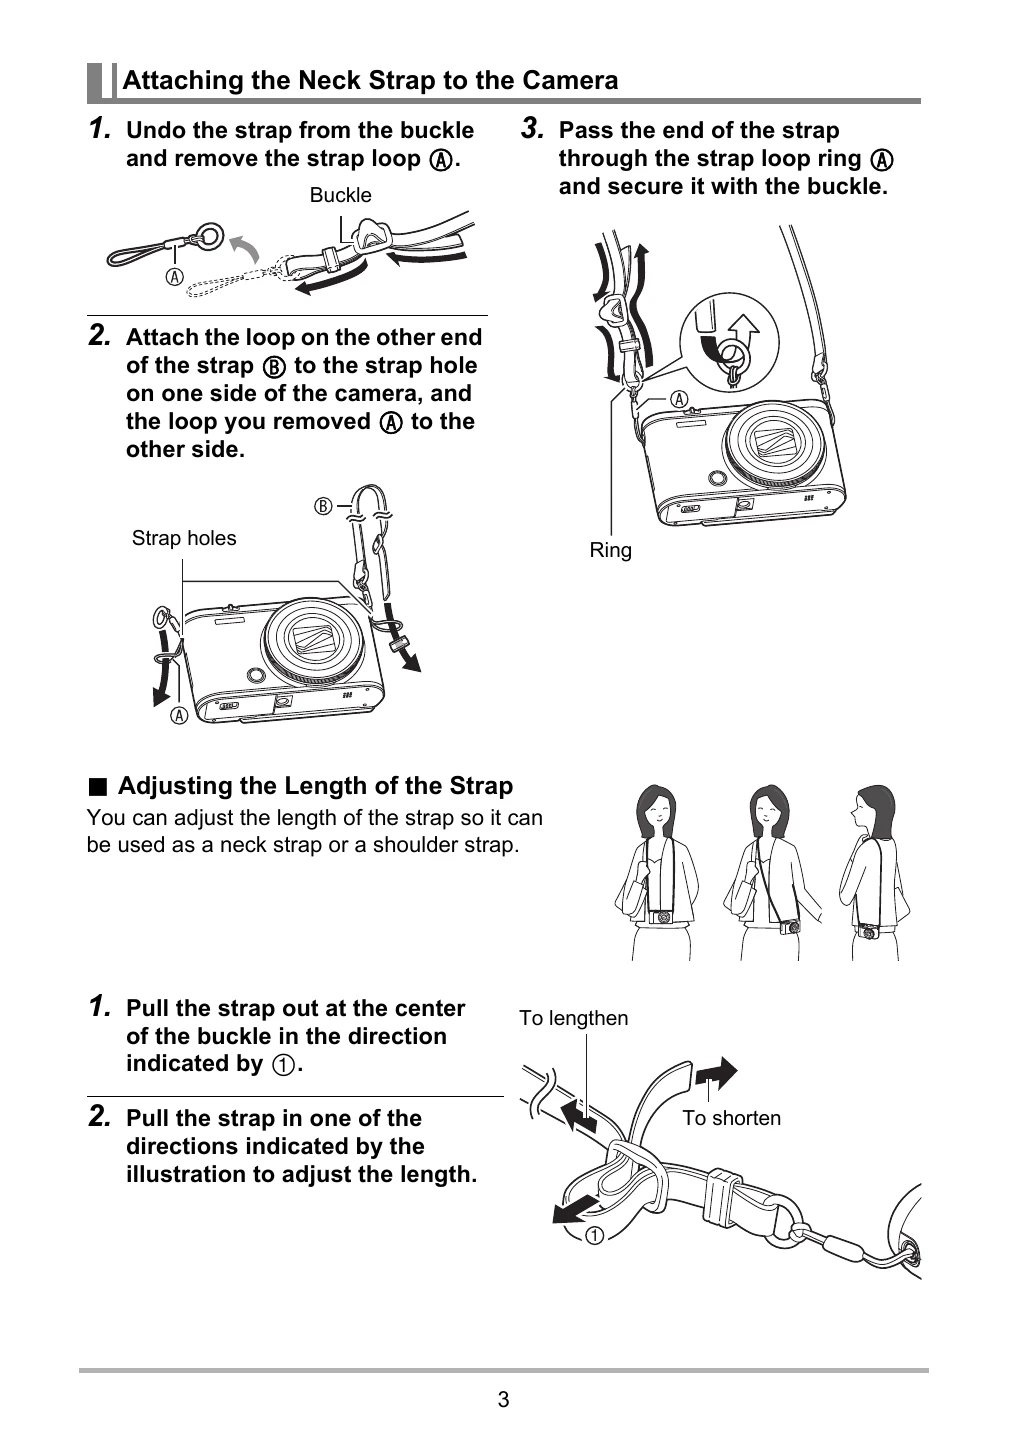
Attaching the Neck Strap: Undo the strap, attach loops to camera strap holes, and secure with buckle. Adjust length for neck or shoulder wear.
Charging the Battery: Load the NP-130A battery with the CASIO logo facing down. Charge using the USB-AC adapter or USB connection to a computer. Charging time is approximately 240 minutes.
Basic Operations: Familiarize yourself with camera parts on pages 11-12. Understand monitor screen icons (page 13). Learn to tilt the screen for self-portraits and low/high-angle shots (pages 19-20).
Snapshot and Movie Recording: The camera supports various recording modes. Explore basic shooting with the Quick Start Basics section (pages 17-18) and detailed functions in the Tutorials.
| Problem | Possible Cause and Recommended Action |
|---|---|
| I can't change the settings of menu items. Menu items for some settings are not displayed on the menu. | Some menu items may not be available, depending on the recording mode in use. While Premium Auto Pro is in use, only the menu items whose settings can be configured will be displayed on the menus. |
| Playback: The color of the playback image is different from what appears on the monitor screen when shooting. | Sunlight or light from another source may be shining directly into the lens when you are shooting. Position the camera so sunlight does not shine directly into the lens. |
| Images are not displayed. | This camera cannot display non-DCF images recorded onto a memory card using another digital camera. |
| Images cannot be edited (with White Balance, Brightness, Resize, Trimming, Rotation). | Note that you cannot edit the following types of snapshots. Snapshots created using MOTION PRINT, CS and interval shot group snapshots, Movies, Panorama Image, Snapshots recorded with another camera. |
| File Deletion: A file cannot be deleted. | 1)The file may be protected. Unprotect the file (page 148). 2)"Delete Key" setting may be “Disabled”. Change the setting to "Enabled" (page 194). |
| Wireless Connection: I can't establish a wireless connection. The wireless connection is broken. | 1)The camera cannot connect with a smartphone if they are too far apart from each other. 2) The smartphone may be connected with another wireless device. Check the smartphone's Wi-Fi settings and confirm that the camera is selected for wireless connection (page 160). 3)Connection may have been lost due to interference caused by a nearby microwave oven, cordless phone, or other wireless device. Move the camera away from the device causing the problem. |
| Location Information: Location information isn't being added to my images. | 1)Pair the camera and smartphone, and then establish a Bluetooth wireless technology connection between them. 2) If you are shooting snapshots, select "On" for the camera's location information setting (page 172). 3)Configure smartphone settings to acquire location information, and make sure it is where location information can be received. |
| Other: The wrong date and time are displayed, or the wrong date and time are being stored along with image data. | The date and time setting is off. Set the correct date and time (page 196). |
| The messages on the display are in the wrong language. | The wrong display language is selected. Change the display language setting (page 197). |
| Images cannot be transferred over a USB connection. | 1)The USB cable may not be connected securely. Check all connections. 2) If the camera is not turned on, turn it on. 3) Your computer may not be able to recognize the camera if you connect via a USB hub. Always connect directly to the computer's USB port. 4)USB communication may not be possible when the battery level indicator is [ ] . Charge the battery before connecting. |
| Language selection screen appears when the camera is turned on. | 1)You did not configure initial settings after purchasing the camera or the camera may have been left with a dead battery. Configure the correct settings (pages 26, 197). 2)There may be a problem with the camera's memory data. If this is the case, perform the reset operation to initialize the camera's setup (page 198). After that, configure each setting. If the language selection screen does not re-appear when you turn the camera on, it means that the camera's memory management data has been restored. If the same message appears after you turn power back on, contact your retailer or a CASIO authorized service center. |
| There are various indicators and values on the monitor screen. | The monitor screen shows indicators and other information about shooting conditions and the image you are recording. You can use [▲] (DISP) to select what information you want to include on the display (page 13). |
| The time and date settings configured the first time after purchasing the camera are reset to their factory defaults when I remove the camera's battery. | Load the camera's battery and reconfigure the time and date settings (page 26). Do not remove the battery from the camera for at least 24 hours after configuring time and date settings. After that, the settings will not be reset if you remove the battery. • If the time and date are reset to their factory default settings when you remove the battery after it has been loaded for more than 24 hours, it could mean that the camera's setting memory is defective. Contact your retailer or a CASIO authorized service center. |
| Buttons are not responsive right after the power has been turned on. | With large capacity memory cards there is a delay after the power has been turned on before the buttons become responsive. |