Brand: CASIO
Category: Digital Camera
Document Type:
Language: EN
Brand: CASIO
Category: Digital Camera
Document Type:
Language: EN
Uploaded: Aug. 9, 2025, 11:40 p.m.
This section guides you through the initial setup and basic operations of your CASIO digital camera.
A digital camera stores images on a memory card, allowing for numerous records and deletions. Images can be stored on a computer, printed, or attached to emails.
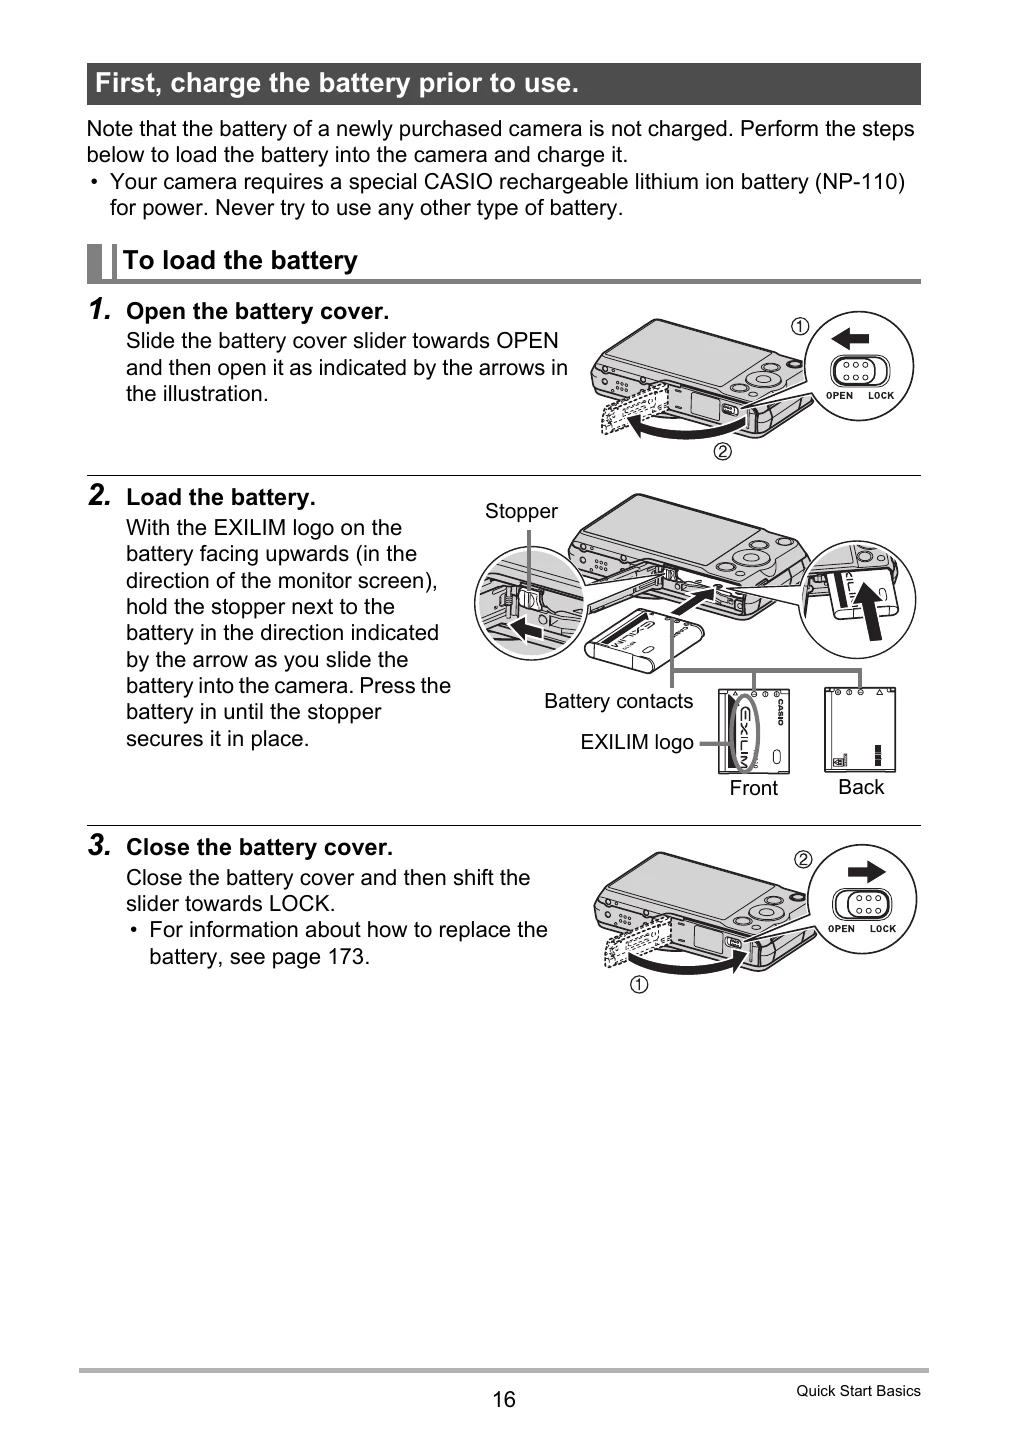
Ensure the battery is charged before first use. Load the rechargeable lithium ion battery (NP-110) into the camera and charge using either the USB-AC adapter or a USB connection to a computer.
Instructions on supported memory cards, how to load one, and how to format a new card are provided.
Simple instructions for powering the camera on and off.
Guidance on proper camera handling.
Steps for taking a photograph, including selecting recording modes and using features like the "Make-up Function".
How to view recorded images.
Methods for deleting single files, specific files, or all files.
Important notes regarding snapshot shooting, including autofocus restrictions.
Detailed guides on various shooting functions like control panel usage, image size, ISO sensitivity, white balance, exposure compensation, flash, zoom, and continuous shutter.
| Problem | Possible Cause and Recommended Action |
|---|---|
| A recorded image was not saved. |
1)Camera power may have been turned off before the save operation was complete, which will result in the image not being saved. If the battery indicator shows 2)You may have removed the memory card from the camera before the save operation was complete, which will result in the image not being saved. Do not remove the memory card before the save operation is complete. |
| Though available lighting is bright, the faces of people in the image are dark. |
Not enough light is reaching the subjects. Change the flash mode setting to |
| Night shots come out bad. |
Use the following BEST SHOT scenes (page 64) when shooting at night. • High Speed Night Scene (for shooting night scenery only) • High Speed Night Scene and Portrait (for shooting people against night scenery) |
| Subjects are too dark when shooting images in a seashore or ski area. |
Sunlight reflected by water, sand, or snow, can cause underexposure of images. Change the flash mode setting to |
| Digital zoom will not go up to the maximum value. |
1)The digital zoom setting may be turned off. Turn on digital zoom (page 95). 2)Zoom will not go up to the maximum value if the “Zoom (SR)” setting is "Single". Change the setting to "Off" (page 49). 3)Zoom will not go up to the maximum value if the snapshot size setting is “VGA”. Change to a different setting (page 38). |
| The image is out of focus during movie recording. |
1)Focusing may not be possible because the subject is outside the focus range. Shoot within the allowable range. 2)The lens may be dirty. Clean the lens (page 169). 3)During High Speed Movie recording, focus is fixed at the position where it was when recording started. To focus an image, half-press the shutter button for Auto Focus or focus manually before you press [●] (Movie) to start recording. |
| Movie recording suddenly stops. | The camera's protection function may have activated because camera temperature is too high. Wait until the camera temperature drops to normal levels. |
| Playback The color of the playback image is different from what appears on the monitor screen when shooting. | Sunlight or light from another source may be shining directly into the lens when you are shooting. Position the camera so sunlight does not shine directly into the lens. |
| Images are not displayed. | This camera cannot display non-DCF images recorded onto a memory card using another digital camera. |
| Images cannot be edited (with White Balance, Brightness, Resize, Trimming, Rotation). |
Note that you cannot edit the following types of snapshots. • Snapshots created using MOTION PRINT • CS group snapshots • Movies • Panorama Image • Snapshots recorded with another camera |
| File Deletion A file cannot be deleted. | The file may be protected. Unprotect the file (page 120). |
| Other The wrong date and time are displayed, or the wrong date and time are being stored along with image data. | The date and time setting is off. Set the correct date and time (page 159). |
| The messages on the display are in the wrong language. | The wrong display language is selected. Change the display language setting (page 160). |
| Images cannot be transferred over a USB connection. |
1)The USB cable may not be connected securely. Check all connections. 2)The wrong USB communication protocol is selected. Select the correct USB communication protocol in accordance with the type of device you are connecting (pages 139, 148). 3) If the camera is not turned on, turn it on. 4)Your computer may not be able to recognize the camera if you connect via a USB hub. Always connect directly to the computer's USB port. |
| Language selection screen appears when the camera is turned on. |
1)You did not configure initial settings after purchasing the camera or the camera may have been left with a dead battery. Configure the correct settings (pages 22, 160). 2)There may be a problem with the camera's memory data. If this is the case, perform the reset operation to initialize the camera's setup (page 164). After that, configure each setting. If the language selection screen does not re-appear when you turn the camera on, it means that the camera's memory management data has been restored. If the same message appears after you turn power back on, contact your retailer or a CASIO authorized service center. |
| The time and date settings configured the first time after purchasing the camera are reset to their factory defaults when I remove the camera's battery. |
Load the camera's battery and reconfigure the time and date settings (page 22). Do not remove the battery from the camera for at least 24 hours after configuring time and date settings. After that, the settings will not be reset if you remove the battery. • If the time and date are reset to their factory default settings when you remove the battery after it has been loaded for more than 24 hours, it could mean that the camera's setting memory is defective. Contact your retailer or a CASIO authorized service center. |
| Buttons are not responsive right after the power has been turned on. | With large capacity memory cards there is a delay after the power has been turned on before the buttons become responsive. |