Quick Start Basics
What is a digital camera?
A digital camera stores images on a memory card, so you can record and delete images a countless number of times.
You can use the images you record in a variety of different ways:
- Store images on your computer.
- Print images.
- Attach images to e-mail.
What you can do with your CASIO camera
Your CASIO camera is packed with a powerful selection of features and functions to make recording of digital images easier, including the following four main functions:
HDR Art
An HDR Art feature combines different parts of a burst of images shot with different exposures into a final image and performs high-precision image analysis to produce final images that are true works of art. (See page 61 for more information.)
Premium Auto
Select Premium Auto recording and the camera automatically determines whether you are shooting a subject or scenery, and other conditions. Premium Auto delivers higher image quality than standard Auto. (See page 26 for more information.)
Advanced Dynamic Photo
Extract people or objects out of images you shoot and insert them into another snapshot or movie (background). You can even insert a moving subject to create true Dynamic Photo images. (See page 104 for more information.)
BEST SHOT
Simply select the sample scene you want and the camera sets up automatically. Then all you need do is press the shutter button for perfect images. (See page 56 for more information.)
First, charge the battery prior to use.
Note that the battery of a newly purchased camera is not charged. Perform the steps under "To charge the battery” to bring the battery to a full charge.
- Your camera requires a special CASIO rechargeable lithium ion battery (NP-120) for power. Never try to use any other type of battery.
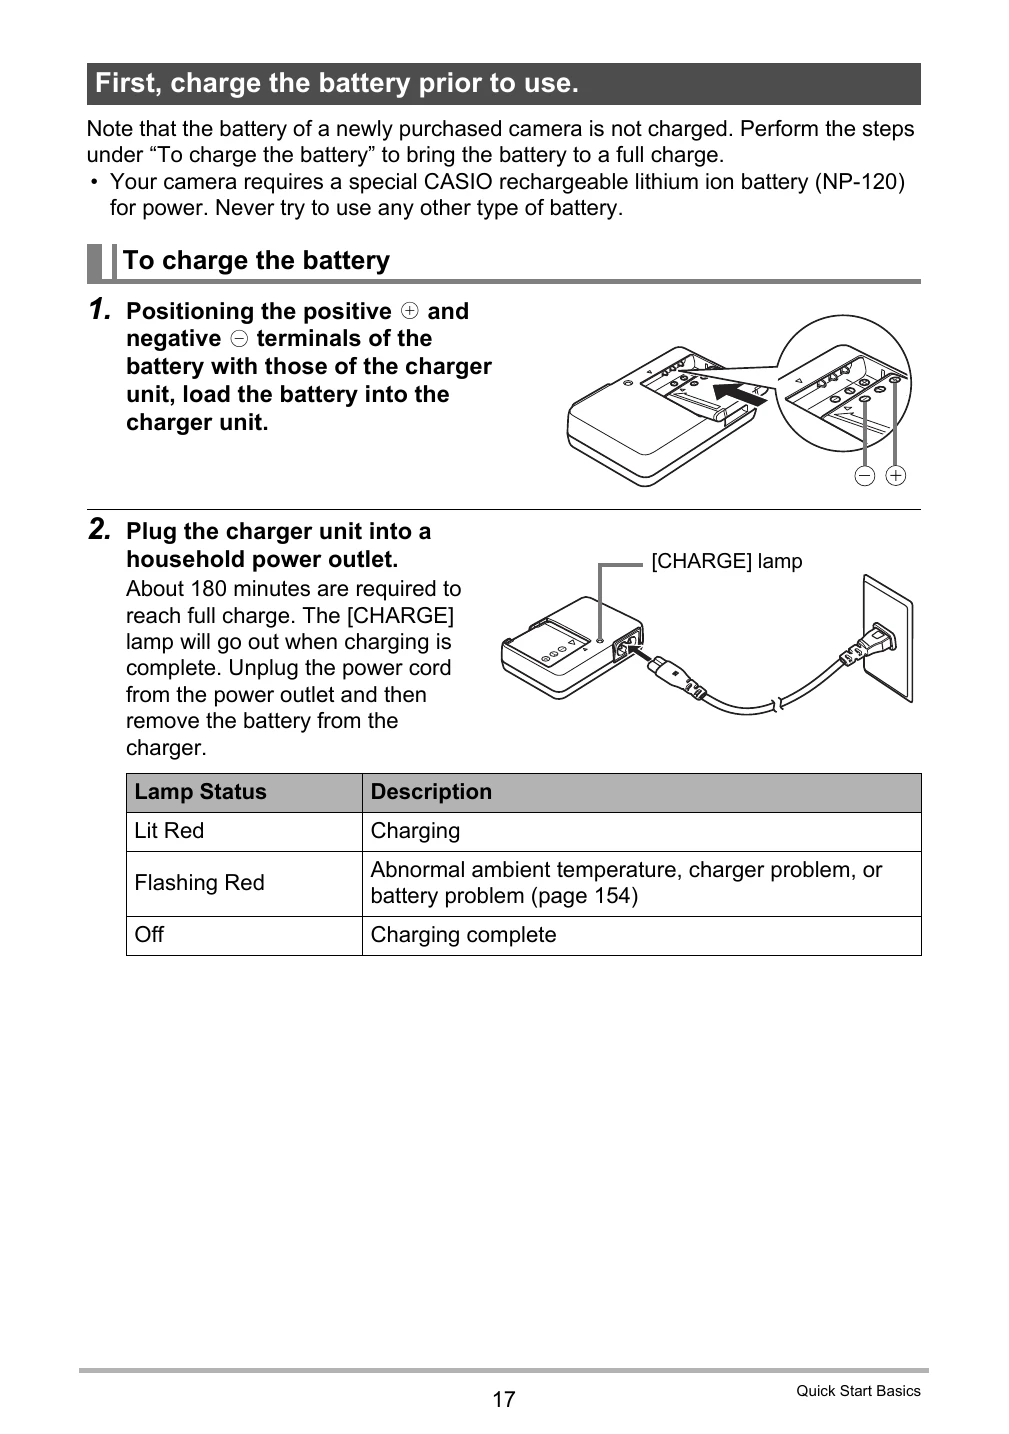
To charge the battery
- Positioning the positive and negative terminals of the battery with those of the charger unit, load the battery into the charger unit.
- Plug the charger unit into a household power outlet. About 180 minutes are required to reach full charge. The [CHARGE] lamp will go out when charging is complete. Unplug the power cord from the power outlet and then remove the battery from the charger.
Checking Remaining Battery Power
As battery power is consumed, a battery indicator on the monitor screen indicates remaining power as shown below.
Battery Power Conservation Tips
- When you do not need to use the flash, select
 (Flash Off) for the flash setting (page 39).
- Enable the Auto Power Off and the Sleep features to protect against wasting battery power when you forget to turn off the camera (pages 142, 143).
Configuring Basic Settings the First Time You Turn On the Camera
The first time you load a battery into the camera, a screen appears for configuring the display language, date, and time settings. Failure to set the date and time correctly will cause the wrong date and time data to be recorded with images.
IMPORTANT!
- A screen for language selection will not appear in step 2 of the procedure below if you purchased a camera intended for the Japanese market. To change the display language from Japanese in this case, use the procedure under "Specifying the Display Language (Language)” (page 142). Note that a version of this manual in the language you select may not be included with a camera intended for the Japanese market.
- Camera models sold in certain geographic areas may not support display language selection.
Preparing a Memory Card
Though the camera has built-in memory that can be used to store images and movies, you probably will want to purchase a commercially available memory card for greater capacity. The camera does not come with a memory card. Images recorded while a memory card is loaded are saved to the memory card. When no memory card is loaded, images are saved to built-in memory.
- For information about memory card capacities, see page 169.
Supported Memory Cards
- SD Memory Card
- SDHC Memory Card
Use one of the above types of memory card.
To load a memory card
- Press [ON/OFF] (Power) to turn off the camera and then open the battery cover. Slide the battery cover slider towards OPEN and then open it as indicated by the arrows in the illustration.
- Load a memory card. Positioning the memory card so its front is facing upwards (towards the monitor screen side of the camera), slide it into the card slot all the way in until you hear it click securely into place.
- Close the battery cover. Close the battery cover and then shift the slider towards LOCK.
IMPORTANT!
- Never insert anything besides a supported memory card (page 21) into the memory card slot.
- Should water or any foreign object ever get into the card slot, immediately turn off the camera, remove the battery, and contact your retailer or nearest CASIO authorized service center.