Brand: CASIO
Category: Digital Camera
Document Type:
Language: EN
Brand: CASIO
Category: Digital Camera
Document Type:
Language: EN
Uploaded: Aug. 9, 2025, 11:42 p.m.
Manual Publish Date: 2012-01-01
Your CASIO camera is packed with a powerful selection of features and functions to make recording of digital images easier, including the following three main functions.
Select Premium Auto recording and the camera automatically determines whether you are shooting a subject or scenery, and other conditions. Premium Auto delivers higher image quality than standard Auto.
See page 24 for more information.
An HDR Art feature combines different parts of a burst of images shot with different exposures into a final image and performs high-precision image analysis to produce final images that are true works of art.
See page 66 for more information.
Extract people or objects out of images you shoot and insert them into another snapshot or movie (background). You can even insert a moving subject to create true Dynamic Photo images.
See page 111 for more information.
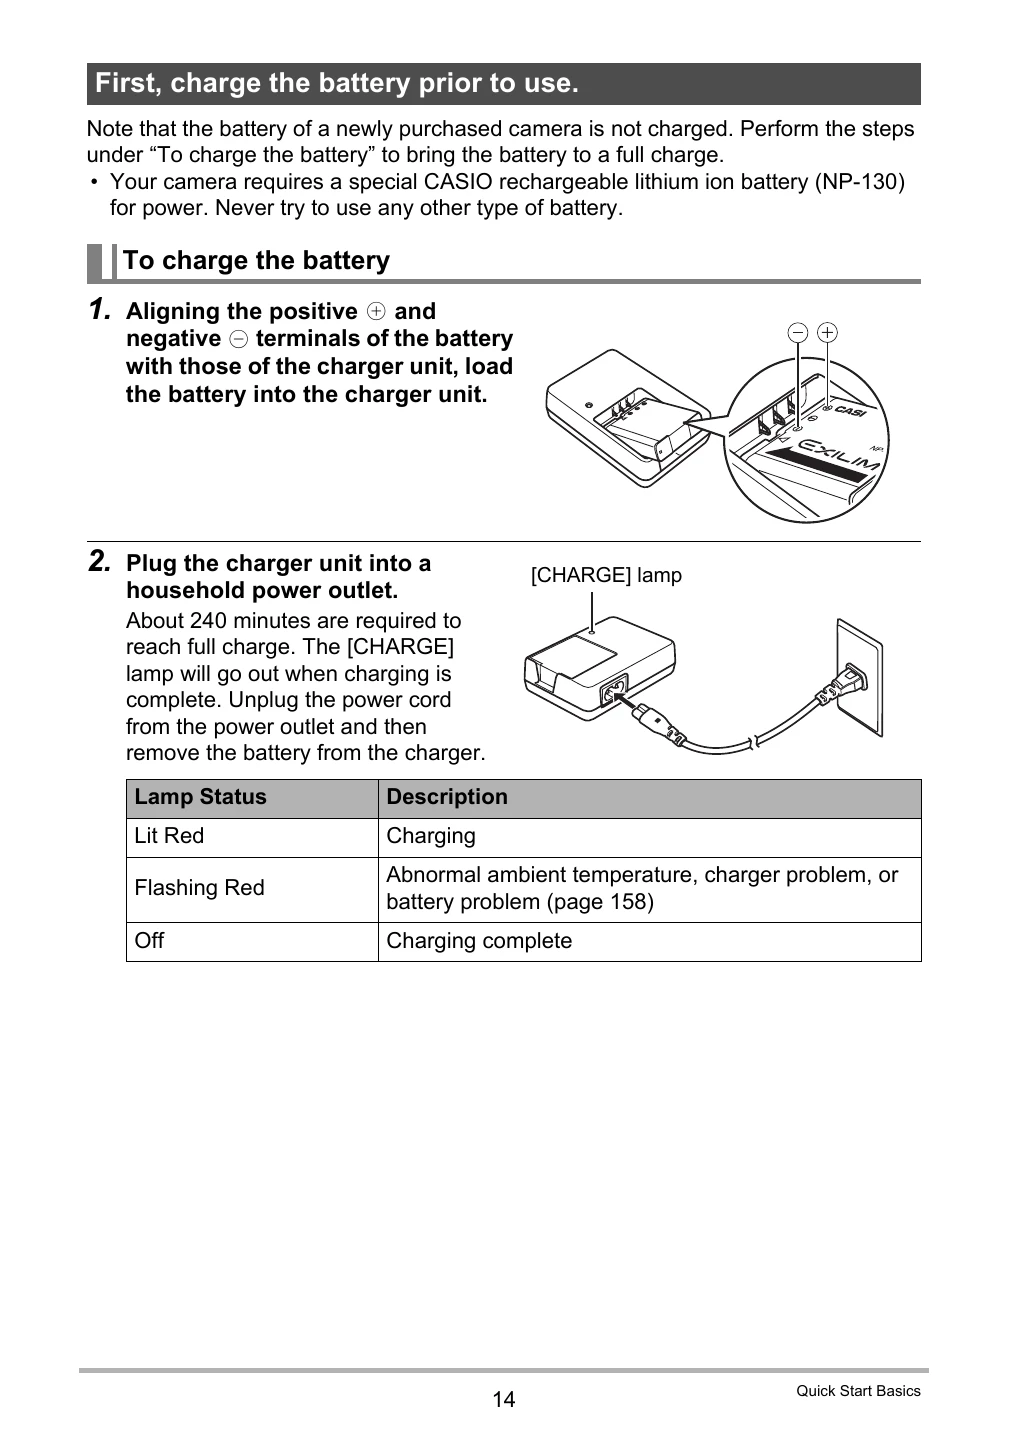
Note that the battery of a newly purchased camera is not charged. Perform the steps under "To charge the battery” to bring the battery to a full charge.
| Lamp Status | Description |
|---|---|
| Lit Red | Charging |
| Flashing Red | Abnormal ambient temperature, charger problem, or battery problem (page 158) |
| Off | Charging complete |
As battery power is consumed, a battery indicator on the monitor screen indicates remaining power as shown below.
| Remaining Power | High | Low | ||||||
|---|---|---|---|---|---|---|---|---|
| Battery Indicator | Cyan | Amber | Red | Red | ||||
| Indicator Color | ||||||||
indicates battery power is low. Charge the battery as soon as possible.
Recording is not possible when is indicated. Charge the battery immediately.
Enabling power saving reduces the brightness of the monitor screen and switches other camera operations to low-power operation, which allows a charge to last longer and increase the number of images that can be shot between charges.
The "ECO Mode” can be enabled only while Auto is selected as the recording mode (page 32).
The first time you load a battery into the camera, a screen appears for configuring the display language, date, and time settings. Failure to set the date and time correctly will cause the wrong date and time data to be recorded with images.
Use [] and [▷] to select the setting you want to change and then use [▲] and [▼] to change it. To switch between 12-hour and 24-hour format, press [●] (Movie).
If you make a mistake configuring display language, date, or time settings with the above procedure, refer to the following pages for information about how to correct the settings.
Though the camera has built-in memory that can be used to store images and movies, you probably will want to purchase a commercially available memory card for greater capacity. The camera does not come with a memory card. Images and movies recorded while a memory card is loaded are saved to the memory card. When no memory card is loaded, images and movies are saved to built-in memory.
Use one of the above types of memory card.
Press the memory card and then release it. This will cause it to pop out of the memory card slot slightly. Pull the card out the rest of the way and then insert another one.
Before using a memory card for the first time with the camera, you must format it.
Pressing [ON/OFF] (Power) enters the REC mode so you can record images. Pressing [◉] (PLAY) while in the REC mode enters the PLAY mode, which you can use to view snapshots and movies (pages 28, 89). Pressing [O] (REC) while in the PLAY mode returns to the REC mode.
Press [ON/OFF] (Power).
| Problem | Possible Cause and Recommended Action |
|---|---|
| A recorded image was not saved. |
1)Camera power may have been turned off before the save operation was complete, which will result in the image not being saved. If the battery indicator shows , charge the battery as soon as possible (page 16). 2)You may have removed the memory card from the camera before the save operation was complete, which will result in the image not being saved. Do not remove the memory card before the save operation is complete. |
| Though available lighting is bright, the faces of people in the image are dark. | Not enough light is reaching the subjects. Change the flash mode setting to (Flash On) for daylight synchro flash (page 38), or adjust EV shift to the + side (page 48). |
| Night shots come out bad. |
Use the following BEST SHOT scenes (page 61) when shooting at night. • Night Scene (for shooting night scenery only) • Night Scene Portrait (for shooting people against night scenery) |
| Subjects are too dark when shooting images in a seashore or ski area. | Sunlight reflected by water, sand, or snow, can cause underexposure of images. Change the flash mode setting to (Flash On) for daylight synchro flash (page 38), or adjust EV shift to the + side (page 48). |
| The focus frame does not appear on the monitor screen. | Normally, turning off the camera while “Detect Smile” is selected for Auto Shutter will cause the camera's face detection setting to change. You will need to change the face detection setting again after turn on the camera. You can tell the camera to remember the Auto Shutter setting by selecting “On” for the "Auto Shutter” power on default setting (page 80). |
| Digital zoom (including HD zoom and Single SR Zoom) does not work. The zoom bar indicates zoom only up to a zoom factor of 12.5. |
1) The digital zoom setting may be turned off. Turn on digital zoom (page 78). 2)Date stamping may be turned on, which will cause digital zoom to be disabled. Turn off date stamping (page 145). 3)Digital zoom is disabled when some BEST SHOT scenes (Business cards and documents, White board, etc.) are selected. Select another scene (page 61). |
| When shooting with Auto Shutter, the shutter does not trigger. | Auto Shutter may not trigger when shooting under very bright or very dark conditions, or when shooting a fast moving subject, etc. If this happens, try changing the Auto Shutter Trigger Sensitivity setting (page 76), or press the shutter button all the way down to release the shutter and shoot the image. |
| The image is out of focus during movie recording. |
1)Focusing may not be possible because the subject is outside the focus range. Shoot within the allowable range. 2) The lens may be dirty. Clean the lens (page 155). |
| Playback | |
| The color of the playback image is different from what appears on the monitor screen when shooting. | Sunlight or light from another source may be shining directly into the lens when you are shooting. Position the camera so sunlight does not shine directly into the lens. |
| Images are not displayed. | This camera cannot display non-DCF images recorded onto a memory card using another digital camera. |
| Images cannot be edited (with resizing, trimming, keystone correction, color restoration, date/ time editing, rotation). |
1)Note that you cannot edit the following types of snapshots. • Snapshots created using MOTION PRINT • Movies • Snapshots recorded with another camera 2)With keystone correction and color restoration, editing is not possible if the camera cannot find a shape to edit within the frame on the monitor screen (pages 104, 105). |
| File Deletion | |
| A file cannot be deleted. |
1) The file may be protected. Unprotect the file (page 106). 2) " Disabled” setting may be “On”. Change the setting to "Off" (page 148). |
| Other | |
| The wrong date and time are displayed, or the wrong date and time are being stored along with image data. | The date and time setting is off. Set the correct date and time (page 145). |
| The messages on the display are in the wrong language. | The wrong display language is selected. Change the display language setting (page 146). |
| Images cannot be transferred over a USB connection. |
1)The USB cable may not be connected securely. Check all connections. 2)The wrong USB communication protocol is selected. Select the correct USB communication protocol in accordance with the type of device you are connecting (pages 125, 132). 3)If the camera is not turned on, turn it on. 4) Your computer may not be able to recognize the camera if you connect via a USB hub. Always connect directly to the computer's USB port. |
| Language selection screen appears when the camera is turned on. |
1)You did not configure initial settings after purchasing the camera or the camera may have been left with a dead battery. Check the camera setup (pages 16, 18). 2)There may be a problem with the camera's memory data. If this is the case, perform the reset operation to initialize the camera's setup (page 150). After that, configure each setting. If the language selection screen does not re-appear when you turn the camera on, it means that the camera's memory management data has been restored. If the same message appears after you turn power back on, contact your retailer or a CASIO authorized service center. |
| The time and date settings configured the first time after purchasing the camera are reset to their factory defaults when remove the camera's battery. |
Load the camera's battery and reconfigure the time and date settings (page 18). Do not remove the battery from the camera for at least 24 hours after configuring time and date settings. After that, the settings will not be reset if you remove the battery. • If the time and date are reset to their factory default settings when you remove the battery after it has been loaded for more than 24 hours, it could mean that the camera's setting memory is defective. Contact your retailer or a CASIO authorized service center. |
| Buttons are not responsive right after the power has been turned on. | With large capacity memory cards there is a delay after the power has been turned on before the buttons become responsive. |
| Display Messages | |
| ALERT | The camera's protection function may have activated because camera temperature is too high. Turn off the camera and wait until it cools down before trying to use it again. |
| Battery is low. | Battery power is low. |
| Cannot correct image! | Keystone correction of the image cannot be performed for some reason. The image will be stored as-is, without correction (page 68). |
| Cannot find the file. | The image you specified with the slideshow “Images” setting cannot be found. Change the “Images” setting (page 97) and try again. |
| Cannot register any more files. | You are attempting to save a user BEST SHOT scene in the “SCENE” folder when the folder already contains 999 user scenes (page 64). |
| Card ERROR |
There is something wrong with the memory card. Turn off the camera, remove the memory card and then reload it into the camera. If this message re-appears when you turn the camera back on, format the memory card (page 150). IMPORTANT! Formatting a memory card deletes all its files. Before formatting, try transferring recoverable files to a computer or some other storage device. |
| Check connections! | You are attempting to connect the camera to a printer while the camera's USB settings are not compatible with the USB system of the printer (page 118). |
| Files could not be saved because battery is low. | Battery power is low, so an image file could not be saved. |
| Folder cannot be created. | You are trying to record a file while there are already 9999 files stored in the 999th folder. If you want to record more, delete files you no longer need (page 29). |
| Images are being transferred. Stop transfer and turn off power? | You are attempting to turn off power while image data is being transferred using the Eye-Fi card (page 136). |
| LENS ERROR | This message appears and the camera turns off whenever lens performs some unexpected operation. If the same message appears after you turn power back on, contact a CASIO authorized service center or your original retailer. |
| LENS ERROR 2 | The Camera Shake unit may be malfunctioning. If the same message appears after you turn power back on, contact your retailer or a CASIO authorized service center. |
| Load paper! | The printer ran out of paper while printing. |
| Memory Full | Memory is full with images you recorded and/or files saved by editing operations. Delete files you no longer need (page 29). |
| No subjects in memory. Use the BS "Dynamic Photo" to shoot a subject. | There is no extracted subject in camera memory that can be inserted into a background image. |
| Printing Error |
An error occurred while printing. • The printer is turned off. • The printer generated an error, etc. |
| Record Error | Image compression could not be performed for some reason during image data storage. Shoot the image again. |
| RETRY POWER ON | The lens came into contact with an obstruction while moving. The camera will turn off automatically when this message appears. Remove the obstruction and turn power back on again. |
| SYSTEM ERROR | Your camera system is corrupted. Contact your retailer or a CASIO authorized service center. |
| The card is locked. | The LOCK switch of the SD, SDHC, or SDXC memory card loaded in the camera is in the locked position. You cannot store images to or delete images from a memory card that is locked. |
| There are no files. | There are no files in built-in memory or on the memory card. |
| There are no printing images. Set up DPOF. | There are currently no files specified for printing. Configure the required DPOF settings (page 120). |
| There is no image to register. | The setup you are trying to save is for an image that cannot be saved as a user BEST SHOT scene. |
| This card is not formatted. | The memory card loaded in the camera is not formatted. Format the memory card (page 150). |
| This file cannot be played. | The file you are trying to access is corrupted or is a type that cannot be displayed by this camera. |
| This function cannot be used. | This message will appear part way through an operation when you attempt to use a function that is not allowed in combination with another function. |