Manual for MB16A

Manual for MB16A

Brand: ASUS

Category: Monitor

Document Type: Manual

Language: EN

Uploaded: April 20, 2026, 8:11 p.m.

Manual Publish Date: 2020-11-01

Warranty Information

Product warranty or service will not be extended if the product is repaired, modified or altered, or if the serial number is defaced or missing.

1.1 Welcome!

Thank you for purchasing the ASUS® Portable USB Monitor! The latest ASUS Portable USB Monitor provides great portability and simplicity to your daily life, enhancing both of your viewing experience and style.

1.2 Package contents

Check your package for the following items:
  • Portable USB monitor
  • Quick start guide
  • Warranty card
  • USB Type-C to Type-C cable
  • USB Type-C to Type-A cable
  • Leather case
If any of the above items is damaged or missing, contact your retailer immediately.

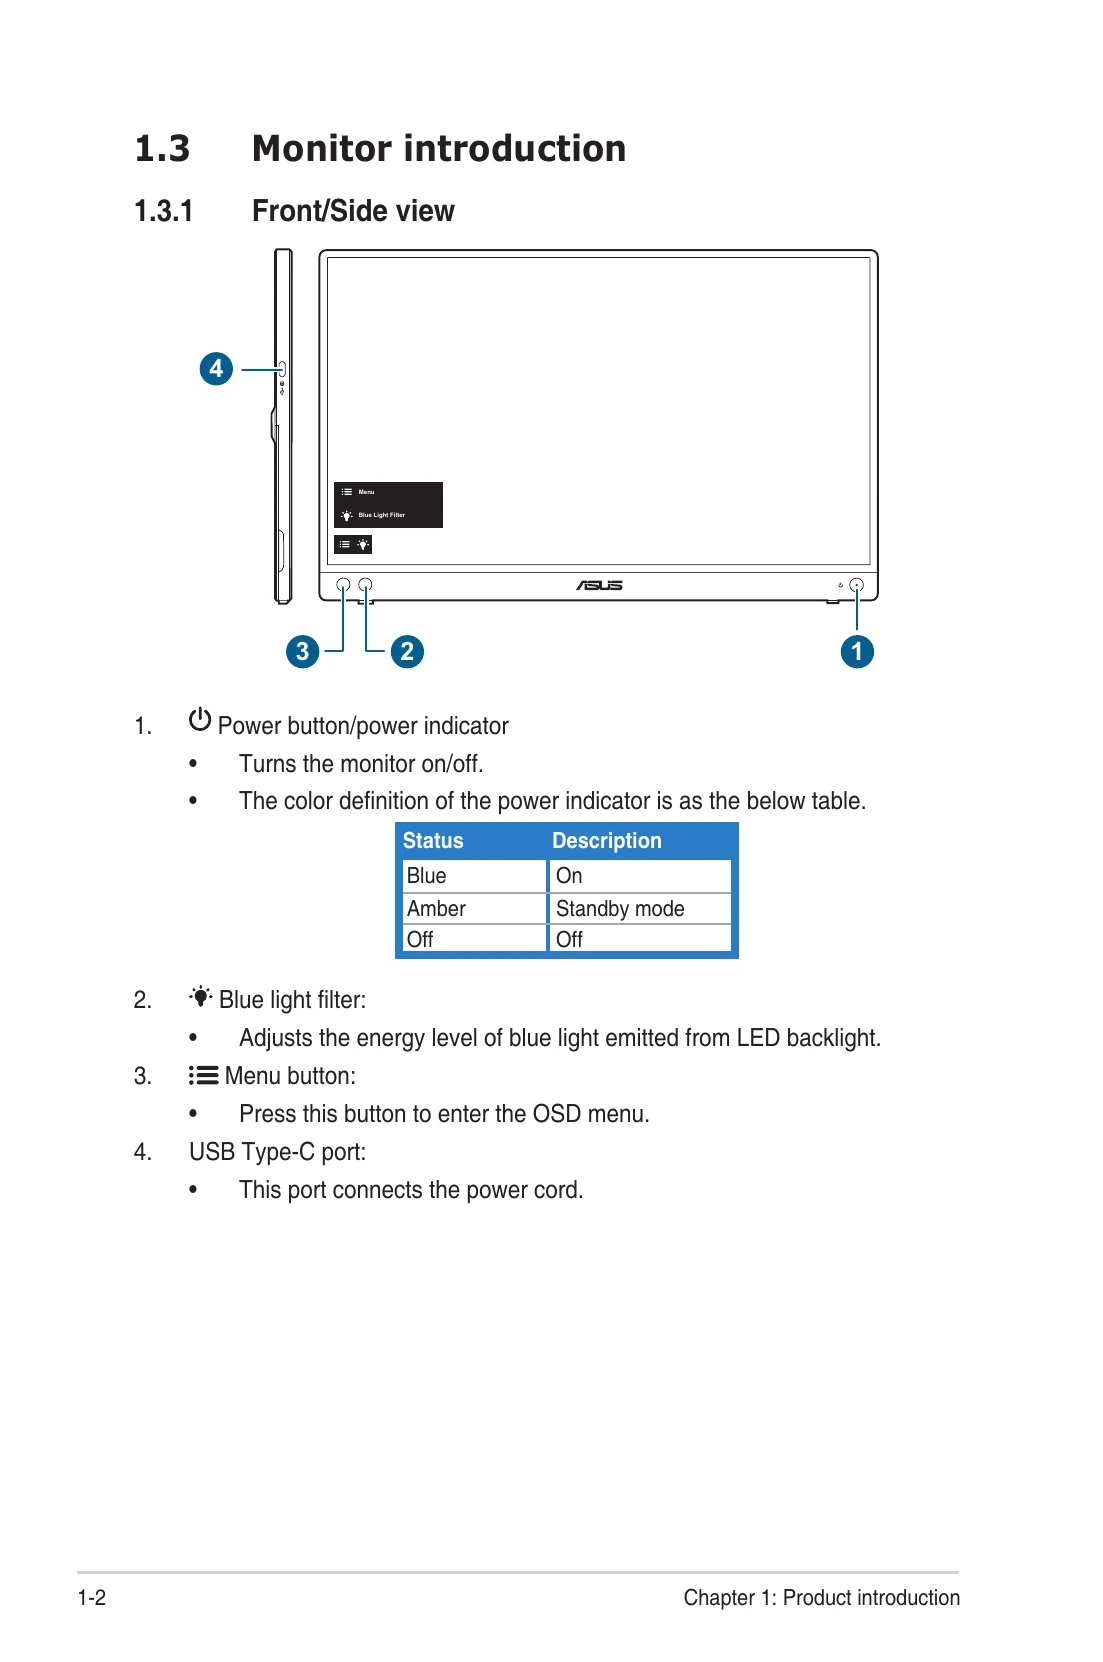
1.3 Monitor introduction

1.3.1 Front/Side view

  1. Power button/power indicator
    Turns the monitor on/off.
    The color definition of the power indicator is as the below table.
    StatusDescription
    BlueOn
    AmberStandby mode
    OffOff
  2. Blue light filter:
    Adjusts the energy level of blue light emitted from LED backlight.
  3. Menu button:
    Press this button to enter the OSD menu.
  4. USB Type-C port:
    This port connects the power cord.

2.1 Monitor standing positions

You can stand up the monitor in the following positions.

2.2 Adjusting the monitor

  • For optimal viewing, we recommend that you look at the full face of the monitor, then adjust the monitor to the angle that is most comfortable for you.
  • Hold the stand to prevent the monitor from falling when you change its angle.
  • You can adjust the monitor's angle at 0° ~ 70°.
(Tilt)

2.3 Connect the USB monitor with system

2.4 Turning on the monitor

Press the power button . See page 1-2 for the location of the power button. The power indicator lights up in blue to show that the monitor is ON.

2.5 Announcements

As this product includes magnet in the structure, there could be potential risk to cause the damage of computer hard disc and objects that are sensitive to magnet. Please ensure not to stack the product with the computer when computer is in use (power on or standby mode) otherwise the hard drive could possibly be influenced by the result of permanent data missing or the computer display could be switched off due to computer auto protection mechanism. When placing this product together with the computer in a bag, you must have the computer power off to avoid possible hard drive damage.

Troubleshooting and error codes

Problem Possible Solution
Power LED is not ON
  • Press the button to check if the monitor is in the ON mode.
  • Check if the power cord is properly connected to the monitor and the power outlet.
  • Check if the power switch is ON.
The power LED lights amber and there is no screen image
  • Check if the monitor and the computer are in the ON mode.
  • Make sure the signal cable is properly connected the monitor and the computer.
  • Inspect the signal cable and make sure none of the pins are bent.
  • Connect the computer with another available monitor to check if the computer is properly working.
Screen image is too light or dark
  • Adjust the Contrast and Brightness settings via OSD.
Screen image bounces or a wave pattern is present in the image
  • Make sure the USB Type-C cable is properly connected to the monitor and the computer.
  • Move electrical devices that may cause electrical interference.
Screen image has color defects (white does not look white)
  • Inspect the USB Type-C cable and make sure that none of the pins are bent.
After connecting with the USB Type-C source device, the power LED lights continuously blinking or showing ASUS logo repeatly
  • Insufficient power supply from source USB Type-C devices. Please follow below steps:
  • 1. Press the Blue Light Filter button, and then connect the USB Type-C cable. This operation will enable built-in safe mode. After displaying ASUS logo, please release the Blue Light Filter button. After ASUS Logo disappearing, there is "safe mode" message OSD showing up. Once “safe mode” message OSD disappears, please set background color to white image or nearly white image (*1).
  • 2. Press MENU button, main menu OSD is showing. The upper left corner of the OSD will display small red-colored font “S”, indicating it is now in safe mode. Enter brightness setup, press the up key to tune up brightness. During the process, please note down brightness value "Y" up until MB16AC re-start.(*2). For example, if brightness value shows “70” and MB16AC restarts when adjusting to “71”, “70” is the “Y” value to note down and is the highest brightness value for the connecting USB-C source device.
  • 3. Press MENU button, main menu OSD is showing. The upper left corner still indicate “S” as safe mode. Adjust the OSD brightness value to "Y"
  • 4. Close the OSD and press Low Blue Low Filter hot key for 5 seconds to turn off safe mode.
  • 5. Complete.
  • *1: White color background will consume higher power, so it's better to use white color background to test the power limit from source USB Type-C device.
  • *2: If the monitor does not re-start when adjusting to value 100, that means source USB Type-C device has sufficient power supply.
Privacy Policy